128208
14
Verklein
Vergroot
Pagina terug
1/34
Pagina verder
GB 7GB 6
installation
An extractor hood should be installed in accordance with
national and local regulations. The underside of the extractor
hood should be a minimum of:
- 65 cm in the case of a ceramic and induction hob;
- 70 cm in the case of a gas hob;
- 75 cm in the case of a gas hob with wok burner.
The appliance should be connected by a registered fitter.
Damage arising from incorrect connection or incorrect fitting
is not covered by the guarantee.
NB:
If an extractor hood and a heat source (for example, gas-,
oil- or coal-fired cookers) which take air from the same room
are in use at the same time, there is a possibility that the
extractor hood will cause an underpressure in that room. The
maximum permitted underpressure is 4 Pa, so that no
combustion gases from the heat source can find their way
back into the room. For this reason, an air supply is required -
to provide a constant supply of fresh air to the room.
The extractor hood's plug should be accessible after fitting
or the extractor hood should be isolated by a bipolar switch
with 3 mm plug pins.
If the connection cable is damaged, it should be replaced by
the service department of the manufacturer or similarly
qualified persons in order to prevent dangerous situations
from arising.
maintenance
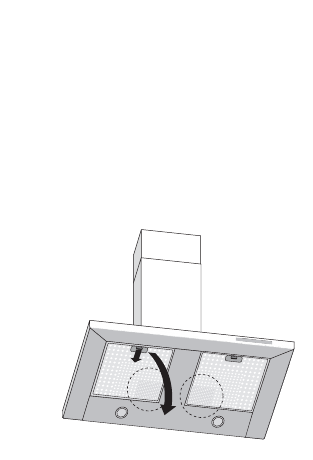
Remove the filters as follows: switch the fan and the
lighting off.
Take hold of the grease filter by the handle and press in the
lock (1). Tilt the front of the filter downwards (2). You can
now draw the filter towards you out of the hood.
The filter may only be fitted in one way. Be careful about the
correct position of the filter (see illustration). Hold the filter in
such a way that the covered part of the top is in a mid-rear
position. This can be recognised on the underside by the
pattern with the smaller holes.
Now fit the filter by first pressing the rear of the filter into the
holder. Keep the lock in the handle pressed and, at the same
time, tilt the front upwards until it won’t go any further. Then
release the lock. The filter is now once again in place.
You can clean the grease filters in the dishwasher or in
soapy water made with washing-up liquid. Allow the filter to
drain well – through the holes in the side – before putting it
back.
If the carbon filters are saturated (poor functioning), a
cleaning set can be ordered (ACC921). To place an order,
please phone the consumer service department (for
telephone numbers, please refer to the accompanying
guarantee booklet).
1
2
removing/replacing grease
filters
replace carbon filters
(only in the case of recirculation)
some preliminary remarks
electrical connection
cleaning the grease filters
14

Hulp nodig? Stel uw vraag in het forum

Spelregels

Misbruik melden

Gebruikershandleiding.com neemt misbruik van zijn services uitermate serieus. U kunt hieronder aangeven waarom deze vraag ongepast is. Wij controleren de vraag en zonodig wordt deze verwijderd.

Product:

Bijvoorbeeld antisemitische inhoud, racistische inhoud, of materiaal dat gewelddadige fysieke handelingen tot gevolg kan hebben.

Bijvoorbeeld een creditcardnummer, een persoonlijk identificatienummer, of een geheim adres. E-mailadressen en volledige namen worden niet als privégegevens beschouwd.

Spelregels forum

Om tot zinvolle vragen te komen hanteren wij de volgende spelregels:

Belangrijk! Als er een antwoord wordt gegeven op uw vraag, dan is het voor de gever van het antwoord nuttig om te weten als u er wel (of niet) mee geholpen bent! Wij vragen u dus ook te reageren op een antwoord.

Belangrijk! Antwoorden worden ook per e-mail naar abonnees gestuurd. Laat uw emailadres achter op deze site, zodat u op de hoogte blijft. U krijgt dan ook andere vragen en antwoorden te zien.

Abonneren

Abonneer u voor het ontvangen van emails voor uw ATAG ws9024am bij:


U ontvangt een email met instructies om u voor één of beide opties in te schrijven.


Ontvang uw handleiding per email

Vul uw emailadres in en ontvang de handleiding van ATAG ws9024am in de taal/talen: Nederlands, Duits, Engels, Frans als bijlage per email.

De handleiding is 3,76 mb groot.


U ontvangt de handleiding per email binnen enkele minuten. Als u geen email heeft ontvangen, dan heeft u waarschijnlijk een verkeerd emailadres ingevuld of is uw mailbox te vol. Daarnaast kan het zijn dat uw internetprovider een maximum heeft aan de grootte per email. Omdat hier een handleiding wordt meegestuurd, kan het voorkomen dat de email groter is dan toegestaan bij uw provider.

Stel vragen via chat aan uw handleiding

Stel uw vraag over deze PDF

loading

Uw handleiding is per email verstuurd. Controleer uw email

Als u niet binnen een kwartier uw email met handleiding ontvangen heeft, kan het zijn dat u een verkeerd emailadres heeft ingevuld of dat uw emailprovider een maximum grootte per email heeft ingesteld die kleiner is dan de grootte van de handleiding.

Er is een email naar u verstuurd om uw inschrijving definitief te maken.

Controleer uw email en volg de aanwijzingen op om uw inschrijving definitief te maken

U heeft geen emailadres opgegeven

Als u de handleiding per email wilt ontvangen, vul dan een geldig emailadres in.

Uw vraag is op deze pagina toegevoegd

Wilt u een email ontvangen bij een antwoord en/of nieuwe vragen? Vul dan hier uw emailadres in.


Info