108239
17
Verklein
Vergroot
Pagina terug
1/34
Pagina verder
GB 13
assembly (continued)
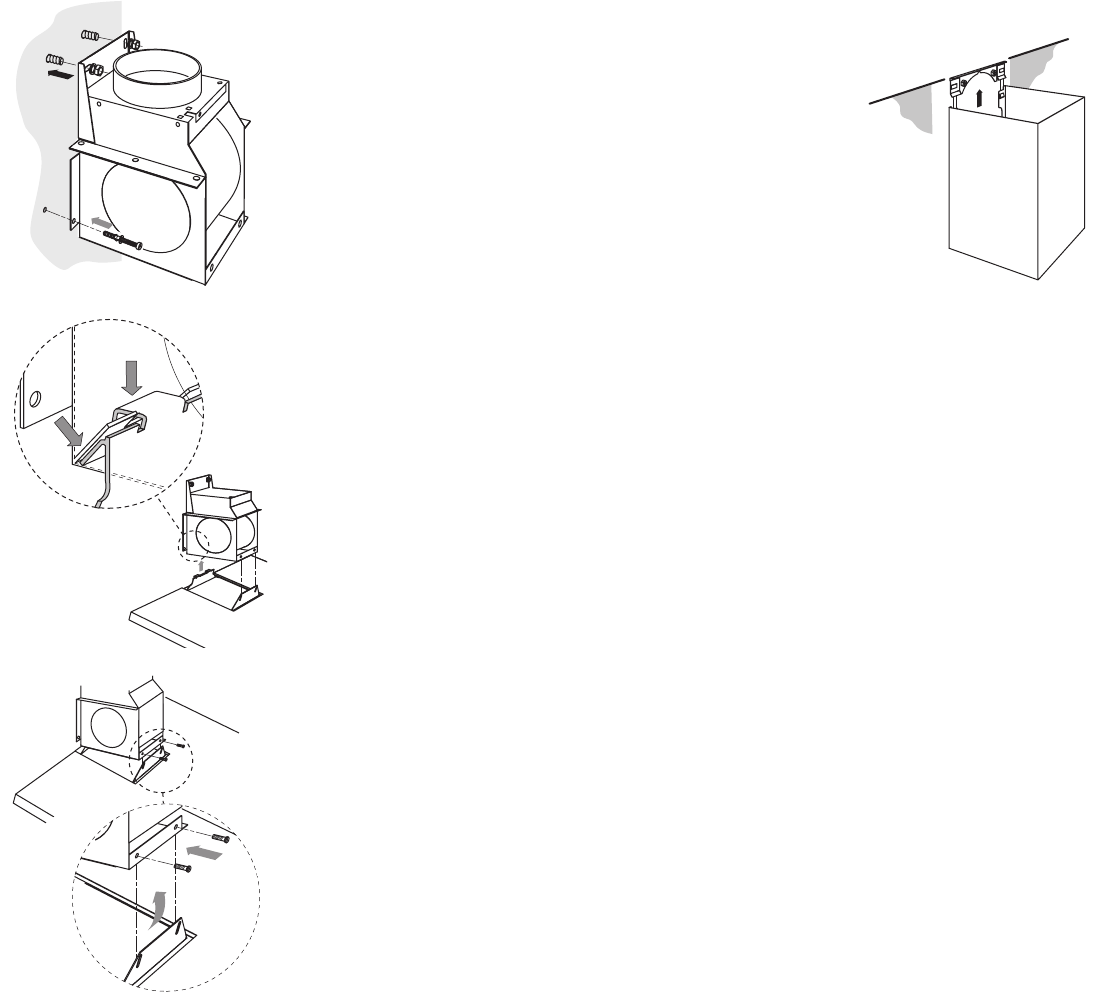
fitting the telescopic pipe
NB: During recirculation, the ventilation slits must not be
covered by the lower telescopic pipe.
Slide the flanged end of the upper telescopic pipe upwards
between the fixing bracket and the wall, and slide the
telescopic pipe against the ceiling. The telescopic pipe locks
into position.
Hook the lower telescopic pipe onto the upper part and
allow the lower part to drop so that it slides into the edge of
the hood.
Put the filters in place and test the extractor hood.
GB 12GB 12
assembly (continued)
Suspend the motor module on the threaded ends (1). Screw
the nuts on. Make sure that the motor module is exactly level.
Drill holes (2 x ø 6 mm) and secure the motor module with the
fixing pins supplied (6 x 60) (2).
Fit the discharge duct.
Connect the motor module electrically.
fitting the hood
Fit the hood to the motor module. First hook the rear of the
hood into the motor module at the bottom (1).
Then lift the front up (2) so that the two bolts supplied (M5 x
12) can be screwed in (3). Use these bolts to level the hood.
Use these screws to level the hood.
Make the plug connections in the hood.
1
1
2
17

Hulp nodig? Stel uw vraag in het forum

Spelregels

Misbruik melden

Gebruikershandleiding.com neemt misbruik van zijn services uitermate serieus. U kunt hieronder aangeven waarom deze vraag ongepast is. Wij controleren de vraag en zonodig wordt deze verwijderd.

Product:

Bijvoorbeeld antisemitische inhoud, racistische inhoud, of materiaal dat gewelddadige fysieke handelingen tot gevolg kan hebben.

Bijvoorbeeld een creditcardnummer, een persoonlijk identificatienummer, of een geheim adres. E-mailadressen en volledige namen worden niet als privégegevens beschouwd.

Spelregels forum

Om tot zinvolle vragen te komen hanteren wij de volgende spelregels:

Belangrijk! Als er een antwoord wordt gegeven op uw vraag, dan is het voor de gever van het antwoord nuttig om te weten als u er wel (of niet) mee geholpen bent! Wij vragen u dus ook te reageren op een antwoord.

Belangrijk! Antwoorden worden ook per e-mail naar abonnees gestuurd. Laat uw emailadres achter op deze site, zodat u op de hoogte blijft. U krijgt dan ook andere vragen en antwoorden te zien.

Abonneren

Abonneer u voor het ontvangen van emails voor uw ATAG WS 9092 MM bij:


U ontvangt een email met instructies om u voor één of beide opties in te schrijven.


Ontvang uw handleiding per email

Vul uw emailadres in en ontvang de handleiding van ATAG WS 9092 MM in de taal/talen: Nederlands, Duits, Engels, Frans als bijlage per email.

De handleiding is 1,65 mb groot.


U ontvangt de handleiding per email binnen enkele minuten. Als u geen email heeft ontvangen, dan heeft u waarschijnlijk een verkeerd emailadres ingevuld of is uw mailbox te vol. Daarnaast kan het zijn dat uw internetprovider een maximum heeft aan de grootte per email. Omdat hier een handleiding wordt meegestuurd, kan het voorkomen dat de email groter is dan toegestaan bij uw provider.

Andere handleiding(en) van ATAG WS 9092 MM

ATAG WS 9092 MM Gebruiksaanwijzing - Nederlands, Deutsch, English, Français - 38 pagina's


Uw handleiding is per email verstuurd. Controleer uw email

Als u niet binnen een kwartier uw email met handleiding ontvangen heeft, kan het zijn dat u een verkeerd emailadres heeft ingevuld of dat uw emailprovider een maximum grootte per email heeft ingesteld die kleiner is dan de grootte van de handleiding.

Er is een email naar u verstuurd om uw inschrijving definitief te maken.

Controleer uw email en volg de aanwijzingen op om uw inschrijving definitief te maken

U heeft geen emailadres opgegeven

Als u de handleiding per email wilt ontvangen, vul dan een geldig emailadres in.

Uw vraag is op deze pagina toegevoegd

Wilt u een email ontvangen bij een antwoord en/of nieuwe vragen? Vul dan hier uw emailadres in.


Info