76784
66
Verklein
Vergroot
Pagina terug
1/80
Pagina verder
Kühlschränke
Refrigerators
Réfrigérateurs
Koelkasten
Benutzerinformation
User Manual
Notice d’utilisation
Gebruiksaanwijzing
SANTO
2
Verehrter Kunde!
Vielen Dank, dass Sie sich für eines unserer Qualitätsprodukte entschieden
haben.
Dieses Gerät bietet Ihnen eine perfekte Synthese aus funktionellem Design
und wegweisender Spitzentechnologie.
Überzeugen Sie sich selbst von dem Entwicklungsvorsprung unserer Produkte,
die bei Leistungsfähigkeit und Bedienung eine absolute Spitzenposition ein-
nehmen.
Besonderer Wert wurde zudem auf so wichtige Aspekte wie
Umweltfreundlichkeit und Energieersparnis gelegt, die integraler Bestandteil
aller unserer Produkte sind.
Lesen Sie dieses Bedienhandbuch aufmerksam durch, um Ihr Gerät optimal
und über lange Zeit zuverlässig nutzen und alle Bedienvorgänge korrekt und
Zeit sparend ausführen zu können.
Bewahren Sie das Handbuch zur späteren Bezugnahme an einem sicheren Ort
auf und händigen Sie es im Verkaufsfall dem zukünftigen Besitzer aus.
Wir wünschen Ihnen viel Freude mit Ihrem neuen Gerät.
Folgende Symbolen werden im Text verwendet:
wichtige Hinweise für Ihre Sicherheit oder für die Funktionsfähigkeit des Gerätes
Hinweise und praktische Tipps
Umweltinformationen
3
Inhaltsverzeichnis
Sicherheit . . . . . . . . . . . . . . . . . . . . . . . . . . . . . . . . . . . . . . . . . . . . . . . . . . . . . . . . 4
Entsorgung . . . . . . . . . . . . . . . . . . . . . . . . . . . . . . . . . . . . . . . . . . . . . . . . . . . 6
Information zur Geräteverpackung . . . . . . . . . . . . . . . . . . . . . . . . . . . . . . . . . . 6
Entsorgung von Altgeräten . . . . . . . . . . . . . . . . . . . . . . . . . . . . . . . . . . . . . . . . 6
Transportschutz entfernen. . . . . . . . . . . . . . . . . . . . . . . . . . . . . . . . . . . . . . . . . . 7
Aufstellen . . . . . . . . . . . . . . . . . . . . . . . . . . . . . . . . . . . . . . . . . . . . . . . . . . . . 7
Aufstellort. . . . . . . . . . . . . . . . . . . . . . . . . . . . . . . . . . . . . . . . . . . . . . . . . . . . . . . 7
Das Kältegerät braucht Luft . . . . . . . . . . . . . . . . . . . . . . . . . . . . . . . . . . . . . . . . 8
Einbau . . . . . . . . . . . . . . . . . . . . . . . . . . . . . . . . . . . . . . . . . . . . . . . . . . . . . . . . . 9
Elektrischer Anschluss . . . . . . . . . . . . . . . . . . . . . . . . . . . . . . . . . . . . . . . . . . . . . 9
Gerätebeschreibung. . . . . . . . . . . . . . . . . . . . . . . . . . . . . . . . . . . . . . . . . . . 10
Geräteansicht . . . . . . . . . . . . . . . . . . . . . . . . . . . . . . . . . . . . . . . . . . . . . . . . . . . 10
Vor Inbetriebnahme . . . . . . . . . . . . . . . . . . . . . . . . . . . . . . . . . . . . . . . . . . . 11
Inbetriebnahme und Temperaturregelung . . . . . . . . . . . . . . . . . . . . . . . . . 11
Gerät abschalten . . . . . . . . . . . . . . . . . . . . . . . . . . . . . . . . . . . . . . . . . . . . . 13
Innenaustattung . . . . . . . . . . . . . . . . . . . . . . . . . . . . . . . . . . . . . . . . . . . . . 13
Abstellflächen/Abstellroste. . . . . . . . . . . . . . . . . . . . . . . . . . . . . . . . . . . . . . . . 13
Variable Innentür. . . . . . . . . . . . . . . . . . . . . . . . . . . . . . . . . . . . . . . . . . . . . . . . 14
Flaschenhalter . . . . . . . . . . . . . . . . . . . . . . . . . . . . . . . . . . . . . . . . . . . . . . . . . . 14
Feuchteregulierung . . . . . . . . . . . . . . . . . . . . . . . . . . . . . . . . . . . . . . . . . . . . . . 14
Variable Ablagebox . . . . . . . . . . . . . . . . . . . . . . . . . . . . . . . . . . . . . . . . . . . . .14
Richtig lagern. . . . . . . . . . . . . . . . . . . . . . . . . . . . . . . . . . . . . . . . . . . . . . . . 15
Abtauen . . . . . . . . . . . . . . . . . . . . . . . . . . . . . . . . . . . . . . . . . . . . . . . . . . . . 16
Der Kühlraum taut automatisch ab. . . . . . . . . . . . . . . . . . . . . . . . . . . . . . . . . 16
Reinigung und Pflege . . . . . . . . . . . . . . . . . . . . . . . . . . . . . . . . . . . . . . . . . 16
Tipps für Energie-Einsparung . . . . . . . . . . . . . . . . . . . . . . . . . . . . . . . . . . . 17
Was tun, wenn . . . . . . . . . . . . . . . . . . . . . . . . . . . . . . . . . . . . . . . . . . . . . . 18
Abhilfe bei Störungen. . . . . . . . . . . . . . . . . . . . . . . . . . . . . . . . . . . . . . . . . . . . 18
Lampe auswechseln. . . . . . . . . . . . . . . . . . . . . . . . . . . . . . . . . . . . . . . . . . . . . . 19
Betriebsgeräusche . . . . . . . . . . . . . . . . . . . . . . . . . . . . . . . . . . . . . . . . . . . . 20
Bestimmungen, Normen, Richtlinien . . . . . . . . . . . . . . . . . . . . . . . . . . . . . 20
Fachbegriffe . . . . . . . . . . . . . . . . . . . . . . . . . . . . . . . . . . . . . . . . . . . . . . . . . 21
4
Sicherheit
Die Sicherheit unserer Kältegeräte entspricht den anerkannten Regeln
der Technik und dem Gerätesicherheitsgesetz. Dennoch sehen wir uns
veranlasst, Sie mit folgenden Sicherheitshinweisen vertraut zu machen:
Bestimmungsgemäße Verwendung
Das Kältegerät ist für die Verwendung im Haushalt bestimmt. Es eig-
net sich zum Kühlen von Lebensmitteln. Wird das Gerät zweckent-
fremdet oder falsch bedient, kann vom Hersteller keine Haftung für
eventuelle Schäden übernommen werden.
Umbauten oder Veränderungen am Kältegerät sind aus Sicherheits-
gründen nicht zulässig.
Sollten Sie das Kältegerät gewerblich oder für andere Zwecke als
zum Kühlen von Lebensmitteln benutzen, beachten Sie bitte die für
Ihren Bereich gültigen gesetzlichen Bestimmungen.
Vor der ersten Inbetriebnahme
Überprüfen Sie das Kältegerät auf Transportschäden. Ein beschädig-
tes Gerät auf keinen Fall anschließen! Wenden Sie sich im Schadens-
fall bitte an den Lieferanten.
Prüfen, dass das Gerät nach der Installation nicht auf dem Netzkabel
steht. Wichtig: Beschädigte Versorgungskabel müssen durch ein
Spezialkabel bzw. einen Spezialsatz ersetzt werden, die beim
Hersteller oder den Kundendienststellen erhältlich sind.
Kältemittel
Das Gerät enthält im Kältemittelkreislauf das Kältemittel Isobutan
(R600a), ein Naturgas mit hoher Umweltverträglichkeit, das jedoch
brennbar ist.
Achten Sie beim Transportieren und Aufstellen des Gerätes darauf,
dass keine Teile des Kältemittelkreislaufs beschädigt werden.
Bei Beschädigung des Kältemittelkreislaufs:
– offenes Feuer und Zündquellen unbedingt vermeiden;
– den Raum, in dem das Gerät steht, gut durchlüften.
Sicherheit von Kindern
• Verpackungsteile (z. B. Folien, Styropor) können für Kinder gefährlich
sein. Erstickungsgefahr! Verpackungsmaterial von Kindern fernhalten!
• Ausgediente Altgeräte bitte vor der Entsorgung unbrauchbar
machen. Netzstecker ziehen, Netzkabel durchtrennen, eventuell vor-
handene Schnapp- oder Riegelschlösser entfernen oder zerstören.
Sicherheit
5
Dadurch verhindern Sie, dass sich spielende Kinder im Gerät einsper-
ren (Erstickungsgefahr!) oder in andere lebensgefährliche Situationen
geraten.
• Kinder können Gefahren, die im Umgang mit Haushaltsgeräten lie-
gen, oft nicht erkennen. Sorgen Sie deshalb für die notwendige Auf-
sicht und lassen Sie Kinder nicht mit dem Gerät spielen!
Im Alltagsbetrieb
• Behälter mit brennbaren Gasen oder Flüssigkeiten können durch Käl-
teeinwirkung undicht werden. Explosionsgefahr! Lagern Sie keine
Behälter mit brennbaren Stoffen, wie z.B. Spraydosen, Feuerzeug-
Nachfüllkartuschen etc. im Kältegerät.
Warnung - Keine Elektrogeräte (z. B. elektrische Eismaschinen,
Rührgeräte etc.) im Kältegerät betreiben.
Warnung - Um die Funktion des Gerätes nicht zu beeinträchtigen,
dürfen die Lüftungsöffnungen der Geräteverkleidungen oder des
Aufbaus von Einbaumöbeln nicht abgedeckt oder zugestellt werden.
• Vor Reinigungsarbeiten das Gerät grundsätzlich abschalten und den
Netzstecker ziehen oder Sicherung in der Wohnung abschalten bzw.
herausdrehen.
• Netzstecker immer am Stecker aus der Steckdose ziehen, nie am
Kabel.
Im Störungsfall
• Sollte einmal eine Störung am Gerät auftreten, sehen Sie bitte zuerst
in dieser Gebrauchsanweisung unter "Was tun, wenn ..." nach. Falls
die dort aufgeführten Hinweise nicht weiterhelfen, führen Sie bitte
keine weiteren Arbeiten selbst aus.
• Kältegeräte dürfen nur von Fachkräften repariert werden. Durch
unsachgemäße Reparaturen können erhebliche Gefahren entstehen.
Wenden Sie sich im Reparaturfall bitte an Ihren Fachhändler oder an
unseren Kundendienst.
6
Entsorgung
Information zur Geräteverpackung
Entsorgen Sie das Verpackungsmaterial Ihres Gerätes sachgerecht. Alle
verwendeten Verpackungsmaterialen sind umweltverträglich und wie-
derverwertbar.
Zu den Werkstoffen: Die Kunststoffe können auch wiederverwertet
werden und sind folgendermaßen gekennzeichnet:
>PE< für Polyäthylen, z. B. bei der äußeren Hülle und den Beuteln im
Innern.
>PS< für geschäumtes Polystyrol, z. B. bei den Polsterteilen, grundsätz-
lich FCKW-frei.
Die Kartonteile werden aus Altpapier hergestellt und sollten auch wie-
der zur Altpapiersammlung gegeben werden.
Entsorgung von Altgeräten
Aus Umweltschutzgründen müssen Kältegeräte fachgerecht entsorgt
werden. Dies gilt für Ihr bisheriges Gerät und - nachdem es eines Tages
ausgedient hat - auch für Ihr neues Gerät.
Warnung! Ausgediente Altgeräte bitte vor der Entsorgung unbrauch-
bar machen. Netzstecker ziehen, Netzkabel durchtrennen, eventuell
vorhandene Schnapp- oder Riegelschlösser entfernen oder zerstören.
Dadurch verhindern Sie, dass sich spielende Kinder im Gerät einsperren
(Erstickungsgefahr!) oder in andere lebensgefährliche Situationen
geraten.
Entsorgungshinweise:
• Das Gerät darf nicht mit dem Haus- oder Sperrmüll entsorgt werden.
• Der Kältemittelkreislauf, insbesondere der Wärmetauscher an der
Geräterückseite, darf nicht beschädigt werden.
• Das Symbol auf dem Produkt oder seiner Verpackung weist dar-
auf hin, dass dieses Produkt nicht als normaler Haushaltsabfall zu
behandeln ist, sondern an einem Sammelpunkt für das Recycling von
elektrischen und elektronischen Geräten abgegeben werden muss.
Durch Ihren Beitrag zum korrekten Entsorgen dieses Produkts schüt-
zen Sie die Umwelt und die Gesundheit Ihrer Mitmenschen. Umwelt
und Gesundheit werden durch falsches Entsorgen gefährdet. Weitere
Informationen über das Recycling dieses Produkts erhalten Sie von
Ihrem Rathaus, Ihrer Müllabfuhr oder dem Geschäft, in dem Sie das
Produkt gekauft haben.
7
Transportschutz entfernen
Das Gerät sowie Teile der Innenausstattung sind für den Transport
geschützt.
1. Klebebänder links und rechts an den Türaußenseiten abziehen.
2. Alle Klebebänder sowie Polsterteile aus dem Geräteinnenraum entfer-
nen.
Aufstellen
Aufstellort
Das Gerät soll in einem gut belüfteten und trockenen Raum stehen.
Die Umgebungstemperatur wirkt sich auf den Stromverbrauch und die
einwandfreie Funktion des Gerätes aus.
Daher sollte das Gerät
– nicht direkter Sonneneinstrahlung ausgesetzt sein;
– nicht an Heizkörpern, neben einem Herd oder sonstigen
Wärmequellen stehen;
– nur an einem Ort stehen, dessen Umgebungstemperatur der Klima-
klasse entspricht, für die das Gerät ausgelegt ist.
Die Klimaklasse finden Sie auf dem Typschild, das sich links im Innen-
raum des Gerätes befindet.
Nachstehende Tabelle zeigt, welche Umgebungstemperatur welcher
Klimaklasse zugeordnet ist:
Direkter Einbau unter einem Kochfeld ist nicht zulässig. Die teilweise
hohen Abstrahlungstemperaturen des Kochfeldes können das Gerät
beschädigen.
Wird in der Nähe ein Kochfeld eingebaut, sind die zugehörigen Einbau-
und Schutzvorschriften zu beachten. Durch die Vielzahl der möglichen
Einbausituationen können hier keine detailierten Angaben erfolgen.
Klimaklasse für Umgebungstemperatur von
SN +10 bis +32 °C
N +16 bis +32 °C
ST +18 bis +38 °C
T +18 bis +43 °C
8
Aufstellen
min. 200 cm
2
min. 200 cm
2
50
Das Kältegerät braucht Luft
Integrierbare Modelle (i-Geräte)
Die integrierte Tür des Möbelschrankes
dichtet die Einbaunische weitgehend ab.
Deshalb muss bei i-Geräten die Belüftung
durch die Öffnung im Möbelsockel erfol-
gen. Die erwärmte Luft muss durch den
Luftschacht an der Rückwand des Möbels
nach oben abziehen können. Die
Lüftungsquerschnitte sollen mindestens
200 cm
2
betragen.
Achtung! Um die Funktion des Gerätes
nicht zu beeinträchtigen, dürfen diese
Lüftungsöffnungen nicht abgedeckt oder
zugestellt werden.
Dekorfähige Modelle (E-Geräte)
Einbaumöglichkeit 1 (optimal):
Optimale Belüftung für E-Geräte ist
gegeben, wenn frische Luft sowohl unter
dem Gerät als auch durch eine Öffnung
im Möbelsockel eintreten kann. Die
erwärmte Luft muss durch den
Luftschacht (min. 200 cm
2
) an der
Rückwand des Möbels nach oben abzie-
hen können.
Eine Erwärmung des Kältegerätes ist durch ausreichenden Abstand und
Einbringung einer geeigneten Wärmeschutzplatte zu verhindern. Die
ordnungsgemäße Be- und Entlüftung des Kältegerätes muss gewährlei-
stet sein.
9
Aufstellen
Einbaumöglichkeit 2:
Auch ohne Lüftungsöffnung im Möbel-
sockel ist der Betrieb von E-Geräten
möglich. Die frische Luft, die unter dem
Gerät eintreten kann, reicht für die
Belüftung aus. Funktion und Lebens-
dauer des Gerätes werden nicht beein-
trächtigt. Die erwärmte Luft muss durch
den Luftschacht (min. 200 cm
2
) an der
Möbelrückseite nach oben abziehen kön-
nen. Bei Belüftung ohne Sockelöffnung
können sich jedoch Abweichungen beim
Energieverbrauch gegenüber den
Prospektangaben ergeben.
Achtung! Um die Funktion des Gerätes
nicht zu beeinträchtigen,
Lüftungsöffnungen nicht abdecken oder
zustellen.
Einbau
Siehe beiliegende Montageanweisung.
Prüfen Sie bitte nach dem Einbau des Geräts, insbesondere nach Türan-
schlagwechsel, ob die Türdichtung ringsum richtig abdichtet. Eine
undichte Türdichtung kann zu verstärkter Reifbildung und dadurch zu
höherem Energieverbrauch führen (siehe auch Abschnitt „Abhilfe bei
Störungen“).
Elektrischer Anschluss
Für den elektrischen Anschluss ist eine vorschriftsmäßig installierte
Schutzkontakt-Steckdose erforderlich. Sie sollte so gesetzt sein, dass
ein Ziehen des Netzsteckers möglich ist.
Die zum Anschluss des Gerätes nötige Schutzkontakt-Steckdose sollte
sich links oder rechts neben der Einbaunische befinden.
Die elektrische Absicherung muss mindestens 10/16 Ampere betragen.
Ist die Steckdose bei eingebautem Gerät nicht mehr zugänglich, muss
eine geeignete Maßnahme in der Elektroinstallation sicherstellen, dass
das Gerät vom Netz getrennt werden kann (z. B. Sicherung, LS-
Schalter, Fehlerstrom-Schutzschalter oder dergleichen mit einer
Kontaktöffnungsweite von min. 3 mm).
10
Vor Inbetriebnahme am Typschild des Gerätes überprüfen, ob
Anschlussspannung und Stromart mit den Werten des Stromnetzes am
Aufstellort übereinstimmen.
Z. B.: AC 220 ... 240 V 50 Hz oder
220 ... 240 V ~50 Hz
(d. h. 220 bis 240 Volt Wechselstrom, 50 Hertz)
Das Typschild befindet sich links im Innenraum des Gerätes.
6 = Obst-/Gemüseschalen
7 = Abstellflächen
8 = Allzweckbox (nicht bei allen
Modellen)
9 = Feuchteregulierung (nicht
bei allen Modellen)
10 = Flaschen-/Dosenhalter
(nicht bei allen Modellen)
11 = Typschild
Gerätebeschreibung
Geräteansicht (verschiedene Modelle)
1 = Temperaturregler und
Innenbeleuchtung
2 = Butter-/Käsefach mit Klappe
3 = Variable Ablagebox (nicht
bei allen Modellen,
Ausführung je nach Modell
unterschiedlich)
4 = Türabstellfächer
5 = Flaschenfach / Flaschenhalter
(nicht bei allen Modellen)
11
Vor Inbetriebnahme
Das Geräteinnere und alle Ausstattungsteile bitte vor
Erstinbetriebnahme reinigen (siehe Abschnitt "Reinigung und Pflege").
Inbetriebnahme und Temperaturregelung
Achtung! Das Gerät nur im eingebauten Zustand betreiben!
Der Temperaturregler befindet sich im
Kühlraum rechts oben. Er ist zugleich
der EIN/AUS-Schalter.
Stellung „0“ = Kühlung aus
Stellung „1“ = wärmste Innentem-
peratur
Stellung „6“ = kälteste Innentemperatur
1. Netzstecker in die Steckdose stecken.
2. Gewünschte Temperatur durch Drehen des Temperaturreglers einstel-
len. Die Innenbeleuchtung geht an. Der Kompressor startet und läuft
dann automatisch.
Hinweis: Bei Änderung der Einstellung läuft der Kompressor nicht
sofort an, wenn gerade automatisch abgetaut wird.
Da die Lagertemperatur im Kühlraum schnell erreicht wird, können Sie
gleich nach dem Einschalten Kühlgut einlagern.
Aus ernährungswissenschaftlicher Sicht ist +5 °C für den Kühlraum als
ausreichend kalte Lagertemperatur anzusehen.
Folgende Einflüsse sind ausschlaggebend für die Innentemperatur:
– Umgebungstemperatur;
– Menge und Temperatur der eingelagerten Lebensmittel;
– Häufiges oder langes Öffnen der Tür;
– ein Fehler am Gerät.
Deshalb muss die Temperaturregler-Einstellung eventuell den gegebe-
nen Einflüssen angepasst werden.
AEG62
12
Inbetriebnahme und Temperaturregelung
Einstellungsempfehlungen:
Beispiele:
Hinweis: Bei Einstellung gemäß Tabelle „Einstellungsempfehlungen“
stellt sich eine mittlere Kühlraumtemperatur von ca. +5°C ein.
Dies gilt für Umgebungstemperaturen von +10 °C bis +38 °C
3. Falls Sie höhere oder tiefere Temperatur wünschen, drehen Sie den
Temperaturregler auf wärmere bzw. kältere Einstellung.
Wichtig!
Hohe Umgebungstemperatur (z. B. an heißen Sommertagen) und kalte
Einstellung des Temperaturreglers (Stellung „5“ bis „6“) kann zu Dauer-
betrieb des Kompressors führen.
Grund: Der Kompressor muss ununterbrochen laufen, um bei hoher
Umgebungstemperatur die tiefe Temperatur im Gerät zu halten. Der
Kühlraum taut dann nicht mehr ab - denn automatisches Abtauen des
Kühlraums ist nur bei stillstehendem Kompressor möglich (siehe auch
Abschnitt „Abtauen“). Starke Reifbildung an der Kühlraumrückwand ist
die Folge.
In diesem Fall den Temperaturregler auf eine wärmere Einstellung
zurückdrehen (Stellung „3“ bis „4“). Bei dieser Einstellung wird der
Kompressor geregelt und der Abtauvorgang wieder automatisch einge-
leitet.
Umgebungstemperatur Temperaturregler-Stellung
ca. 10°C Bereich bis 1
ca. 16°C Bereich um 2
ca. 25°C Bereich um 2
ca. 32°C 2 bis 3
ca. 38°C 1 bis 2
13
Gerät abschalten
Zum Abschalten der Kühlung Temperaturregler auf Stellung „0“ dre-
hen.
Soll das Gerät für längere Zeit außer Betrieb genommen werden:
1. Kühlgut herausnehmen.
2. Gerät abschalten, dazu Temperaturregler auf Stellung „0“ drehen.
3. Netzstecker ziehen oder Sicherung abschalten bzw. herausdrehen.
4. Gerät gründlich reinigen (siehe Abschnitt "Reinigung und Pflege").
5. Tür anschließend geöffnet lassen, um Geruchsbildung zu vermeiden.
Innenausstattung
Abstellflächen/Abstellroste
Je nach Modell ist Ihr Gerät entweder mit Abstellflächen aus Glas oder
mit Abstellrosten ausgestattet.
Die Abstellfläche aus Glas über den Obst- und Gemüseschalen muss
immer in dieser Stellung verbleiben, damit Obst und Gemüse länger
frisch bleiben.
Die übrigen Abstellflächen sind höhenverstellbar:
1. Dazu die Abstellfläche soweit nach
vorne ziehen, bis sie sich nach oben
oder unten abschwenken und her-
ausnehmen lässt.
2. Das Einsetzen in eine andere Höhe
bitte in umgekehrter Reihenfolge
vornehmen.
Hohes Kühlgut einstellen (nicht bei
allen Modellen):
Die vordere Hälfte der zweiteiligen
Glasabstellfläche herausnehmen und in
eine andere Ebene einschieben.
Dadurch gewinnen Sie Raum, um auf
der darunterliegenden Abstellfläche
hohes Kühlgut abzustellen.
14
Innenausstattung
Feuchteregulierung (nicht bei allen Modellen)
Vor der Abstellfläche über den Obst-
und Gemüseschalen befindet sich
bei einigen Modellen ein verstellba-
res Lüftungsgitter.
Die Öffnung der Lüftungsschlitze
kann mit einem Schieber stufenlos
reguliert werden.
Schieber rechts: Lüftungsschlitze
geöffnet.
Schieber links: Lüftungsschlitze geschlossen.
Bei geöffneten Lüftungsschlitzen stellt sich infolge stärkerer
Luftzirkulation ein niedrigerer Feuchtegehalt der Luft in den Obst- und
Gemüseschalen ein.
Bei geschlossenen Lüftungsschlitzen bleibt der natürliche Feuchtege-
halt der Lebensmittel in den Obst- und Gemüseschalen länger erhalten.
Variable Ablagebox
(nicht bei allen Modellen, Ausführung je nach Modell unterschiedlich)
Einige Modelle sind mit einer variablen Ablagebox ausgestattet, die
seitlich verschiebbar unter einem Türabstellfach angebracht ist.
Die Box kann unter jedem Türabstellfach eingesetzt werden.
1. Zum Umsetzen das Abstellfach mit der Box nach oben aus den
Aufnahmen in der Tür herausheben und den Haltebügel aus der
Führung unter dem Abstellfach herausnehmen.
Variable Innentür
Je nach Erfordernis können die Türabstellfächer nach oben herausge-
nommen und in andere Aufnahmen umgesetzt werden.
Flaschenhalter (nicht bei allen Modellen)
Bei einigen Modellen ist im Flaschenfach ein
Flaschenhalter eingesetzt. Er dient als
Kippschutz für einzelne Flaschen und ist
seitlich verschiebbar.
15
2. Das Einsetzen in eine andere Höhe
bitte in umgekehrter Reihenfolge
vornehmen.
Die variable Box kann auch im Kühlraum
an einer Abstellfläche seitlich eingehängt
werden:
1. Dazu die Abstellfläche soweit nach vorne
ziehen, bis sie sich nach oben oder unten
abschwenken und herausnehmen lässt.
2. Den Haltebügel an der Verjüngung der
Abstellfläche einhängen und die
Abstellfläche wieder in die Führungen
einschieben.
Richtig lagern
Im Kühlraum ergeben sich, physikalisch
bedingt, unterschiedliche
Temperaturbereiche.
Der kälteste Bereich befindet sich auf der
untersten Abstellfläche über den Obst-
und Gemüseschalen.
Wärmere Bereiche sind die oberen
Abstellflächen und die Abstellfächer an
der Tür. An welcher Stelle im Kühlraum
geeignete Temperaturen für verschiedene
Arten von Lebensmitteln vorliegen, zeigt
nebenstehendes Einordnungsbeispiel.
Tipp: Lebensmittel sollen immer abge-
deckt oder verpackt in den Kühlraum, um
Austrocknen und Geruchs- oder
Geschmacksübertragung auf anderes Kühlgut zu vermeiden.
16
Reinigung und Pflege
Aus hygienischen Gründen sollte das Geräteinnere, einschließlich
Innenausstattung, regelmäßig gereinigt werden.
Warnung!
• Das Gerät darf während der Reinigung nicht am Stromnetz ange-
schlossen sein. Stromschlaggefahr! Vor Reinigungsarbeiten Gerät
abschalten und Netzstecker ziehen oder Sicherung abschalten.
• Das Gerät nie mit Dampfreinigungsgeräten reinigen. Feuchtigkeit
könnte in elektrische Bauteile gelangen, Stromschlaggefahr! Heißer
Dampf kann zu Schäden an Kunststoffteilen führen.
• Das Gerät muss trocken sein, bevor Sie es wieder in Betrieb nehmen.
Achtung!
• Ätherische Öle und organische Lösungsmittel können Kunststoffteile
angreifen, z. B.
– Saft von Zitronen- oder Apfelsinenschalen;
– Buttersäure;
– Reinigungsmittel, die Essigsäure enthalten.
Solche Substanzen nicht mit den Geräteteilen in Kontakt bringen.
• Keine scheuernden Reinigungsmittel verwenden.
Zum Verpacken eignen sich:
– Frischhaltebeutel und -folien aus Polyäthylen;
– Kunststoffbehälter mit Deckel;
– Spezielle Hauben aus Kunststoff mit Gummizug;
– Aluminiumfolie.
Abtauen
Der Kühlraum taut automatisch ab
Das Abtauen des Verdampfers in der Rückwand des Kühlraums erfolgt
automatisch.
Das Tauwasser wird in der Ablaufrinne an der Rückwand des Kühlrau-
mes aufgefangen, durch das Ablaufloch in die Auffangschale am Kom-
pressor geleitet und dort verdunstet.
Das Tauwasser-Ablaufloch muss regelmäßig gereinigt werden (siehe
Kapitel „Reinigung und Pflege“).
17
1. Gerät abschalten und den Netzstecker ziehen oder Sicherung abschal-
ten bzw. herausdrehen.
2. Entfernen Sie Reif mit einem weichen Kunststoffschaber, z. B. Teigkrat-
zer. Keinesfalls harte oder spitze Gegenstände dazu benutzen.
3. Gerät einschließlich Innenausstattung mit einem Lappen und lauwar-
mem Wasser reinigen. Eventuell etwas handelsübliches Geschirrspül-
mittel beigeben.
4. Anschließend mit klarem Wasser nachwischen und trockenreiben.
5. Das Tauwasser-Ablaufloch an der
Rückwand des Kühlraumes regelmäßig
mit Hilfe des im Ablaufloch eingesetz-
ten grünen Reinigungsstiftes frei
machen.
6. Nachdem alles trocken ist,
Lebensmittel wieder einlagern und
Gerät wieder in Betrieb nehmen.
Tipps zur Energie-Einsparung
• Das Gerät nicht in der Nähe von Herden, Heizkörpern oder anderen
Wärmequellen aufstellen. Bei hoher Umgebungstemperatur läuft der
Kompressor häufiger und länger.
• Ausreichende Be- und Entlüftung des Gerätes gewährleisten. Lüf-
tungsöffnungen niemals abdecken.
• Keine warmen Speisen in das Gerät stellen. Warme Speisen erst
abkühlen lassen.
• Tür nur so lange wie nötig geöffnet lassen.
• Die Temperatur nicht kälter als nötig einstellen.
18
Die Lebensmittel sind zu
warm.
Temperatur ist nicht rich-
tig eingestellt.
Bitte im Abschnitt “Inbe-
triebnahme” nachsehen.
Tür war längere Zeit geöff-
net.
Tür nur so lange wie nötig
geöffnet lassen.
Innerhalb der letzen 24
Std. wurden größere
Mengen warmer
Lebensmittel eingelagert.
Temperaturregler vorüber-
gehend auf kältere
Einstellung
drehen.
Das Gerät steht neben
einer Wärmequelle.
Bitte im Abschnitt
Aufstellort” nachsehen.
Lampe ist defekt.
Bitte im Abschnitt “Lampe
auswechseln” nachsehen.
Innenbeleuchtung funktio-
niert nicht.
Was tun, wenn ...
Abhilfe bei Störungen
Möglicherweise handelt es sich bei einer Störung nur um einen kleinen
Fehler, den Sie anhand nachfolgender Hinweise selbst beheben können.
Führen Sie keine weiteren Arbeiten selbst aus, wenn nachstehende
Informationen im konkreten Fall nicht weiterhelfen.
Warnung! Reparaturen am Kältegerät dürfen nur von Fachkräften
durchgeführt werden. Durch unsachgemäße Reparaturen können
erhebliche Gefahren für den Benutzer entstehen. Wenden Sie sich im
Reparaturfall an Ihren Fachhändler oder an unseren Kundendienst.
Gerät kühlt zu stark.
Temperatur ist zu kalt ein-
gestellt.
Temperaturregler vorüber-
gehend auf wärmere
Einstellung drehen.
Störung Mögliche Ursache Abhilfe
Gerät arbeitet nicht.
Gerät ist nicht eingeschal-
tet.
Netzstecker ist nicht ein-
gesteckt oder lose.
Sicherung hat ausgelöst
oder ist defekt.
Steckdose ist defekt.
Störungen am Stromnetz
behebt Ihr
Elektrofachmann.
Gerät einschalten.
Netzstecker einstecken.
Sicherung überprüfen,
gegebenenfalls erneuern.
19
Was tun, wenn...
Lampe auswechseln
Warnung! Stromschlaggefahr! Vor dem Lampenwechsel Gerät abschal-
ten und den Netzstecker ziehen oder Sicherung abschalten bzw. her-
ausdrehen.
Lampendaten: 220-240 V, max. 15 W, Fassung: E 14
1. Zum Abschalten des Gerätes Temperaturregler auf Stellung “O” drehen.
2. Netzstecker ziehen.
3. Zum Auswechseln der Lampe Befestigungsschraube herausdrehen.
4. Gemäß Abbildung auf die
Lampenabdeckung drücken und diese
nach hinten abschieben.
5. Defekte Lampe auswechseln.
6. Lampenabdeckung wieder einsetzen
und Befestigungsschraube eindrehen.
7. Gerät wieder in Betrieb nehmen.
Störung Mögliche Ursache
An den undichten Stellen
Türdichtung vorsichtig mit
einem
Haartrockner erwär-
men (nicht wärmer als ca.
50°C). Gleichzeitig die
erwärmte Türdichtung von
Hand so in Form ziehen,
da
ss sie wieder einwandfrei
anliegt.
Türdichtung ist undicht
(evtl. nach Türanschlag-
wechsel).
Starke Reifbildung im
Gerät, evtl. auch an der
Türdichtung.
Abhilfe
Nach Änderung der
Temperatureinstellung
läuft der Kompressor nicht
sofort an.
Dies ist normal, es liegt
keine Störung vor.
Der Kompressor läuft nach
einiger Zeit selbsttätig an.
Tauwasser-Ablaufloch ist
verstopft.
Siehe Abschnitt “Reinigung
und Pflege”.
Wasser am Kühlraumboden
oder auf Abstellflächen.
EG6
20
Betriebsgeräusche
Folgende Geräusche sind charakterstisch für Kältegeräte:
Klicken
Immer wenn der Kompressor ein- oder ausschaltet, ist ein Klicken zu
hören.
Summen
Sobald der Kompressor arbeitet, können Sie ihn summen hören.
Blubbern/Plätschern
Wenn Kältemittel in dünne Rohre einströmt, können Sie ein blub-
berndes oder plätscherndes Geräusch hören. Auch nach dem
Abschalten des Kompressors ist dieses Geräusch noch kurze Zeit hör-
bar.
Bestimmungen, Normen, Richtlinien
Das Kältegerät ist für den Haushalt bestimmt und wurde unter
Beachtung der für diese Geräte geltenden Normen hergestellt.
Bei der Fertigung wurden insbesondere die nach dem Gerätesicher-
heitsgesetz (GSG), der Unfallverhütungsvorschrift für Kälteanlagen
(VBG 20) und den Bestimmungen des Verbandes Deutscher
Elektrotechniker (VDE) notwendigen Maßnahmen getroffen.
Der Kältekreislauf wurde auf Dichtheit geprüft.
Dieses Gerät entspricht den folgenden EG-Richtlinien:
– 73/23/EWG vom 19.2.1973 - Niederspannungsrichtlinie
– 89/336/EWG vom 3.5.1989
(einschließlich Änderungsrichtlinie 92/31/EWG) - EMV-Richtlinie
– 94/2/EG vom 21. 01. 1994 - Richtlinie zur Energieettikettierung
– 96/57 EG vom 3. 9. 1996 - Anforderung im Hinblick auf die Energie-
effizienz von elektrischen Haushaltskühl- und Gefriergeräten und
entsprechenden Kombinationen.
21
Fachbegriffe
Kältemittel
Flüssigkeiten, die zur Kälteerzeugung verwendet werden können,
nennt man Kältemittel. Sie haben einen verhältnismäßig niedrigen
Siedepunkt, so niedrig, dass die Wärme der im Kältegerät lagernden
Lebensmittel das Kältemittel zum Sieden bzw. Verdampfen bringen
kann.
Kältemittelkreislauf
Geschlossenes Kreislaufsystem, in dem sich das Kältemittel befindet.
Der Kältemittelkreislauf besteht im wesentlichen aus Verdampfer,
Kompressor, Verflüssiger sowie aus Rohrleitungen.
Verdampfer
Im Verdampfer verdampft das Kältemittel. Wie alle Flüssigkeiten
benötigt Kältemittel zum Verdampfen Wärme. Diese Wärme wird
dem Geräteinnenraum entzogen, der dadurch abkühlt. Deshalb ist
der Verdampfer im Geräteinnenraum angeordnet oder unmittelbar
hinter der Innenwand eingeschäumt und dadurch nicht sichtbar.
Kompressor
Der Kompressor sieht aus wie eine kleine Tonne. Er wird von einem
eingebauten Elektromotor angetrieben und ist hinten im
Sockelbereich des Gerätes untergebracht. Aufgabe des Kompressors
ist es, dampfförmiges Kältemittel aus dem Verdampfer abzuziehen,
zu verdichten und zum Verflüssiger weiterzuleiten.
Verflüssiger
Der Verflüssiger hat meist die Form eines Gitters. Im Verflüssiger wird
das vom Kompressor verdichtete Kältemittel verflüssigt. Dabei wird
Wärme frei, die über die Oberfläche des Verflüssigers an die
Umgebungsluft abgegeben wird. Der Verflüssiger ist deshalb außen,
meist an der Geräterückseite angebracht.
22
Dear Customer
Thank you for choosing one of our high-quality products.
With this appliance you will experience the perfect combination of functio-
nal design and cutting edge technology.
Convince yourself that our appliances are engineered to deliver the best
performance and control - indeed we are setting the highest standards of
excellence.
In addition to this you find environmental and energy saving aspects as an
integral part of our products.
To ensure optimal and regular performance of your appliance please read this
instruction manual carefully. It will enable you to navigate all processes per-
fectly and most efficiently.
To refer to this manual any time you need to, we recommend you to keep it
in a safe place. And please pass it to any future owner of the appliance.
We wish you much joy with your new appliance.
The following symbols are used in this manual
Important information concerning your personal safety and information on
how to avoid damaging the appliance
General information and tips
Environmental information
23
Contents
Important Safety Instructions . . . . . . . . . . . . . . . . . . . . . . . . . . . . . . . . . . . 24
Disposal. . . . . . . . . . . . . . . . . . . . . . . . . . . . . . . . . . . . . . . . . . . . . . . . . . . . . 26
Appliance Packaging Information. . . . . . . . . . . . . . . . . . . . . . . . . . . . . . . . . . 26
Disposal of old Appliances . . . . . . . . . . . . . . . . . . . . . . . . . . . . . . . . . . . . . . . . 26
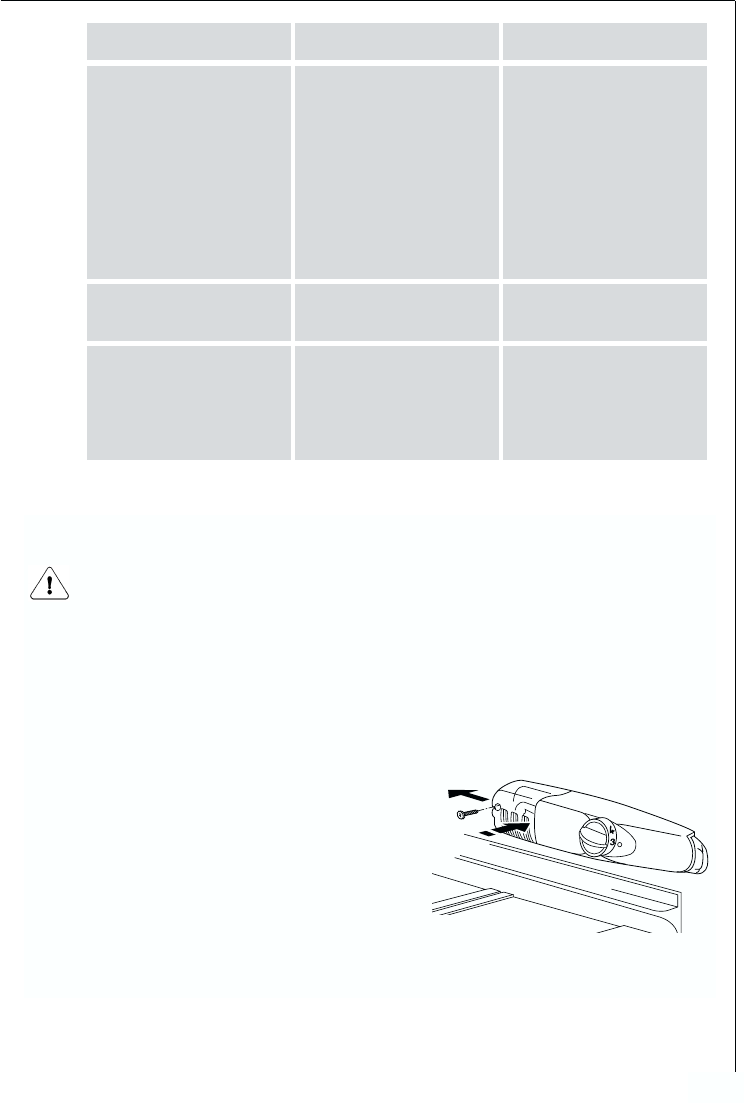
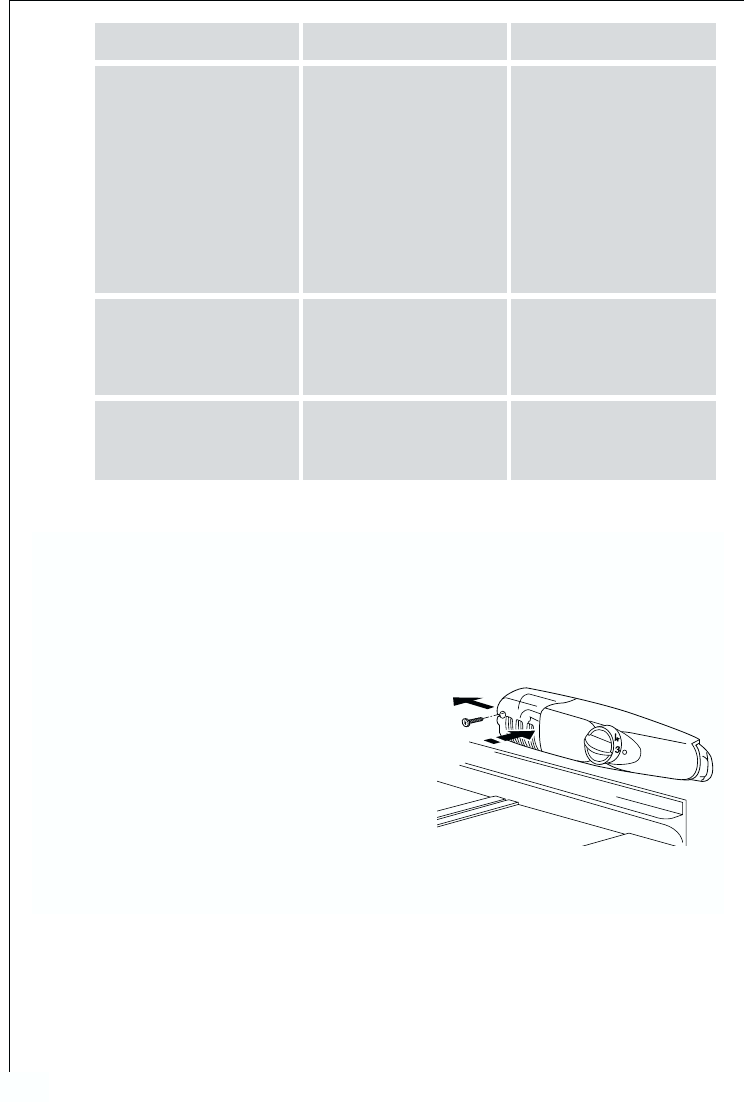
Remove transport safeguard . . . . . . . . . . . . . . . . . . . . . . . . . . . . . . . . . . . . 27
Installation . . . . . . . . . . . . . . . . . . . . . . . . . . . . . . . . . . . . . . . . . . . . . . . . . . 27
Installation Location. . . . . . . . . . . . . . . . . . . . . . . . . . . . . . . . . . . . . . . . . . . . . 27
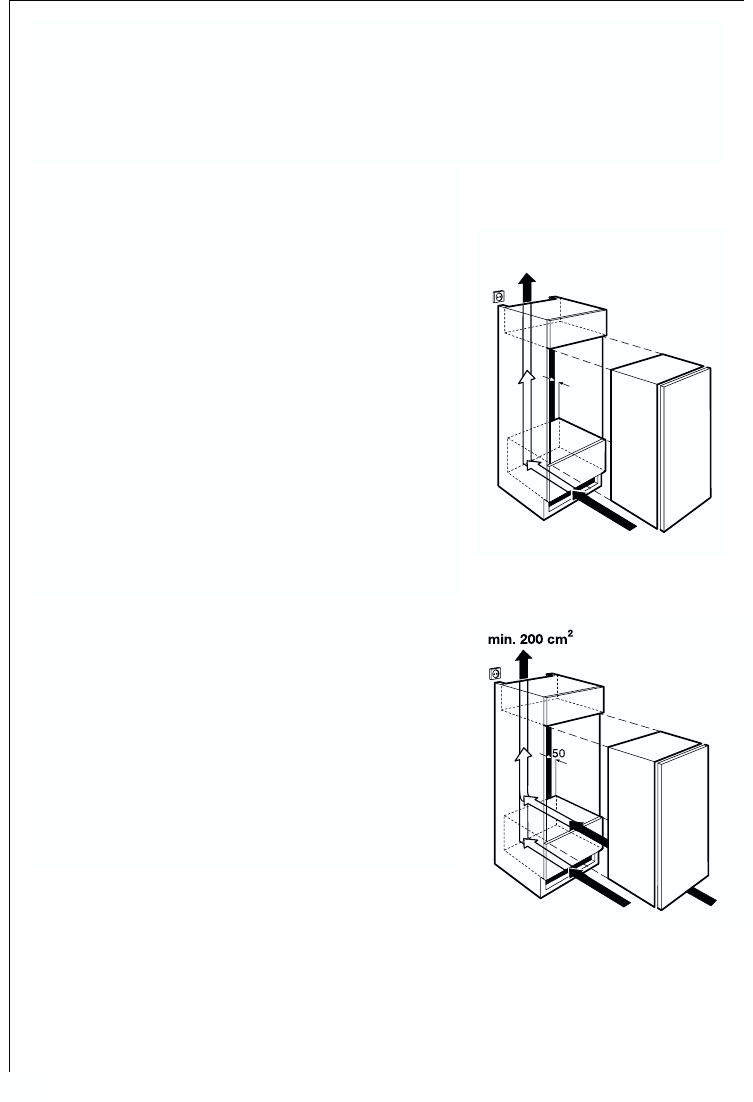
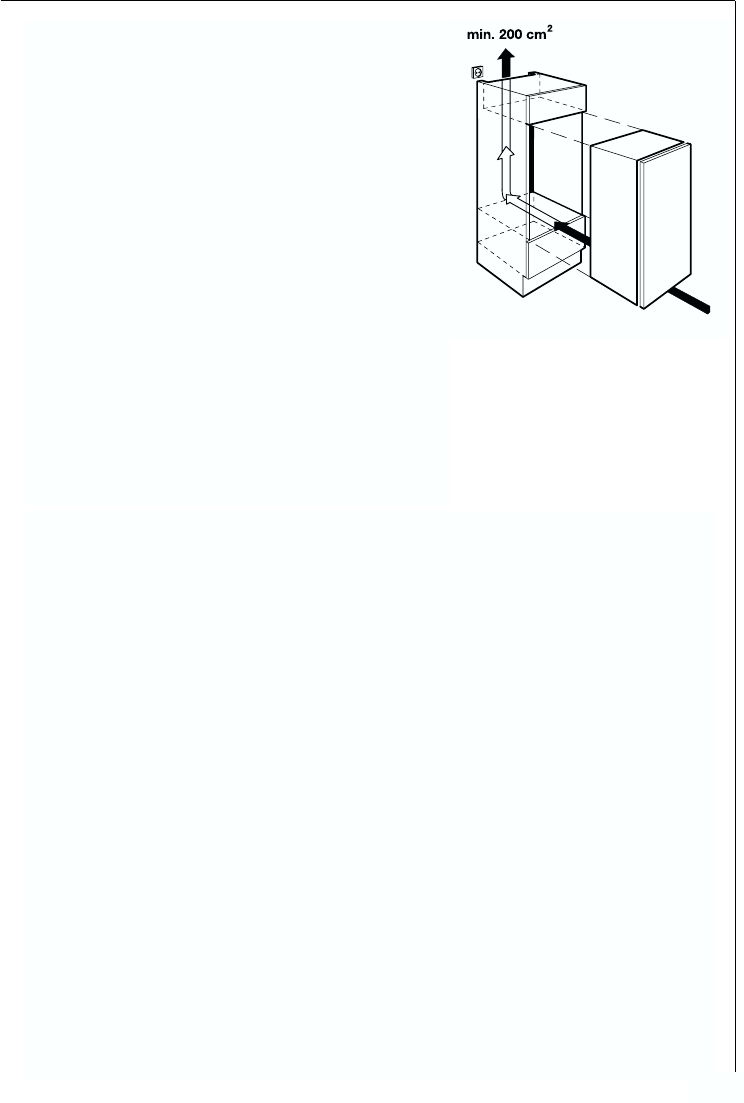
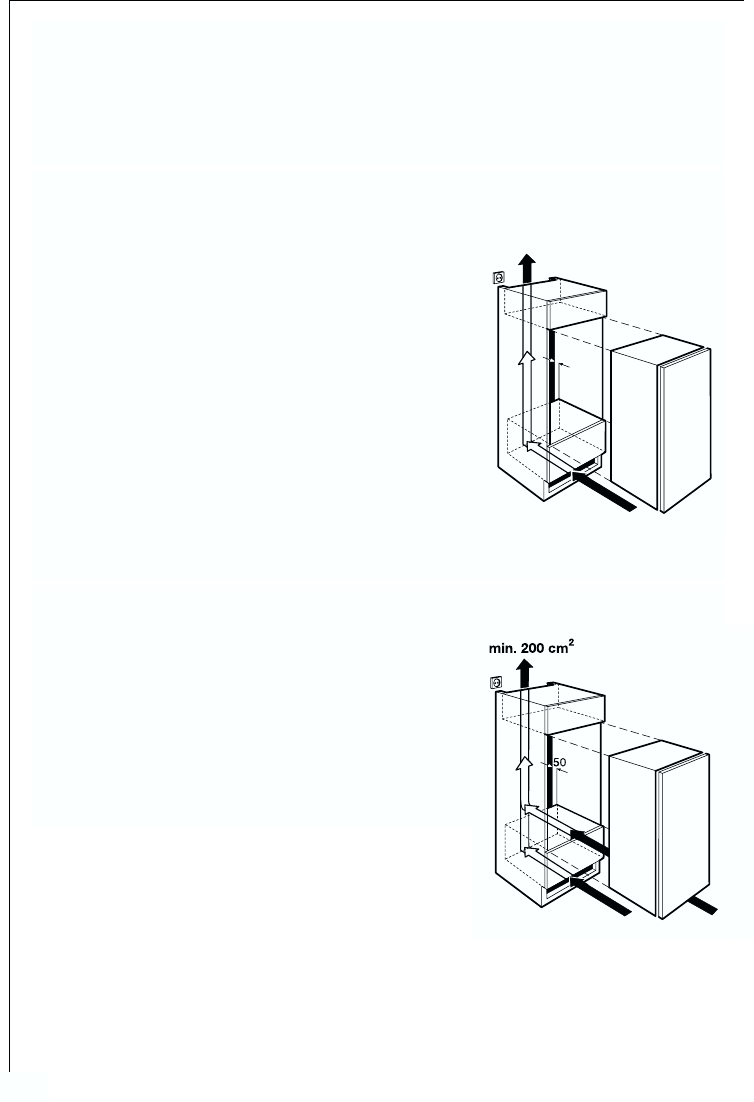
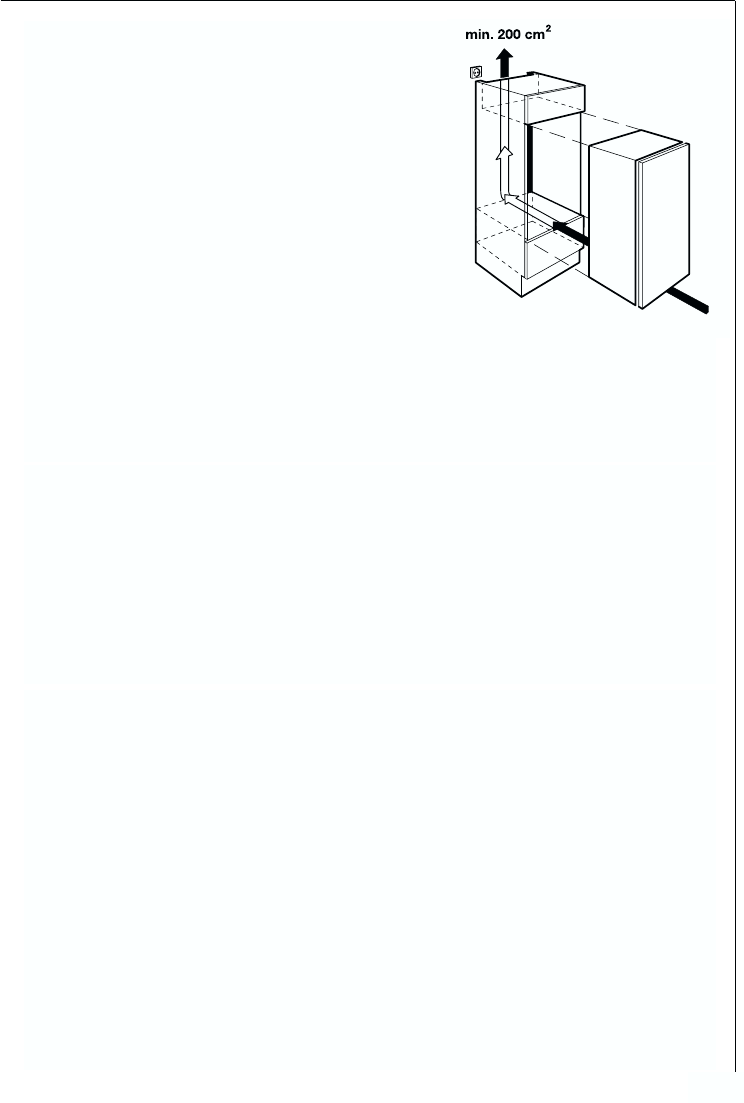
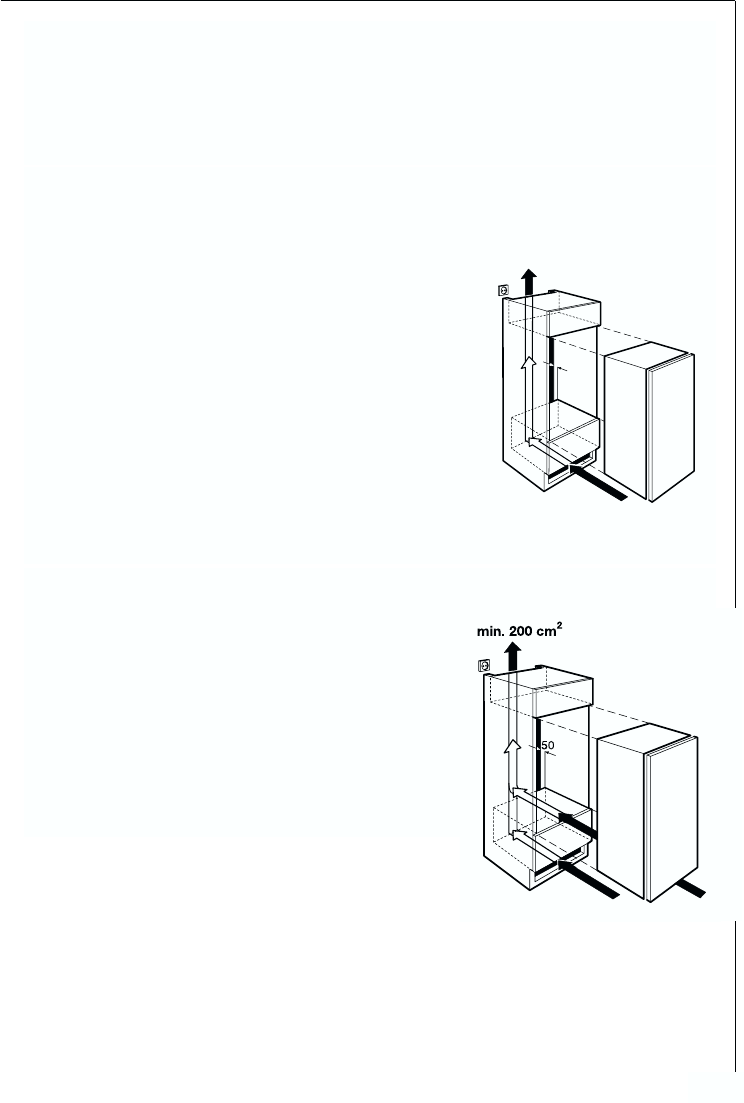
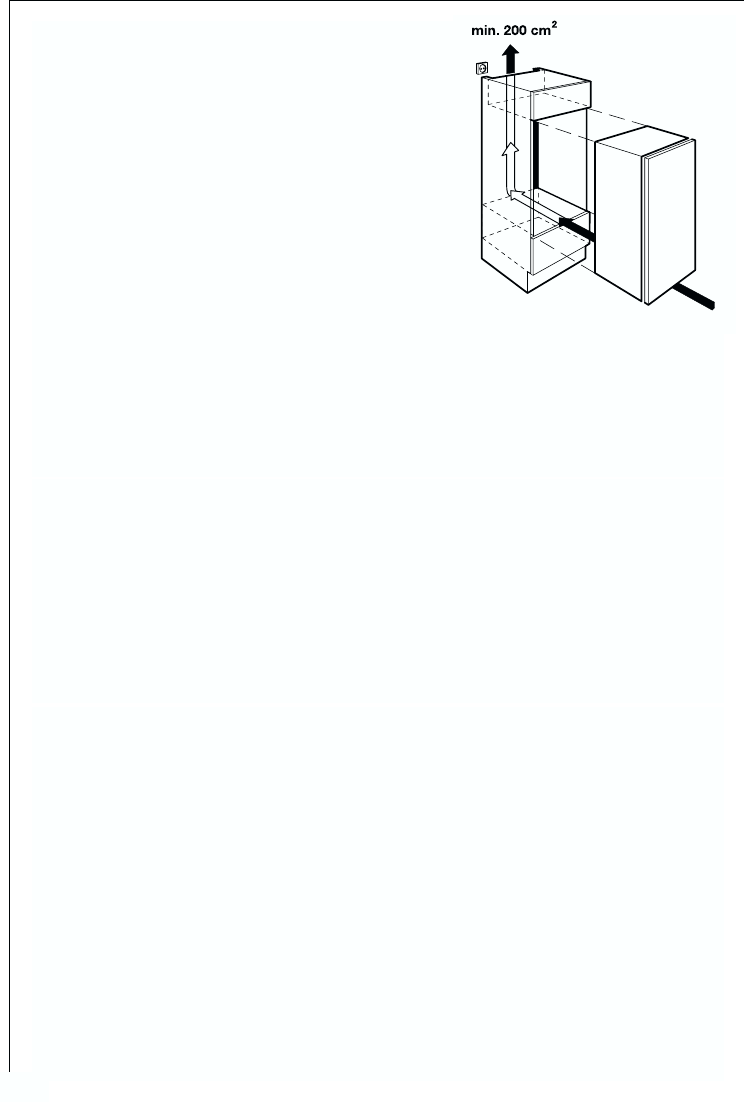
Your refrigerator needs ventilation. . . . . . . . . . . . . . . . . . . . . . . . . . . . . . . . . 28
Installation. . . . . . . . . . . . . . . . . . . . . . . . . . . . . . . . . . . . . . . . . . . . . . . . . . . . . 29
Electrical connection . . . . . . . . . . . . . . . . . . . . . . . . . . . . . . . . . . . . . . . . . . . . 29
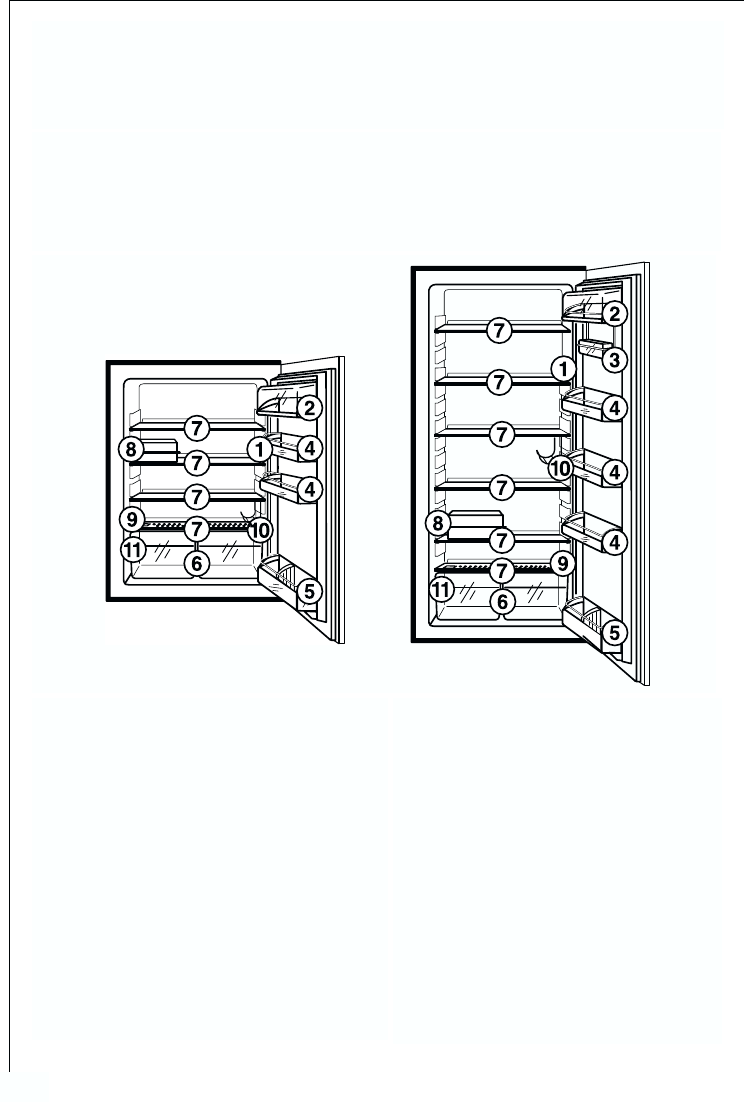
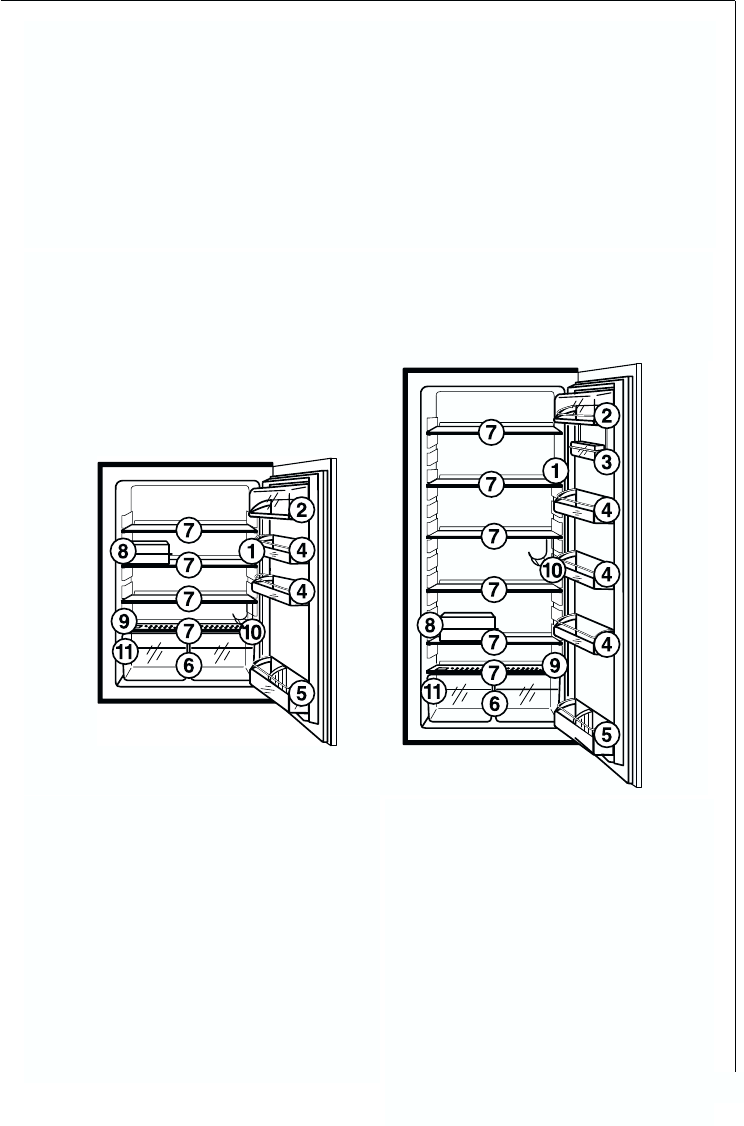
Description of the appliance . . . . . . . . . . . . . . . . . . . . . . . . . . . . . . . . . . . . 30
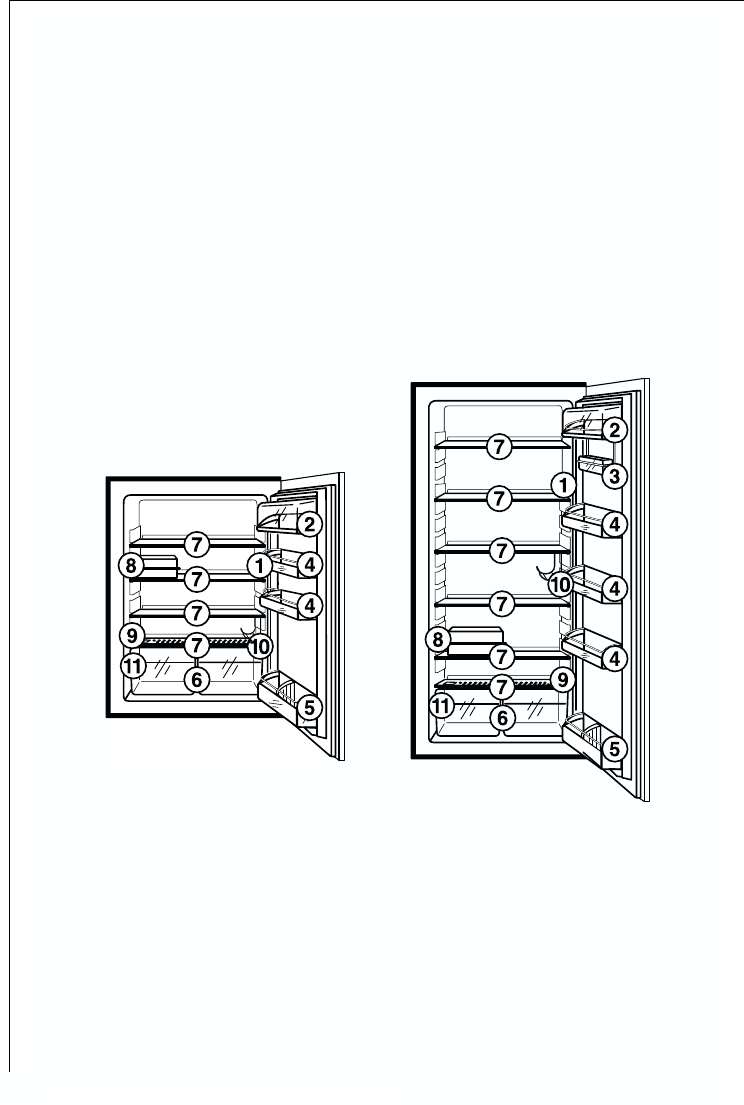
View of the appliance. . . . . . . . . . . . . . . . . . . . . . . . . . . . . . . . . . . . . . . . . . . . 30
Prior to Initial Start–Up. . . . . . . . . . . . . . . . . . . . . . . . . . . . . . . . . . . . . . . . 31
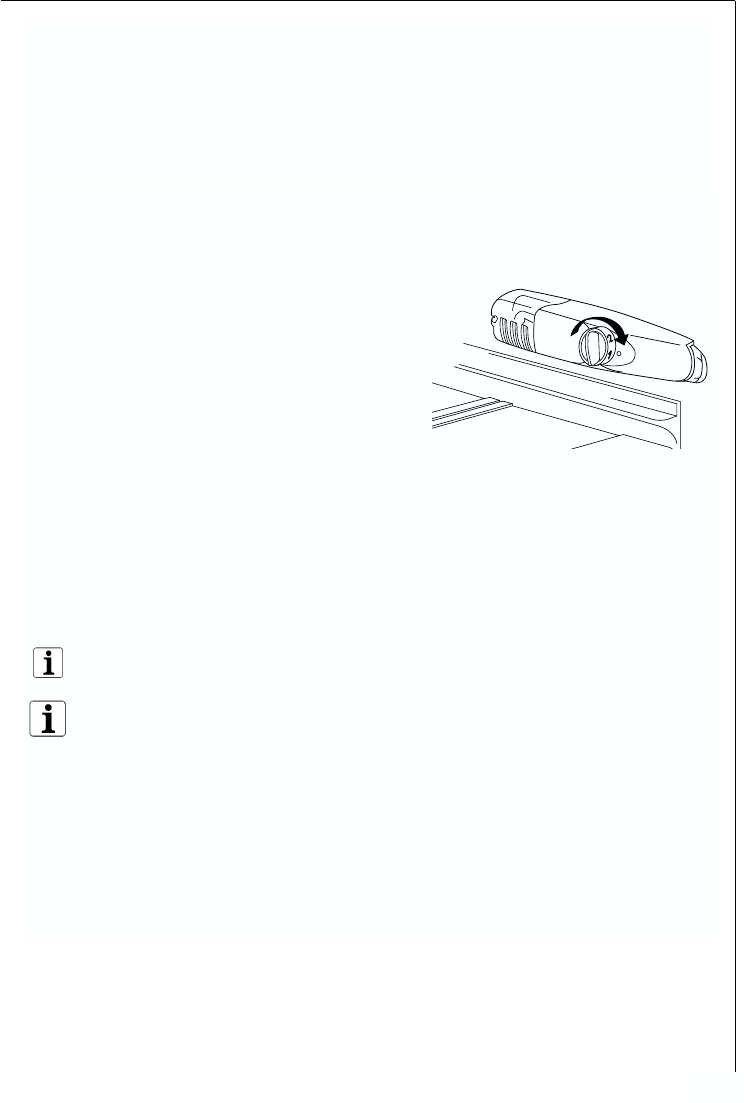
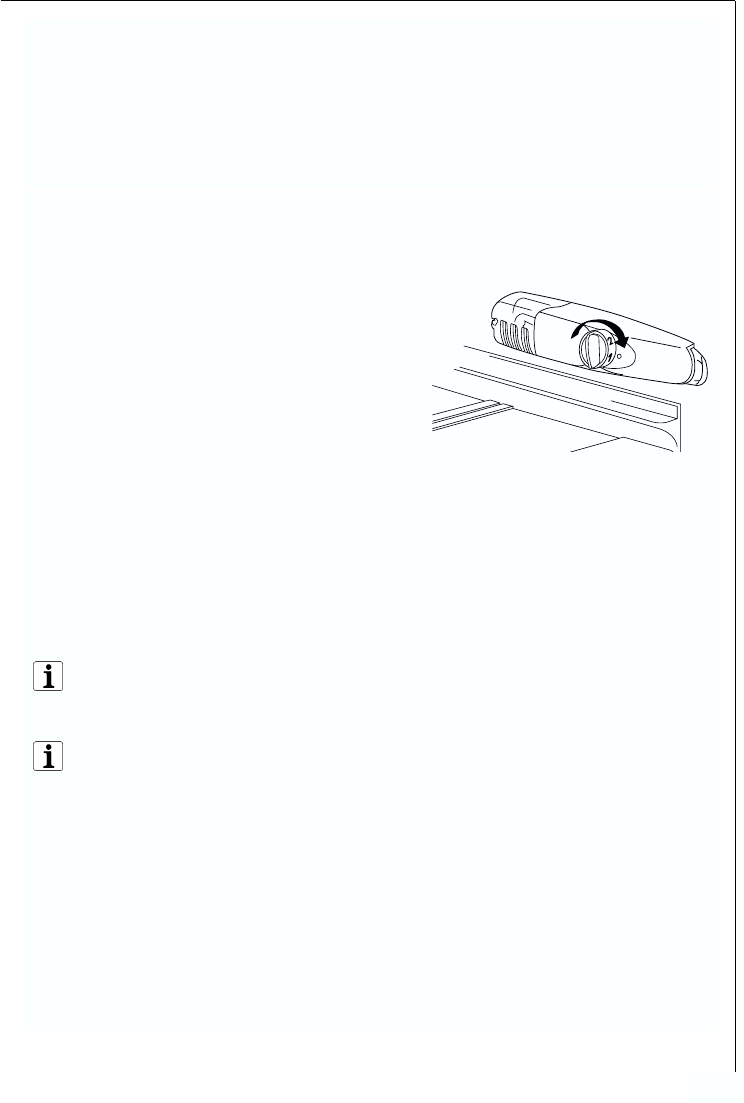
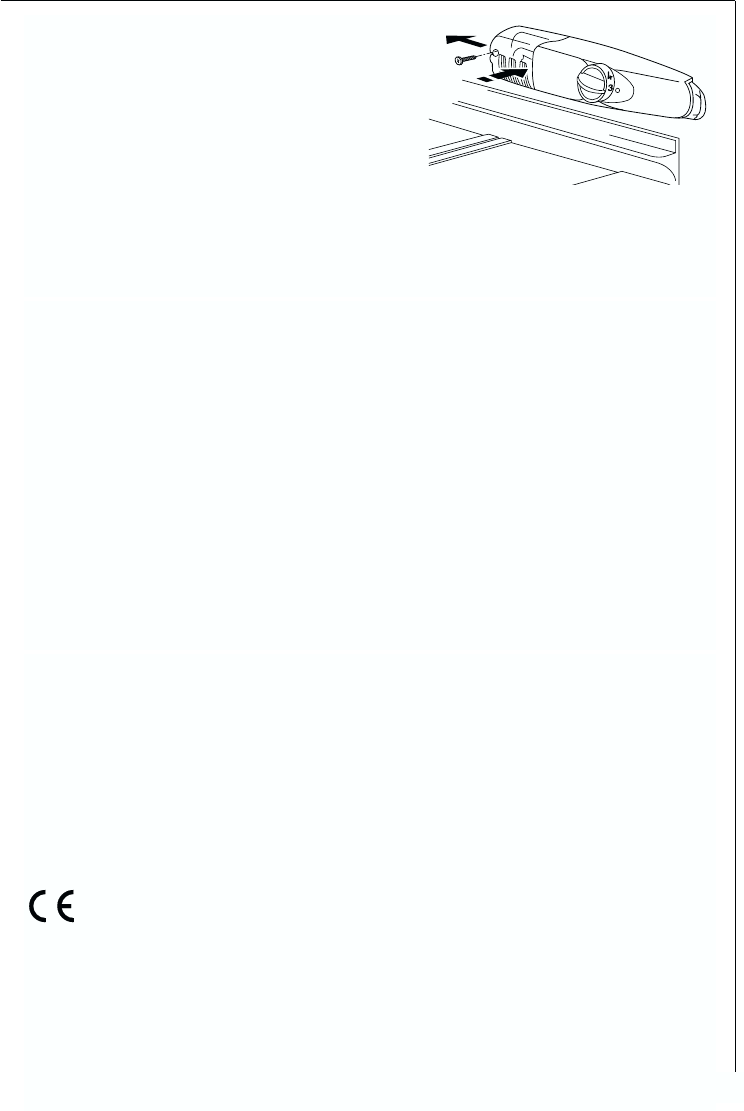
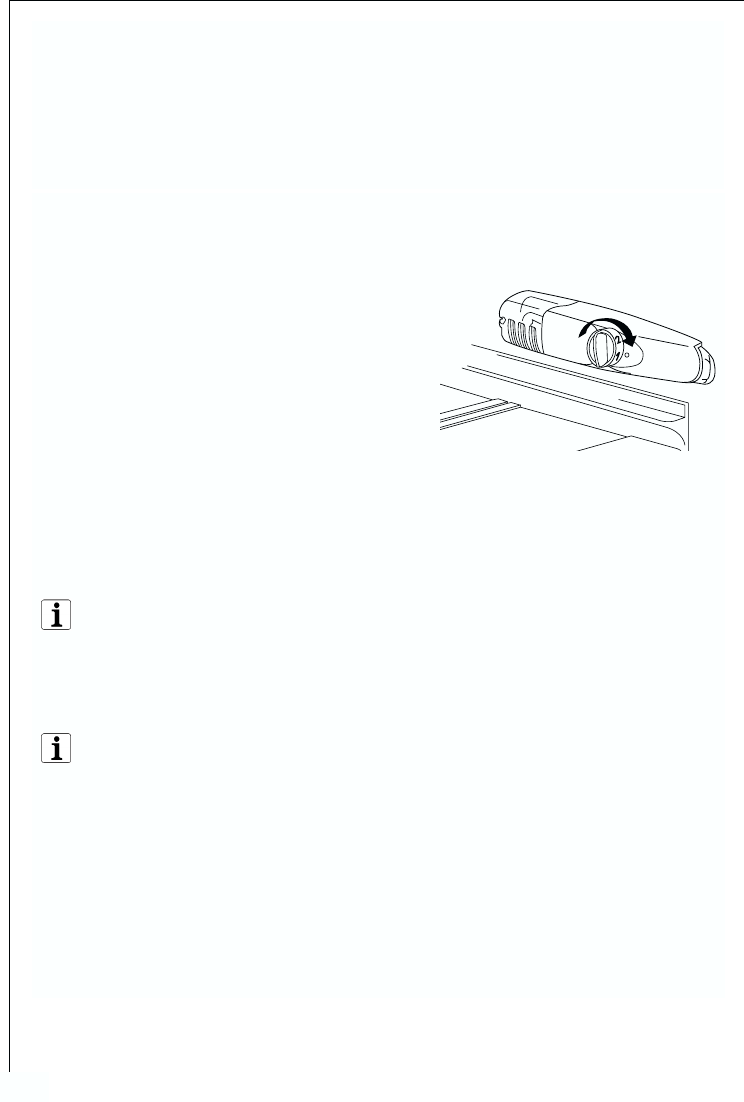
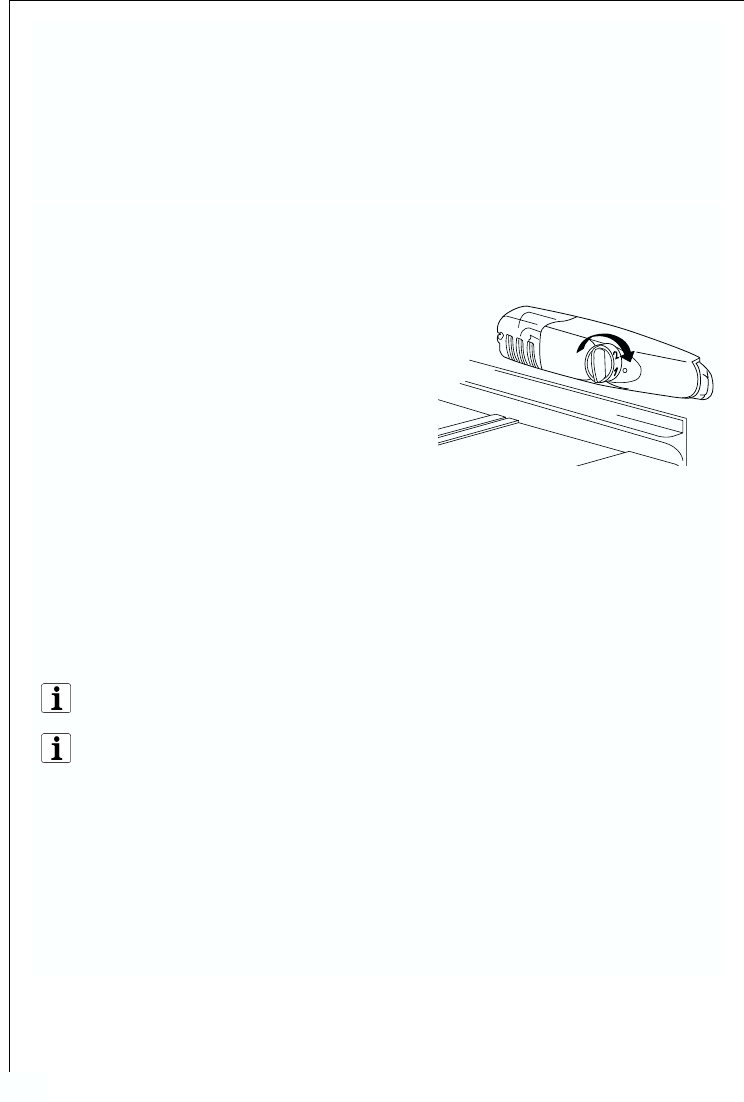
Starting up and temperature regulation . . . . . . . . . . . . . . . . . . . . . . . . . . 31
Switching off the appliance . . . . . . . . . . . . . . . . . . . . . . . . . . . . . . . . . . . . 32
Interior Accessories . . . . . . . . . . . . . . . . . . . . . . . . . . . . . . . . . . . . . . . . . . . 33
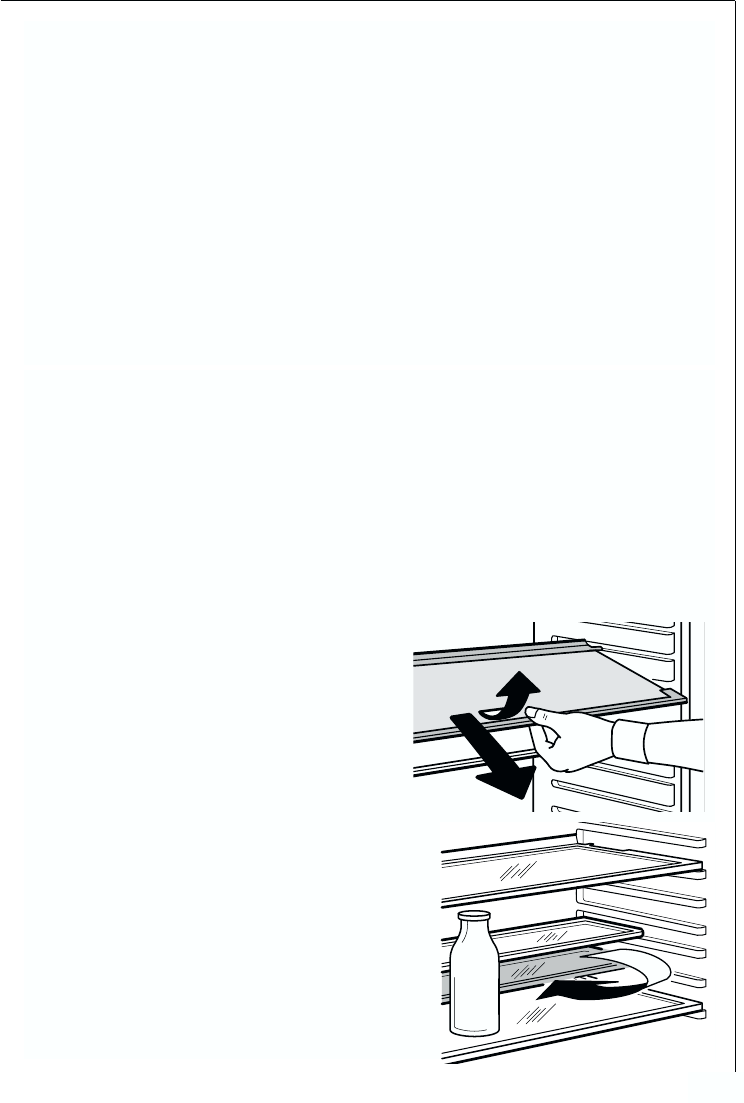
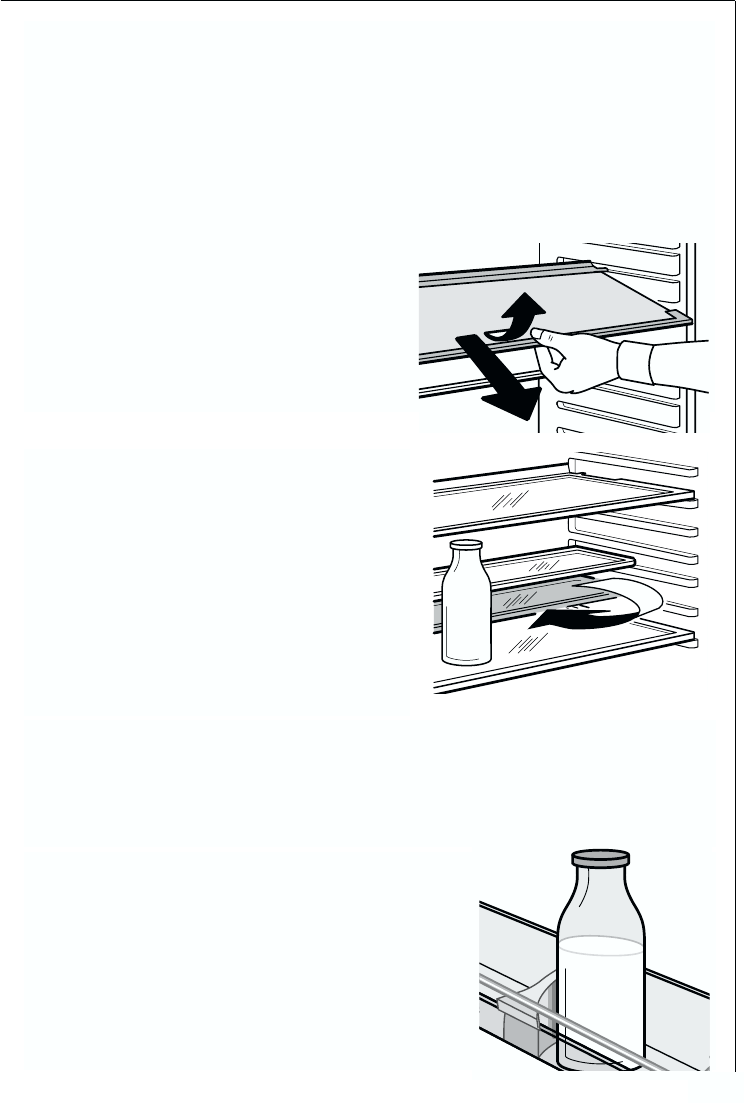
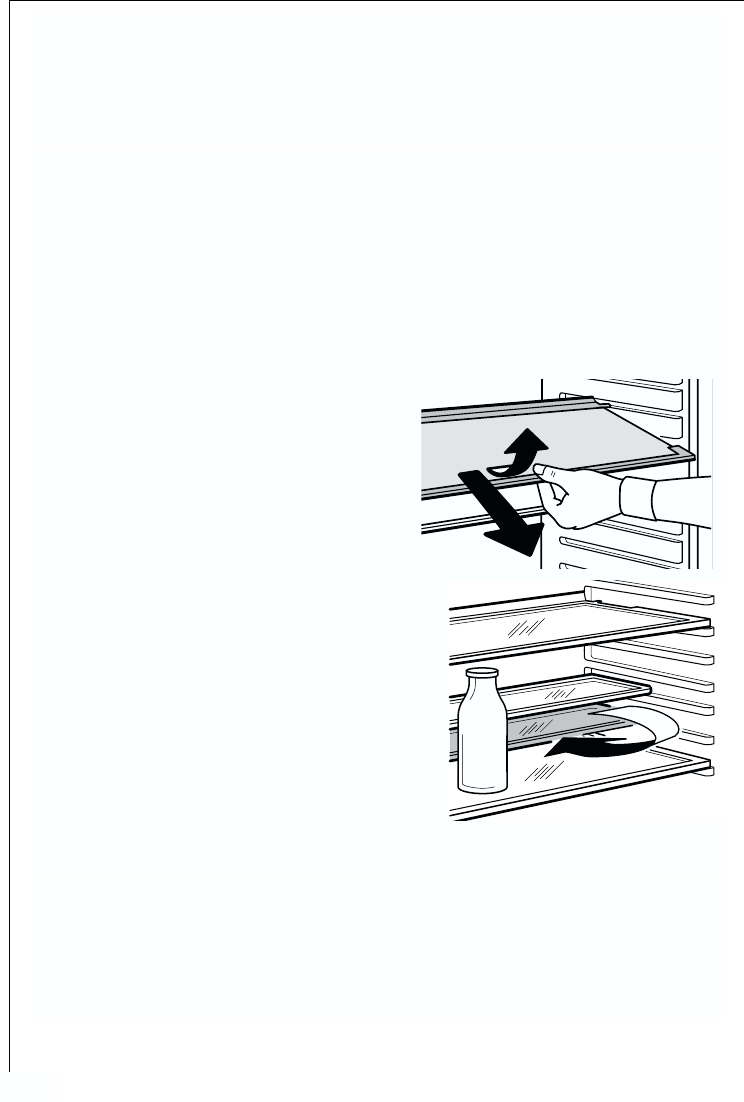
Storage shelves . . . . . . . . . . . . . . . . . . . . . . . . . . . . . . . . . . . . . . . . . . . . . . . . . 33
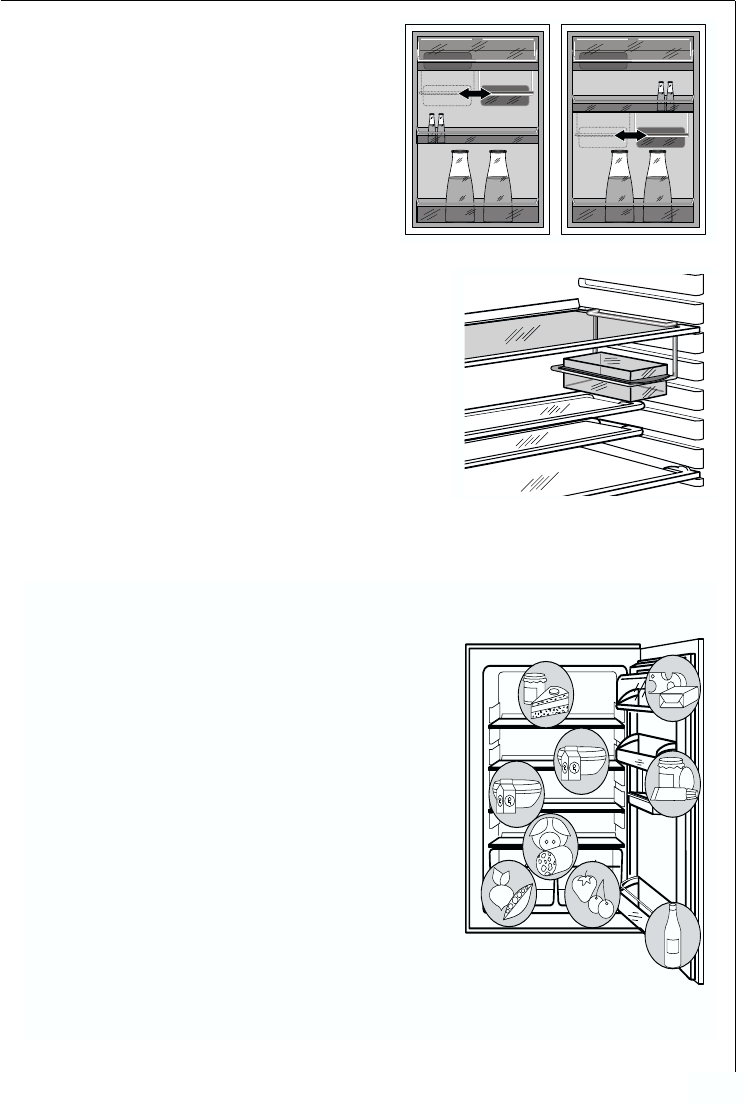
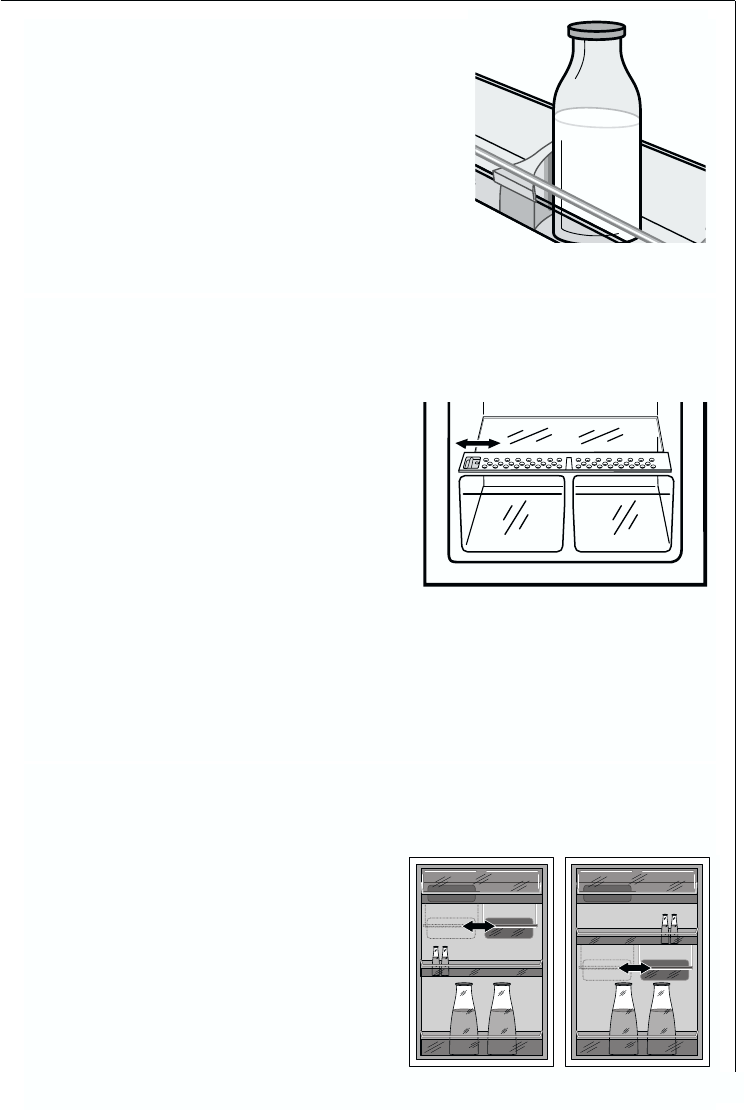
Variable inner door . . . . . . . . . . . . . . . . . . . . . . . . . . . . . . . . . . . . . . . . . . . . . . 33
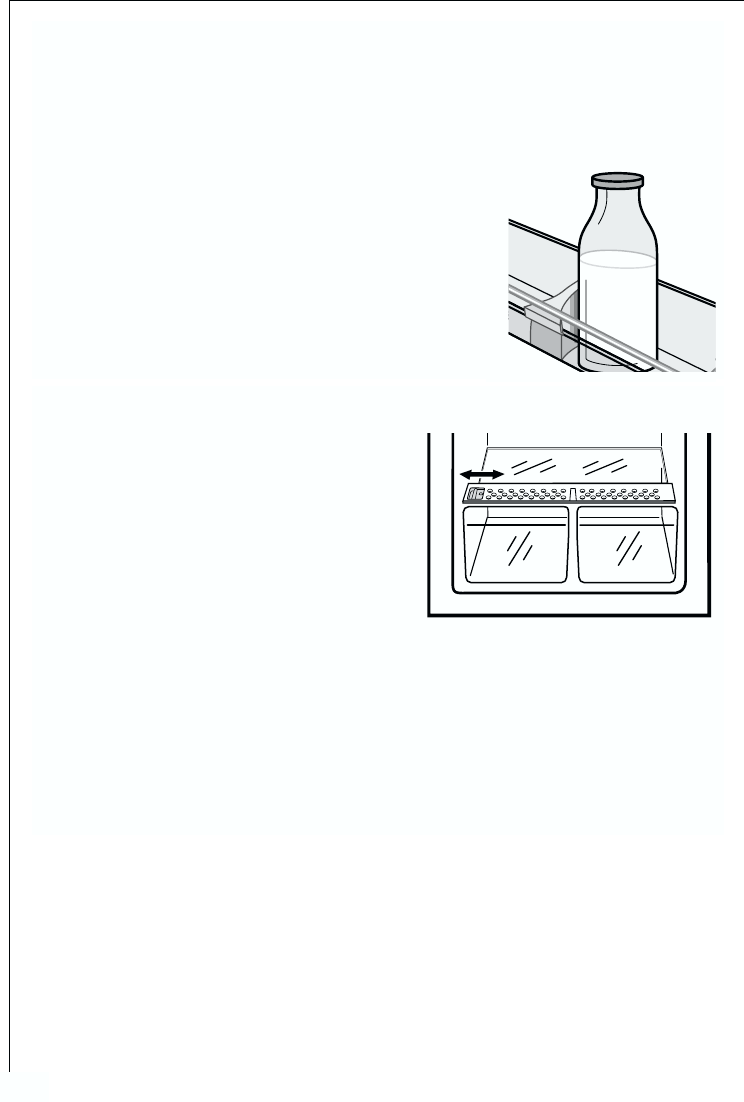
Bottle holder . . . . . . . . . . . . . . . . . . . . . . . . . . . . . . . . . . . . . . . . . . . . . . . . . . . 33
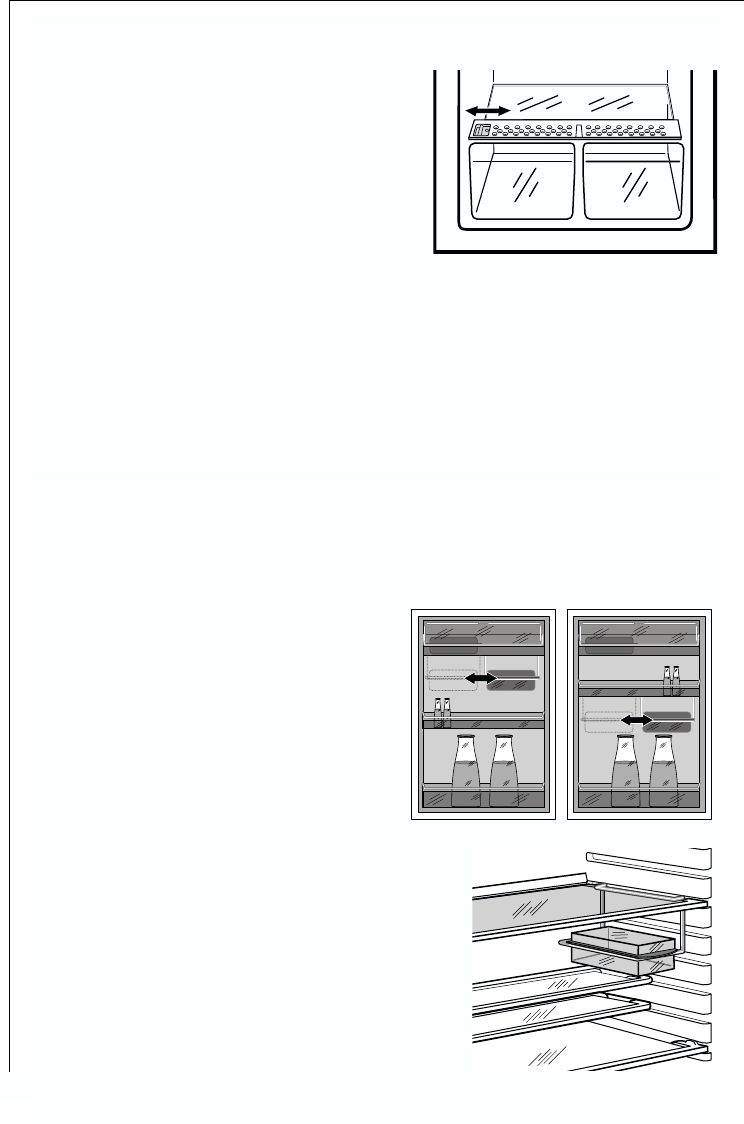
Moisture regulation . . . . . . . . . . . . . . . . . . . . . . . . . . . . . . . . . . . . . . . . . . . . . 34
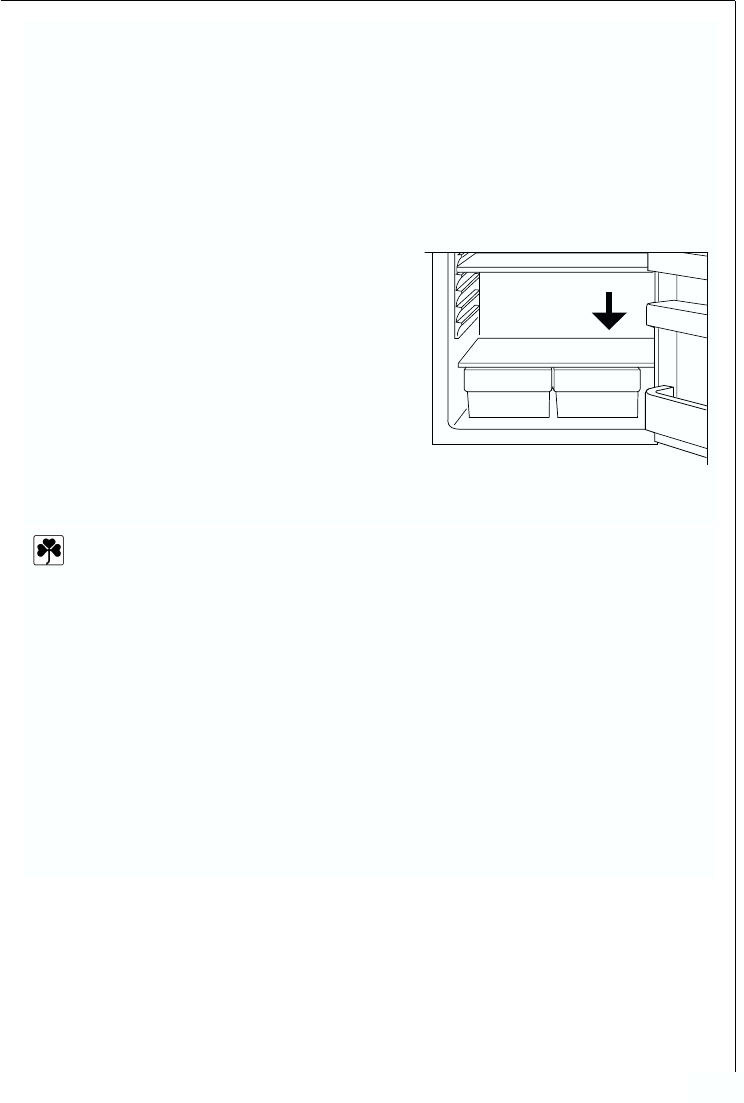
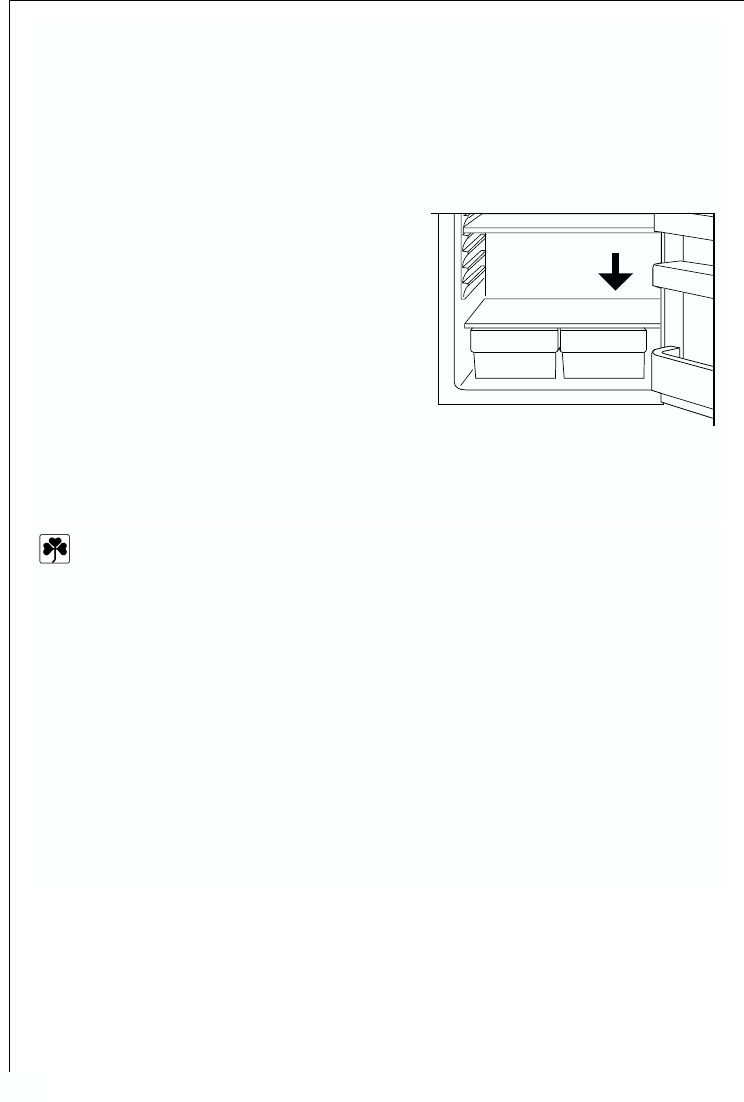
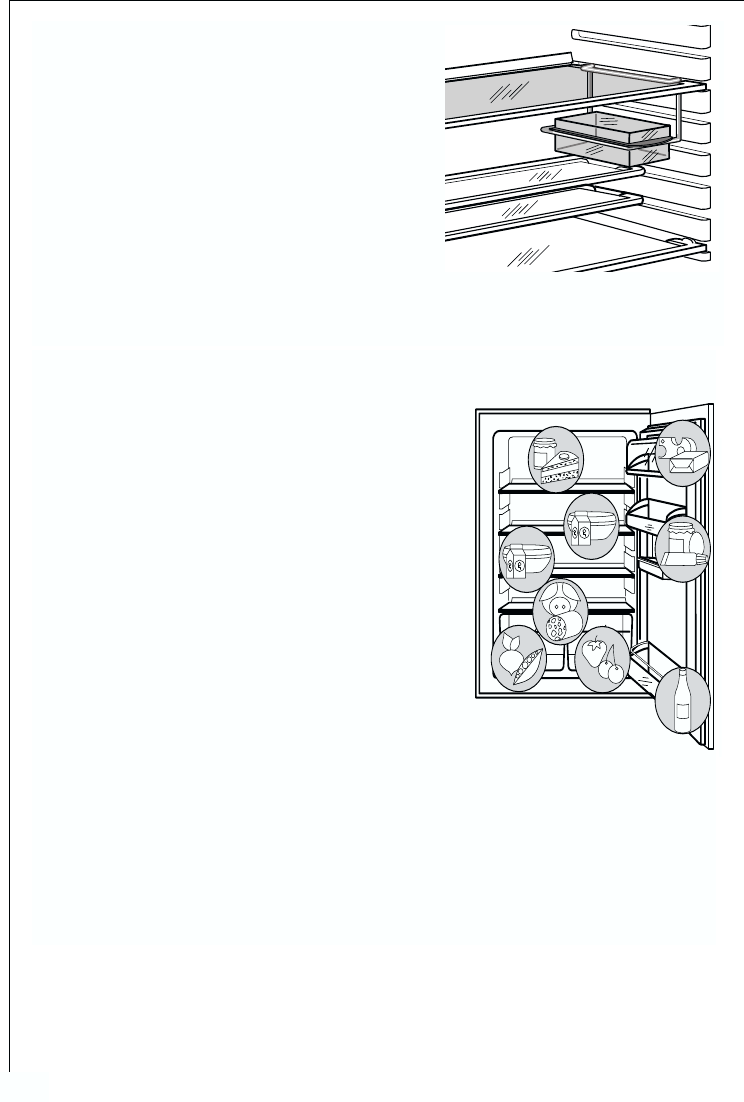
Variable storage box . . . . . . . . . . . . . . . . . . . . . . . . . . . . . . . . . . . . . . . . . . . .34
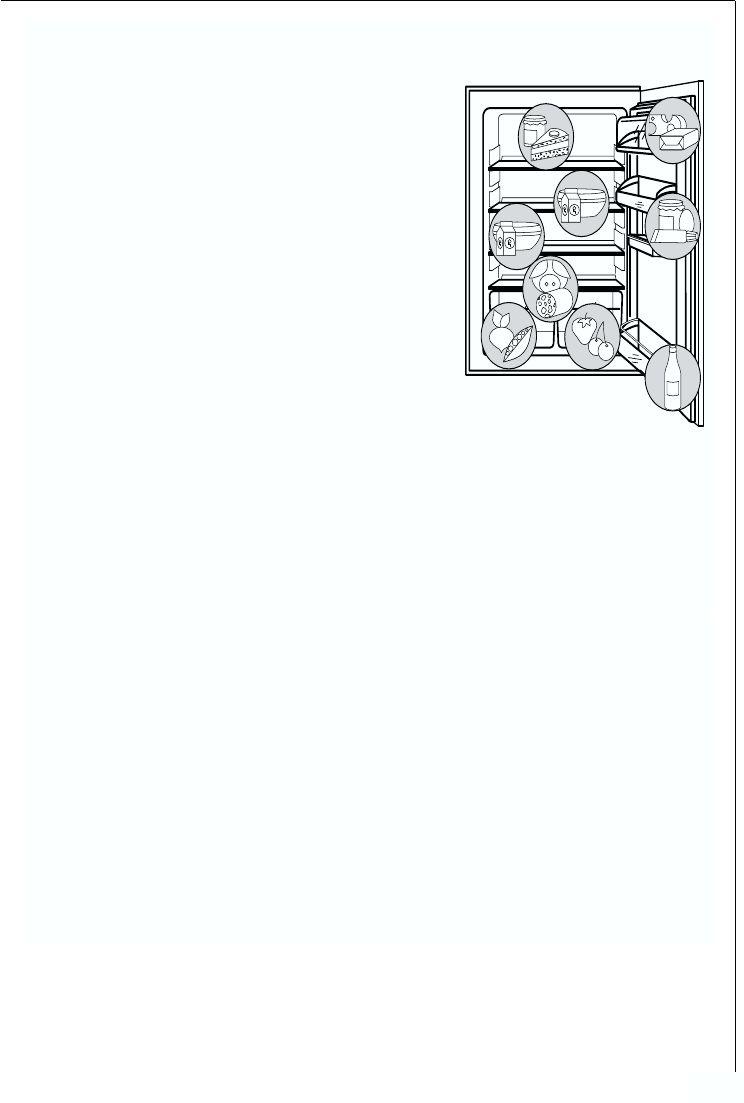
Correct storage. . . . . . . . . . . . . . . . . . . . . . . . . . . . . . . . . . . . . . . . . . . . . . . 35
Defrosting. . . . . . . . . . . . . . . . . . . . . . . . . . . . . . . . . . . . . . . . . . . . . . . . . . . 35
The fridge defrosts automatically . . . . . . . . . . . . . . . . . . . . . . . . . . . . . . . . . . 35
Cleaning and Care . . . . . . . . . . . . . . . . . . . . . . . . . . . . . . . . . . . . . . . . . . . . 36
Energy Saving Tips. . . . . . . . . . . . . . . . . . . . . . . . . . . . . . . . . . . . . . . . . . . . 36
What to do if ... . . . . . . . . . . . . . . . . . . . . . . . . . . . . . . . . . . . . . . . . . . . . . . 37
Correcting Malfunctions . . . . . . . . . . . . . . . . . . . . . . . . . . . . . . . . . . . . . . . . . 37
Changing the light bulb. . . . . . . . . . . . . . . . . . . . . . . . . . . . . . . . . . . . . . . . . . 38
Noises during Operation . . . . . . . . . . . . . . . . . . . . . . . . . . . . . . . . . . . . . . . 39
Regulations, Standards, Guidelines. . . . . . . . . . . . . . . . . . . . . . . . . . . . . . . 39
Customer Service . . . . . . . . . . . . . . . . . . . . . . . . . . . . . . . . . . . . . . . . . . . . . 40
Technical Terminology . . . . . . . . . . . . . . . . . . . . . . . . . . . . . . . . . . . . . . . . . 41
24
Important Safety Instructions
These warnings are provided in the interests of your safety. Ensure
you fully understand them before installing or using the appliance.
Your safety is of paramount importance. If you are unsure about the
meaning of these warnings contact the Customer Care Department
for assistance.
Intended use
The refrigerator is intended for use in the home. It is suitable for the
cooling food. If the appliance is used for purposes other than those
intended or used incorrectly, no liability can be accepted by the
manufacturer for any damage that may be caused.
Alterations or changes to the refrigerator are not permitted for rea-
sons of safety.
If you use the refrigerator in a commercial application or for purpo-
ses other than the cooling of foods, the manufacturer accepts no lia-
bility for any damages which may occur.
Prior to initial start–up
Check the appliance for transport damage. Under no circumstance
should a damaged appliance be plugged in. In the event of damage,
please contact your supplier.
Ensure that the appliance does not stand on the electrical supply
cable. Important: if the supply cable is damaged, it must be replaced
by a special cord or assembly available from the manufacturer or its
Customer Service.
Refrigerant
The refrigerant isobutane (R600a) is contained within the refrigerant
circuit of the appliance, a natural gas with a high level of environmen-
tal compatibility, which is nevertheless flammable.
Warning - During transportation and installation of the appliance,
be certain that none of the components of the refrigerant circuit
become damaged.
If the refrigerant circuit should become damaged:
– avoid open flames and sources of ignition;
– thoroughly ventilate the room in which the appliance is situated.
Safety of children
Packaging (e.g. wraps, polystyrene) can be dangerous for children.
There is a risk of suffocation! Keep packaging material away from
children!
25
Important Safety Instructions
Please make old appliances unusable prior to disposal. Pull out the
mains plug, cut off the mains cable, break or remove spring or bolt
catches, if fitted. By doing this you ensure that children cannot lock
themselves in the appliance when playing (there is risk of suffocati-
on!) or get themselves into other dangerous situations.
Often children cannot recognise the hazards present in household
appliances. It is therefore important that you ensure adequate super-
vision and never let children play with the appliance!
Daily Operation
Containers with flammable gases or liquids can leak at low tempera-
tures. There is a risk of an explosion! Do not store any containers
with flammable materials such as spray cans, fire extinguisher refill
cartridges etc in the refrigerator/freezer.
Warning - Do not operate any electrical appliances in the refrigera-
tor and/or freezer (e.g. electric ice cream makers, mixers etc.).
Warning - In order not to impair the function of the appliance,
never cover or obstruct the ventilation openings.
Warning - Do not damage the cooling circuit.
Before cleaning the appliance, always switch off the appliance and
unplug it, or disconnect from the electricity supply.
When unplugging always pull the plug from the mains socket, do not
pull on the cable.
In case of malfunction
If a malfunction occurs on the appliance, please look first in the
"What to do if ..." section of these instructions. If the information
given there does not help, please do not perform any further repairs
yourself.
This product should be serviced by an authorised engineer and only
genuine spare parts should be used.
Under no circumstances should you attempt to repair the appliance
yourself. Repairs carried out by inexperienced persons may cause
injury or serious malfunctioning. Contact your local Customer care
department.
26
Disposal
Appliance Packaging Information
All materials are environmentally sound! They can be disposed of or
burned at an incinerating plant without danger.
About the materials: The plastics can be recycled and are identified as
follows:
>PE< for polyethylene, e.g. the outer covering and the bags in the
interior.
>PS< for polystyrene foam, e.g. the pads, which are all free of chloro-
fluorocarbon.
The carton parts are made from recycled paper and should be disposed
of at a waste-paper recycling collection location.
Disposal of old Appliances
For environmental reasons, refrigeration appliances must be disposed
of properly. This applies to your old appliance, and - at the end of its
service life - for your new appliance as well.
Warning! Before disposing of old appliances make them inoperable.
Remove plug from mains, sever the power cable, remove or destroy any
snap or latch closures. This ensures that playing children do not lock
themselves inside the appliance (danger of suffocation!) or place
themselves into other life-endangering situations.
Disposal:
The appliance may not be disposed of with domestic waste or bulky
refuse.
The refrigerant circuit, especially the heat exchanger at the back of
the appliance, must not be damaged.
• The symbol on the product or on its packaging indicates that
this product may not be treated as household waste. Instead it shall
be handed over to the applicable collection point for the recycling of
electrical and electronic equipment. By ensuring this product is dis-
posed of correctly, you will help prevent potential negative conse-
quences for the environment and human health, which could other-
wise be caused by inappropriate waste handling of this product. For
more detailed information about recycling of this product, please
contact your local city office, your household waste disposal service
or the shop where you purchased the product.
27
Remove transport packaging
The appliance and the interior fittings are protected for transport.
1. Pull off the adhesive tape on the left and right side of the door.
2. Remove all adhesive tape and packing pieces from the interior of the
appliance.
Installation
Installation Location
The appliance should be set up in a well ventilated, dry room.
Energy use and efficient performance of the appliance is affected by
the ambient temperature.
The appliance should therefore
– not be exposed to direct sunlight;
– not be installed next to radiators, cookers or other sources of heat;
– only be installed at a location whose ambient temperature
corresponds to the climate classification, for which the appliance is
designed.
The climate classification can be found on the rating plate, which is
located at the left on the inside of the appliance.
The following table shows which ambient temperature is correct for
each climate classification:
Installation directly under a hob is not allowed. The temperatures of
the hob, which in part are quite high, may damage the appliance.
If a hob is installed near the appliance, the corresponding installation
and safety instructions must be adhered to. Considering the numerous
installation conditions which are possible, there is no way of providing
detailed information here.
Climate classification for an ambient temperature of
SN +10 to +32 °C
N +16 to +32 °C
ST +18 to +38 °C
T +18 to +43 °C
28
Installation
Your refrigerator needs ventilation
Integratable models (i-appliances)
The integrated door of the furniture cabi-
net largely seals the installation recess. i-
appliances must therefore be provided
with ventilation by having an opening in
the furniture plinth. The warmed air must
be able to be exhausted upwards through
the air shaft on the furniture back.
The ventilation cross-sections should be at
least 200 cm
2
.
Important note! In order not to impair the
function of the appliance, never cover or
obstruct the ventilation openings.
Models fitted for matching front panel (E-appliances)
Installation option 1 (optimum):
Optimum ventilation of E-appliances is
ensured through fresh air being able to
enter both under the appliance as well as
through an opening in the furniture
plinth. The warmed air must be able to be
exhausted upwards through the air shaft
(min. 200 cm
2
) on the furniture back.
min. 200 cm
2
min. 200 cm
2
50
It is necessary to avoid overheating of the refrigerator by maintaining
adequate distances from heat sources and by the use of a suitable
thermal insulation plate. Proper ventilation of the appliance must also
be ensured.
Installation
29
Installation option 2:
Operation of E-appliances is possible
even without a ventilation opening in
the furniture plinth. The fresh air able to
enter under the appliance is sufficient
for ventilation. The function and life of
the appliance are not impaired. The war-
med air must be able to be exhausted
upwards through the air shaft (min. 200
cm
2
) on the furniture back. If the appli-
ance is ventilated without a plinth ope-
ning, however, the energy consumption
may differ from that specified in the
brochure.
Important note! In order not to impair the function of the appliance,
never cover or obstruct the ventilation openings.
Installation
See installation instructions supplied.
Please check whether, after installing your appliance and especially
after rehingeing the door, the door seal seals right round. An untight
door seal may lead to heavy frosting and thereby to a higher power
consumption (see also „What to do if...“).
Electrical connection
A correctly installed, earthed socket is required for the electrical sup-
ply. The supply must have a fuse rating of at least 10 Amps. If the
socket is not accessible once the appliance is built in, the electrical
installation must include suitable means of isolating the appliance
from the mains (e.g. a fused spur).
Before initial start-up, refer to the appliance rating plate to ascertain
if supply voltage and current values correspond with those of the
mains at the installation location.
e.g.: AC 220 ... 240 V 50 Hz or
220 ... 240 V ~50 Hz
(i.e. 220 to 240 volts alternating current, 50 Hertz)
The rating plate is inside the appliance on the left.
The mains cable may only be changed by a qualified electrician or
30
Description of the appliance
View of the appliance
(various models)
1 = Temperature regulator and
interior lighting
2 = Butter and cheese compart-
ment with lid
3 = Variable storage box (not
included with all models,
design differs depending on
the model)
4 = Door storage compartment
5 = Bottle compartment
Bottle holder (not on all
models)
6 = Fruit and vegetable bins
7 = Shelves
8 = General purpose box (not
included with all models)
9 = Moisture regulation (not on
all models)
10 = Bottle / Can holder (not on
all models)
11 = Rating plate
competent person. If your appliance needs repairing, please contact
your local Customer Care Department.
31
Prior to Initial Start–Up
Please clean the appliance interior and all accessories prior to initial
start-up (see section: “Cleaning and Care”).
Starting up and temperature regulation
Important! Only use the appliance when built–in!
The temperature regulator is in the
refrigerator compartment on the upper
right. It is also the ON/OFF-switch.
Position „0“ = Refrigeration off
Position „1“ = Warmest interior tem-
perature
Position „6“ = Coldest interior
temperature
1. Plug the mains plug into the mains socket.
2. Set the required temperature by turning the temperature regulator.
The inside light goes on. The compressor starts and then runs automa-
tically.
Note: When the setting is changed, the compressor does not start
immediately if automatic defrosting is currently taking place.
Goods to be refrigerated can be loaded immediately after switching
on, because the storage temperature in the refrigerator is quickly
reached.
Note: From a food science point of view, +5 °C should be considered
cold enough as a storage temperature.
The following effects are of significance in respect of the interior tem-
perature:
Ambient temperature;
Quantity and temperature of the food stored;
Frequency with which the door is opened and how long it is left
open.
– A defect in the appliance.
The temperature regulator setting may therefore need to be adjusted
to suit the specific conditions.
AEG62
32
Switching off the appliance
1. To switch off the appliance, turn the temperature regulator to position
"0". The inside light goes out.
If the appliance is not going to be used for an extended period:
1. Switch off the appliance by turning the temperature regulator to posi-
tion "0". The inside light goes out.
2. Remove the mains plug or switch off or disconnect from the electricity
supply.
3. Clean thoroughly (see section: “Cleaning and Maintenance”).
4. Leave the door open to avoid the build up of odours.
Recommended settings:
Examples:
3. If you want a higher or lower temperature, turn the temperature regu-
lator to a warmer or cooler setting respectively.
Important!
High ambient temperatures (e.g. on hot summer days) and a cold set-
ting on the temperature regulator (position"5" to "6") can cause the
compressor to run continuously.
Reason: when the ambient temperature is high, the compressor must
run continuously to maintain the low temperature in the appliance.
The fridge will not be able to defrost since automatic defrosting of the
fridge is only possible when the compressor is not running (see also
"Defrosting" section). The result is the build up of a thick layer of frost
on the fridge rear wall.
If this happens, turn the temperature regulator back to a warmer set-
ting (position “4” to “5”). At this setting the compressor will be
switched on and off as usual and automatic defrosting recommenced.
Ambient temperature Temperature controller position
Approx. 10°C Range up to 1
Range about 2
Approx. 25°C Range about 2
Approx. 32°C 2 to 3
Approx. 38°C 1 to 2
Approx. 16°C
33
Interior Accessories
Storage Shelves/Storage Racks
Depending on the model, your appliance is equipped with either glass
storage shelves or storage racks. The glass shelf above the fruit and
vegetable compartment must always remain in this position so that
fruit and vegetables stay fresh longer.
The remaining storage shelves can be adjusted to various heights:
1. Pull the storage shelf forward until
it can be tipped up or down and
removed.
2. To insert at a different height use
the same procedure in reverse.
Adjustment for tall goods (not for
all models):
Remove the front half of the two-
part vario glass storage shelf and
insert it at a different level. Space is
thus gained for storage of tall goods
on the underlying storage shelf.
Variable Inner Door
The door compartments can be pulled up and removed, and inserted at
other positions as needed.
Bottle Holder
(not on all models)
On some models there is a bottle holder
in the bottle compartment. This is used to
prevent individual bottles from falling
over and can be slid sideways.
34
Interior Accessories
Moisture regulation (not on all models)
On some models, there is an adjusta-
ble air grille in front of the shelf
above the fruit and vegetable com-
partments.
The opening in the ventilation slots
can be steplessly adjusted with a sli-
der.
Slider in right position: Ventilation
slots opened.
Slider in left position: Ventilation slots closed.
With the ventilation slots open, the stronger air circulation results in a
lower air moisture content in the fruit and vegetable compartments.
When the ventilation slots are closed, the natural moisture content of
the food in the fruit and vegetable compartments is preserved for lon-
ger.
Variable Storage Box
(not on all models, design differs depending on the model)
Some models are equipped with a variable storage box which is fitted
under a door shelf compartment and can be slid sideways.
The box can be inserted under
every door shelf compartment.
1. To change, lift the shelf compart-
ment with the box upwards and
out of the holders in the door and
remove the retaining bracket out
of the guide under the shelf com-
partment.
2. Please do the same in reverse to
insert the shelf at a different
height.
The variable box can be hung from a
storage shelf in the refrigerator com-
partment:
1. Pull the storage shelf forward until it
can be tipped up or down and removed.
2. Hang the retaining bracket on the taper
on the storage shelf and slide the stor-
age shelf back into the guides.
35
Defrosting
The fridge defrosts automatically
The rear wall of the fridge covers with frost when the compressor is
running, and defrosts when the compressor is off.
The water from the thawing frost is collected in the drain channel on
the rear of the fridge, feed through the drain hole into the collector
on the compressor, and then evaporated.
The water drainage hole must be cleaned regularly (see the section
"Cleaning and Maintenance").
Correct Storage
For physical reasons, there are different
temperature regions in the fridge.
The coldest region is on the lowest stora-
ge shelf.
Warmer regions are the top storage shelf,
the vegetable basket and the storage
compartments on the door.
The arrangement example shows at
which places in the refrigerator suitable
temperatures for various types of foods
exist.
Tip: Food in the fridge should always be
covered or packaged, to prevent drying
and tainting of other food.
The following are suited for packaging:
– Polyethylene airtight bags and wraps;
– Plastic containers with lids;
– Special plastic covers with elastic;
– aluminium foil.
36
Cleaning and Care
For hygienic reasons the appliance interior, including interior acces-
sories, should be cleaned regularly.
Warning!
The appliance may not be connected to the mains during cleaning.
Danger of electrical shock! Before cleaning switch the appliance off
and remove the plug from the mains, or switch off or turn out the
circuit breaker or fuse.
Never clean the appliance with a steam cleaner. Moisture could
accumulate in electrical components, danger of electrical shock! Hot
vapours can lead to the damage of plastic parts.
The appliance must be dry before it is placed back into service.
Important!
Ethereal oils and organic solvents can attack plastic parts, e.g.
– lemon juice or the juice from orange peel;
– butyric acid;
– cleansers which contain acetic acid.
Do not allow such substances to come into contact with appliance
parts.
Do not use any abrasive cleansers.
1. Remove the food from the refrigerator. Store it in a cool place, well
covered.
2. Remove the mains plug or switch off or disconnect from the electricity
supply.
3. Remove frost from time to time with a soft plastic scraper, e.g. a pastry
scraper. Under no circumstances use hard or pointed objects to remove
frost.
4. Clean the appliance and the interior accessories with a cloth and luke-
warm water. Commercially available dish washing detergents may also
be used.
5. After cleaning wipe with fresh water and rub dry.
6. Regularly unblock the condensation
water drainage hole in the rear wall
of the refrigeration chamber with the
aid of the green strip inserted into
the drainage hole.
7. After everything is dry place appli-
ance back into service.
37
What to do if ...
Correcting Malfunctions
A malfunction may be caused by only a minor fault that you can recti-
fy yourself using the following instructions. Do not perform any other
work on the appliance if the following information does not provide
assistance in your specific case.
Important! Repairs to refrigerators/freezers may only be performed by
competent service engineers. Improper repairs can give rise to signifi-
cant hazards for the user. If your appliance needs repairing, please
contact your specialist dealer or our local Customer Service.
Energy Saving Tips
Do not install the appliance near boilers, radiators or other sources
of heat. High ambient temperatures cause longer, more frequent
operation of the compressor.
Ensure sufficient air circulation and exhaust at the appliance base
and at the back wall of the appliance. Never cover air vent openings.
Do not place warm foods into the appliance. Allow warm foods to
cool first.
Only leave door open as long as necessary.
Do not set temperature any colder than necessary.
Symptom Possible Cause Remedy
Appliance does not work.
Appliance is not switched
on.
Mains plug is not plugged
in or is loose.
Fuse has blown or is
defective
Socket is defective.
Mains malfunctions are to
be corrected by an
electrician.
Temperature is set too
cold.
Turn the temperature
regulator to a warmer set-
ting temporarily.
Switch on the appliance.
Insert mains plug.
Check fuse, replace if nec-
essary.
Appliance cools too much.
38
What to do if ...
Changing the light bulb
Warning! There is a risk of electric shocks! Before changing the light
bulb, switch off the appliance and unplug it, or pull the fuse or the
circuit breaker.
Light bulb data: 220-240 V, max. 15 W
1. To switch off the appliance, turn the temperature regulator to
position "0".
2. Unplug the mains plug.
Symptom Possible Cause Remedy
The food is too warm.
Temperature is not proper-
ly adjusted.
Please look in the “Starting
up and temperature regu-
lation” section.
Door was open for an
extended period.
A large quantity of warm
food was placed in the
appliance within the last
24 hours.
The appliance is near a
heat source.
Open the door only as long
as necessary.
Turn the temperature
regulator to a colder set-
ting temporarily.
Please look in the
“Installation location” section.
Light bulb is defective.
Interior lighting does not
work.
Please look in the “Changing
the Light Bulb” sections.
Heavy build up of frost,
possibly also on the door
seal.
Door seal is not air tight
(possibly after reversing
the door).
Carefully warm the leaking
sections of the door seal
with a hair dryer (on a
cool setting). At the same
time shape the warmed
door seal by hand such
that it sits correctly.
The compressor does not
start immediately after
changing the temperature
setting.
This normal, no error has
occurred.
Water on the floor or on
storage shelves.
Water drain hole is
blocked.
See the “Cleaning and
Care” section.
The compressor starts after
a period of time.
39
3. To change the light bulb, undo the
cross head screw and remove the light
bulb cover.
4. Change the defective light bulb.
5. Refit the light bulb cover and the
cross head screw.
6. Put the refrigerator back into
operation.
AEG65
Noises during Operation
The following noises are characteristic of refrigeration appliances:
Clicks
Whenever the compressor switches on or off, a click can be heard.
Humming
As soon as the compressor is in operation, you can hear it humming.
Bubbling/Splashing
When refrigerant flows into thin tubes, you can hear bubbling or
splashing noises. Even after the compressor has been switched off,
this noise can be heard for a short time.
Regulations, Standards, Guidelines
This appliance was designed for household use and was manufactured
in accordance with the appropriate standards. The necessary measures
in accordance with appliance safety legislation regulations (GSG), acci-
dent prevention regulations for refrigeration appliances (VBG 20) and
the regulations of the German Society of Electrical Engineers (VDE)
were observed in the manufacture of this appliance.
The refrigerant circuit has been checked for leaks.
This appliance is in accordance with the following EU guidelines:
– 73/23/EWG dated 19 February 1973 - low voltage guidelines.
– 89/336/EWG dated 3 May 1989
(including guideline change notice 92/31/EWG) - EMV guideline
– 94/2/EG dated 21.01.1994 - Directive on Energy Labelling
– 96/57 EG dated 3.9.1996 - Energy Efficiency Requirements of
Household Electric Refrigerators, Freezers and Combinations Thereof.
40
Customer Service
If you cannot find the remedy for a malfunction in these operating instruc-
tions, please contact your dealer or our customer service department.
Addresses and telephone numbers are listed in the accompanying booklet
"Guarantee Conditions/Customer Service Locations".
Selective ordering of replacement parts can save unnecessary travel and costs.
For this reason always provide the following appliance information:
• Model Name
• Model Number (PNC)
• Serial Number (S-No.)
This information can be found on the serial plate in the interior at the left of
the appliance. We recommend that you enter this information here, so that it
is handy if needed.
Note: The customer bears the costs of unjustified customer service calls even
during the guarantee period.
Technical Terminology
Refrigerant Liquids that can be used to a generate a cooling effect are
known as refrigerants. They have a relatively low boiling-point, indeed so
low, that the warmth from the food stored in the fridge or freezer can
cause the refrigerant to boil and vaporise.
Refrigerant Circuit Closed circulation system that contains the refrig-
erant. The refrigerant circuit comprises primarily of an evaporator, a com-
pressor, a condenser and pipe work.
Evaporator The refrigerant is evaporated in the evaporator. Similar to all
other liquids, refrigerant requires heat to evaporate. This heat is removed
from the interior of the appliance, as a result the interior is cooled. The
evaporator is therefore located inside the appliance or placed in foam
immediately behind the inner wall and thus not visible.
Compressor The compressor looks like a small drum. It is driven by a
built-in electric motor and is mounted on the base of the appliance at the
rear. The task of the compressor is to draw in vaporised refrigerant from the
evaporator, to compress it, and to pass it on to the condenser.
Condenser
The condenser normally has the form of a grid. The refrigerant compressed
in the compressor is liquefied in the condenser. During this process, heat is
released to the surrounding air at the surface of the condenser. The con-
denser is mounted on the base of the appliance.
41
Chère cliente, cher client
Nous vous remercions d'avoir choisi un de nos produits.
Tout au long de son utilisation, vous ferez l'expérience d'une combinaison
parfaite entre design fonctionnel et technologie d'avant-garde.
Sa fabrication est basée sur les standards les plus élevés de l'excellence. Votre
appareil a été ainsi conçu pour vous fournir les meilleures performances tout
en respectant les aspects environnementaux et d'économie d'énergie.
Nous vous conseillons de lire attentivement cette notice d'utilisation et de la
conserver à proximité pour une utilisation optimale.
Pensez également à la transmettre au prochain utilisateur.
Nous vous souhaitons beaucoup de plaisir avec votre appareil A.E.G.
Electrolux.
Les symboles suivants sont utilisés dans cette notice d’utilisation
Informations importantes concernant votre sécurité personnelle et consignes
pour éviter tout endommagement de l'appareil
Informations générales et conseils
Information environnementale
42
Sommaire
Sécurité. . . . . . . . . . . . . . . . . . . . . . . . . . . . . . . . . . . . . . . . . . . . . . . . . . . . . 43
Protection de l’environnement . . . . . . . . . . . . . . . . . . . . . . . . . . . . . . . . . . 45
Information sur l’emballage de l’appareil . . . . . . . . . . . . . . . . . . . . . . . . . . . 45
Mise au rebut des anciens appareils. . . . . . . . . . . . . . . . . . . . . . . . . . . . . . . . 45
Retrait de la protection pour le transport . . . . . . . . . . . . . . . . . . . . . . . . . 46
Installation . . . . . . . . . . . . . . . . . . . . . . . . . . . . . . . . . . . . . . . . . . . . . . . . . . 46
Emplacement. . . . . . . . . . . . . . . . . . . . . . . . . . . . . . . . . . . . . . . . . . . . . . . . . . . 46
L’appareil frigorifique a besoin d’air. . . . . . . . . . . . . . . . . . . . . . . . . . . . . . . . 47
Encastrement. . . . . . . . . . . . . . . . . . . . . . . . . . . . . . . . . . . . . . . . . . . . . . . . . . . 48
Branchement électrique . . . . . . . . . . . . . . . . . . . . . . . . . . . . . . . . . . . . . . . . . . 48
Description de l’appareil . . . . . . . . . . . . . . . . . . . . . . . . . . . . . . . . . . . . . . . 49
Vue de l’appareil . . . . . . . . . . . . . . . . . . . . . . . . . . . . . . . . . . . . . . . . . . . . . . . 49
Avant la mise en service . . . . . . . . . . . . . . . . . . . . . . . . . . . . . . . . . . . . . . . 50
Mise en service et réglage de la temperature . . . . . . . . . . . . . . . . . . . . . . 50
Arrêt de l’appareil . . . . . . . . . . . . . . . . . . . . . . . . . . . . . . . . . . . . . . . . . . . . 51
Equipement intérieur. . . . . . . . . . . . . . . . . . . . . . . . . . . . . . . . . . . . . . . . . . 52
Clayettes. . . . . . . . . . . . . . . . . . . . . . . . . . . . . . . . . . . . . . . . . . . . . . . . . . . . . . . 52
Porte intérieure réglable . . . . . . . . . . . . . . . . . . . . . . . . . . . . . . . . . . . . . . . . . 52
Porte-bouteille . . . . . . . . . . . . . . . . . . . . . . . . . . . . . . . . . . . . . . . . . . . . . . . . . 53
Contrôle de l’humidité.. . . . . . . . . . . . . . . . . . . . . . . . . . . . . . . . . . . . . . . . . . . 53
Boîte variable . . . . . . . . . . . . . . . . . . . . . . . . . . . . . . . . . . . . . . . . . . . . . . . . . .53
Rangement correct . . . . . . . . . . . . . . . . . . . . . . . . . . . . . . . . . . . . . . . . . . .54
Dégivrage . . . . . . . . . . . . . . . . . . . . . . . . . . . . . . . . . . . . . . . . . . . . . . . . . .55
Le compartiment réfrigérateur dégivre automatiquement . . . . . . . . . . . . . .55
Entretien et nettoyage. . . . . . . . . . . . . . . . . . . . . . . . . . . . . . . . . . . . . . . . . 55
Conseils d’économie d’énergie . . . . . . . . . . . . . . . . . . . . . . . . . . . . . . . . . . 56
Que faire si ... . . . . . . . . . . . . . . . . . . . . . . . . . . . . . . . . . . . . . . . . . . . . . . . . 57
En cas d’anomalie de fonctionnement . . . . . . . . . . . . . . . . . . . . . . . . . . . . . . 57
Remplacement de l’ampoule d’éclairage . . . . . . . . . . . . . . . . . . . . . . . . . . . . 58
Bruits de fonctionnement . . . . . . . . . . . . . . . . . . . . . . . . . . . . . . . . . . . . . . 59
Règlements, normes, directives. . . . . . . . . . . . . . . . . . . . . . . . . . . . . . . . . . 59
Termes techniques . . . . . . . . . . . . . . . . . . . . . . . . . . . . . . . . . . . . . . . . . . . . 60
43
Sécurité
La sécurité de nos appareils est conforme aux règles reconnues de la
technique et à la loi sur la sécurité des appareils. Nous nous voyons
cependant obligés de vous familiariser avec les conseils de sécurité sui-
vants:
Utilisation conforme à la destination
• L’appareil frigorifique est conçu pour une utilisation domestique. Il
est adapté à la réfrigération de produits alimentaires. En cas d’emploi
non conforme de l’appareil, le fabricant ne peut endosser aucune
responsabilité en cas de dommages éventuels.
• Pour des raisons de sécurité, il est interdit de modifier ou de trans-
former l’appareil frigorifique.
• Si l’appareil frigorifique est utilisé pour un usage professionnel ou
dans des buts autres que la réfrigération d’aliments, observer les dis-
positions légales correspondantes en vigueur.
Avant la première mise en service
• Contrôlez l’appareil pour dégâts de transport éventuels. Ne brancher
en aucun cas un appareil endommagé! En cas de dommage, veuillez
vous adresser au fournisseur.
• Assurez-vous, après avoir installé l’appareil, que celui-ci ne repose
pas sur le câble d’alimentation. Important: en cas de dommage du
câble d’alimentation, il faudra le remplacer avec un câble spécial ou
un ensemble disponible chez le fabricant ou le service consomma-
teurs.
Frigorigène
Le circuit frigorifique de l’appareil contient un frigorigène, l’isobutane
(R600a), un gaz naturel peu polluant mais inflammable.
Avertissement - Lors du transport et de l’installation de l’appareil,
veiller à n’endommager aucune partie du circuit frigorifique.
• En cas d’endommagement du circuit frigorifique:
- éviter impérativement les flammes ouvertes et les sources d’inflam-
mation;
- bien ventiler la pièce dans laquelle se trouve l’appareil.
Sécurité des enfants
• Les matériaux d’emballage (p. ex. films, mousse de polystyrène) peu-
vent être dangereux pour les enfants. Danger de suffocation ! Main-
tenir les matériaux d’emballage hors de portée des enfants.
• Veuillez rendre inutilisables les appareils arrivés en fin de vie avant de
les éliminer. Enlever la fiche de la prise de courant, couper le cordon
d’alimentation, enlever ou détruire les fermetures à coulisse ou à ver-
Sécurité
44
rou éventuellement présentes. Vous évitez de la sorte que des enfants
qui jouent puissent s’enfermer dans l’appareil (Danger de suffoca-
tion!) ne se mettent dans d’autres types de situation de danger mor-
tel.
• Les enfants ne peuvent souvent pas reconnaître les dangers inhérents
à la manipulation d’appareils ménagers. Veillez pour cette raison à la
surveillance nécessaire et ne laissez jamais les enfants jouer avec
l’appareil!
Dans le cadre du fonctionnement quotidien
• Les récipients contenant des gaz ou des liquides sous pression peu-
vent devenir perméables sous l’effet du froid. Danger d’explosion!
N’entreposez pas de récipients contenant des substances inflamma-
bles tels que bombes, briquets, cartouches de recharge, etc. dans
l’appareil.
Avertissement - Ne pas faire fonctionner d’appareils électriques (par
ex. de sorbetières électriques, de mélangeurs, etc.) à l’intérieur de
l’appareil frigorifique.
Avertissement - Ne pas fermer les ouvertures de ventilation des
parois de l'appareil ni de la structure des meubles d'encastrement.
• Avant tous travaux de nettoyage, mettre par principe l’appareil hors
service et tirer la fiche de la prise ou couper le fusible ou le tirer.
• Tirer toujours sur la fiche pour débrancher celle–ci, jamais sur le
câble.
En cas de dérangement
• Si votre appareil devait un jour présenter un défaut, veuillez consul-
ter d’abord ce mode d’emploi à la section "Que faire si ...". Si les indi-
cations qui y sont mentionnées ne vous aident pas, n’exécutez pas de
travaux par vous–même.
• Les appareils frigorifiques peuvent uniquement être réparés par des
spécialistes. Des réparations incorrectes peuvent être source de dan-
gers très graves. En cas de réparation, adressez–vous à votre reven-
deur spécialisé ou à notre service après–vente.
45
Elimination
Information sur l’emballage de l’appareil
Tous les matériaux utilisés sont non polluants! Ils peuvent être déposés
sans danger à une décharge ou incinérés!
Matériaux: Les matières plastiques peuvent également être recyclées et
sont repérées de la manière suivante:
>PE< pour le polyéthylène, par ex. pour l’enveloppe extérieure et les
sachets à l’intérieur.
>PS< pour la mousse de polystyrène, par ex. pour les éléments de rem-
bourrage, toujours sans CFC.
Les éléments en carton sont réalisés à partir de papier recyclé et doi-
vent être ramenés à la collecte de vieux papiers.
Mise au rebut des anciens appareils
Pour des raisons de protection de l’environnement, les appareils frigori-
fiques doivent être éliminés dans les règles de l’art. Cette règle s’appli-
que à votre appareil précédent ainsi qu’à votre nouvel appareil, lors-
qu’il ne servira plus.
Attention ! Avant l’élimination, rendre les vieux appareils inutilisables.
Débrancher la fiche secteur, sectionner le câble d’alimentation, retirer
ou détruire les éventuelles fermetures à houssette ou à verrou. Ceci a
pour but d’empêcher des enfants de s’enfermer dans l’appareil par jeu
(risque d’asphyxie!) ou de se mettre dans d’autres situations dangereu-
ses pouvant être mortelles.
Consignes d’élimination :
• L’appareil ne doit pas être mis avec les ordures ménagères ou les
déchets encombrants.
• Le circuit frigorifique, en particulier l’échangeur thermique au dos de
l’appareil, ne doit pas être endommagé.
• Le symbole sur le produit ou son emballage indique que ce pro-
duit ne peut être traité comme déchet ménager. Il doit plutôt être
remis au point de ramassage concerné, se chargeant du recyclage du
matériel électrique et électronique. En vous assurant que ce produit
est éliminé correctement, vous favorisez la prévention des consé-
quences négatives pour l’environnement et la santé humaine qui,
sinon, seraient le résultat d’un traitement inapproprié des déchets de
ce produit. Pour obtenir plus de détails sur le recyclage de ce produit,
veuillez prendre contact avec le bureau municipal de votre région,
46
votre service d’élimination des déchets ménagers ou le magasin où
vous avez acheté le produit.
Retrait de la protection pour le transport
L’appareil et certaines parties de l’équipement intérieur sont protégés
pour le transport.
1. Enlevez les bandes autocollantes à gauche et à droite à l’extérieur de la
porte.
2. Enlevez toutes les bandes autocollantes et rembourrages à l’intérieur
de l’appareil (sauf la plaque signalétique).
Installation
Emplacement
Placez de préférence votre appareil loin d’une source de chaleur
(chauffage, cuisson ou rayons solaires trop intenses) dans un local bien
ventilé et sec.
La température ambiante influence sur la consommation électrique et
le bon fonctionnement de l’appareil.
Pour son bon fonctionnement, il est impératif de respecter les tempé-
ratures ambiantes du local où doit être placé l’appareil, suivant la clas-
se climatique (indiquée sur la plaque signalétique) pour lequel il est
prévu. Au delà de ces températures, ses performances peuvent s’en
trouver diminuées.
Le tableau ci-dessous vous permet de repérer les différentes classes cli-
matiques existantes et les températures ambiantes correspondantes en
fonction du modèle de l’appareil.
Classe climatique pour une température ambiante de
SN +10 à +32 °C
N +16 à +32 °C
ST +18 à +38 °C
T +18 à +43 °C
Modèles habillables
(appareils version E)
Possibilité d’encastrement 1 (optimale):
Une aération optimale des appareils ver-
sion E est assurée quand l’air frais peut
entrer non seulement sous l’appareil, mais
aussi à travers un orifice dans le socle du
meuble. L’air réchauffé doit pouvoir
s’échapper vers le haut, par le dégage-
ment d’aération (au moins
200 cm
2
) à l’arrière du meuble.
47
Installation
Le montage direct sous une table de cuisson n’est pas permis. Les tem-
pératures, en partie élevées, de la table de cuisson peuvent endomma-
ger l’appareil.
Si une table de cuisson est installée près de l’appareil, les relatives
prescriptions de montage et de sécurité doivent être respectées. Étant
donné les multiples conditions possibles d’installation, il est impossible
de fournir ci-contre des informations détaillées.
Il est recommandé d’éviter le réchauffement du réfrigérateur en main-
tenant une distance adéquate de toutes sources de chaleur et en utili-
sant une plaque d’isolation thermique appropriée. La correcte ventila-
tion de l’appareil doit en outre être garantie.
L’appareil frigorifique a besoin d’air
Modèles intégrables (appareils version i)
La porte intégrée de l’élément de cuisine
rend la niche d’encastrement en grande
partie étanche. C’est la raison pour laquel-
le l’entrée d’air pour les appareils version i
doit se faire conformément à la fig. à tra-
vers un orifice dans le socle du meuble.
L’air réchauffé doit pouvoir s’échapper
vers le haut, par le dégagement d’aération
à l’arrière du meuble. Les sections d’aérati-
on doivent avoir au moins 200 cm
2
.
Attention! Afin de ne pas gêner le bon
fonctionnement de l’appareil, les orifices
d’aération ne doivent pas être recouverts
ou obstrués.
min. 200 cm
2
min. 200 cm
2
50
48
Installation
Encastrement
Voir les instructions de montage ci-jointes.
Après l’encastrement de l’appareil, en particulier après le changement
du côté d’ouverture de la porte, veuillez vérifier si le joint de la porte
assure une étanchéité correcte tout autour de la porte. Un joint de
porte non étanche peut entraîner une formation plus forte de givre et
donc une consommation plus élevée d’énergie (voir également chapitre
„Que faire si...“).
Branchement électrique
Une prise de courant avec contact de terre installée réglementaire-
ment est nécessaire pour le raccordement électrique. Elle devrait être
placée de façon à pouvoir retirer la fiche du câble d’alimentation.
La protection électrique doit admettre un courant d’au moins 10
ampères.
Si la prise de courant n’est plus accessible lorsque l’appareil est mis en
place, un dispositif approprié de l’installation électronique doit garantir
que l’appareil puisse être coupé du réseau (p. ex. fusible, disjoncteur,
disjoncteur différentiel ou équivalent avec ouverture de contact d’au
moins 3 mm).
Possibilité d’encastrement 2:
Le fonctionnement des appareils version
E est possible également sans orifice
d’aération dans le socle du meuble. L’air
frais, qui peut entrer sous l’appareil, suf-
fit pour l’aération. Il n’est pas porté
atteinte de ce fait au fonctionnement et
à la durée de vie de l’appareil. L’air
réchauffé doit pouvoir s’échapper vers
le haut, par le dégagement d’aération
(au moins 200 cm
2
) à l’arrière du
meuble. En cas d’aération sans orifice
dans le socle, il se peut cependant que
la consommation d’énergie diverge par rapport aux indications don-
nées dans le prospectus.
Attention! Afin de ne pas gêner le bon fonctionnement de l’appareil,
les orifices d’aération ne doivent pas être recouverts ou obstrués.
49
Avant la mise en service, vérifier sur la plaque signalétique de l’appareil
si la tension d’alimentation et le type de courant correspondent aux
valeurs du réseau électrique du lieu d’installation.
P. ex. : AC 220 ... 240 V 50 Hz ou
220 ... 240 V ~50 Hz
(c–à–d courant alternatif 220 à 240 volts, 50 Hertz)
La plaque signalétique se trouve à gauche à l’intérieur de l’appareil.
Description de l’appareil
Vue de l’appareil (différents modèles)
1 = Régulateur de température
et l’éclairage intérieur
2 = Compartiment à beurre/à
fromage avec clapet
3 = Boîte de rangement variable
(exécution variable suivant
les modèles, pas dans tous
les modèles)
4 = Compartiment de porte
5 = Compartiment à bouteilles
Porte-bouteilles (pas pour
tous les modèles)
6 = Tiroir à fruits/à légumes
7 = Clayettes (étagères)
8 = Boîte universelle (pas dans
tous les modèles)
9 = Régulation d'humidité (pas
pour tous les modèles)
10 = Support de bouteilles/boîtes
(pas pour tous les modèles)
11 = Plaque signalétique
50
Mise en service et réglage de la température
Attention! Ne faire fonctionner l’appareil que lorsqu’il est installé!
Le régulateur de température se trouve
en haut à droite dans le compartiment
de réfrigération. Il sert en même temps
d’interrupteur MARCHE/ARRET.
Position „0“ = arrêt
Position „1“ = température intérieure
la plus chaude
Position „6“ = température intérieure la plus froide
1. Branchez la fiche dans la prise de courant.
2. Régler la température souhaitée en tournant le régulateur de tempéra-
ture. L'éclairage intérieur s'allume. Le compresseur tourne et travaille
alors automatiquement.
Vu que la température du réfrigérateur est atteinte rapidement, celui-
ci peut être garni immédiatement après la mise en marche.
Indication: En cas de modification du réglage de température, le com-
presseur ne démarre pas immédiatement si le dégivrage automatique
est en cours.
Du point de vue des spécialistes de l’alimentation, la température de
+5°C pour le compartiment de réfrigération peut être considérée
comme une température de stockage suffisamment basse.
La température intérieure est influencée par les facteurs suivants :
– température ambiante ;
– quantité et température des aliments entreposés ;
– ouvertures fréquentes ou de longue durée de la porte ;
– défaut de l’appareil.
Aussi le réglage de la température doit-il éventuellement être adapté
aux circonstances.
AEG62
Avant la mise en service
Nettoyer l’intérieur de l’appareil et tous les équipements avant la pre-
mière mise en service (voir “Nettoyage et entretien”).
51
Recommandations de réglage:
Exemples:
3. Si vous souhaitez une température plus élevée ou plus faible, tournez
le régulateur de température sur un réglage plus chaud ou plus froid.
Important!
Une température ambiante élevée (p. ex. lors de chaudes journées
d’été) et un réglage sur une température très froide (position «5» à «6»)
peuvent conduire au fonctionnement permanent du compresseur.
Raison: en cas de température ambiante élevée, le compresseur doit
tourner en permanence pour maintenir la basse température à l’inté-
rieur de l’appareil. Dans ce cas, le compartiment frigo ne dégivre plus –
le dégivrage automatique du compartiment frigo est uniquement pos-
sible lorsque le compresseur est à l’arrêt (voir également section
«Dégivrage»).
Une formation importante de givre à la paroi arrière du compartiment
frigo en est la conséquence.
Dans ce cas, mettre le régulateur de température sur un réglage plus
chaud (position «4» à «5»). Pour ce réglage, le compresseur est régulé et
le processus de dégivrage a de nouveau lieu automatiquement.
Température ambiante
Position du bouton de réglage de
température
env. 10°C Plage jusque 1
env. 16°C Plage autour de 2
env. 25°C Plage autour de 2
env. 32°C 2 à 3
env. 38°C 1 à 2
Arrêt de l’appareil
Pour mettre le refroidissement hors service, mettre le régulateur de
température en position "0". L'éclairage intérieur s'éteint.
Si l’appareil doit rester longtemps hors service:
1. Débranchez l’appareil, à cet effet tourner le régulateur de température
sur "0". L'éclairage intérieur s'éteint.
2.
Débranchez et videz l’appareil.
52
Equipement intérieur
Clayettes
Selon le modèle votre appareil est équipé de clayette(s) à fil et/ou en
verre.
La surface de rangement en verre au-dessus du bac à légumes doit
toujours rester dans cette position, afin que les fruits et légumes res-
tent frais plus longtemps.
Les autres clayettes sont réglables en
hauteur:
1. Tirez la clayette vers l’avant jusqu’à
ce qu’elle puisse basculée vers le bas
ou vers le haut tout en la mainte-
nant et retirez-la.
2. Pour la mise en place à une autre
hauteur, procédez dans l’ordre inver-
se.
Pour conserver des produits de grande
hauteur (pas dans tous les modèles):
Sortez la moitié avant de la clayette en
verre Vario en deux parties et glissez-la
à un autre niveau. Ceci permet de
gagner la place nécessaire pour placer
des produits hauts sur la tablette de
rangement qui se trouve en dessous.
Porte intérieure réglable
Si nécessaire, les rangements de la porte peuvent être retirés vers le
haut et placés dans d’autres logements.
3. Dégivrez et nettoyez soigneusement l’appareil (voir chapitre
«Nettoyage et entretien»).
4. Maintenez les portes entrouvertes pendant toute la durée de non-utili-
sation afin d'éviter la formation de mauvaises odeurs.
53
Equipement intérieur
Porte-bouteille
(pas dans tous les modèles)
Dans certains modèles, un support de bou-
teilles est placé dans le compartiment à
bouteilles. Il sert à empêcher les bouteilles
de se renverser et peut être déplacé
latéralement.
Contrôle de l’humidité (pas dans tous les modèles)
La clayette inferieure en verre est
équipée d’un dispositif muni de
fentes dont les ouvertures sont
réglables à I’aide d’un levier coulis-
sant.
Le rôle de ce filtre est de retarder la
déshydratation des fruits et légumes
dans le bac à légumes ce qui permet
d’augmenter considérablement leur conservation.
Lorsque les fentes sont fermées, le taux d’humidité est plus élevé.
Lorsque les fentes sont ouvertes, le taux d’humidité est plus bas.
Si vous êtes amené à retirer cette clayette (lors du nettoyage par
exemple), veillez à la replacer correctement.
Boîte variable
(pas dans tous les modèles, réalisation variable suivant les modèles)
Certains modèles sont équipés d'une boîte variable fixée sous un bal-
connet de porte et pouvant être déplacée latéralement.
Cette boîte peut être rangée en
dessous de chaque balconnet de
porte.
1. Pour la changer de place, soulevez
le compartiment de rangement
avec la boîte vers le haut hors des
logements dans la porte et enlevez
l'étrier de retenue hors du guide en
dessous du balconnet de range-
ment.
54
Rangement correct
Pour des raisons physiques, il existe
des zones de températures diffé-
rentes dans le compartiment réfri-
gérateur. La zone la plus froide se
trouve sur la surface de rangement
inférieure. Les zones plus chaudes
sont la surface de rangement supé-
rieure et les surfaces de rangement
dans la porte. L’exemple ci-contre
indique à quel endroit du réfrigéra-
teur se trouvent les zones de tem-
pératures appropriées pour diffé-
rents types d’aliments.
Conseil: Les aliments devraient tou-
jours être placés couverts ou
emballés dans le compartiment sur-
gélateur, afin d’éviter la transmis-
sion d’odeurs ou de goûts à d’autres aliments.
Pour l’emballage, utiliser :
– des sachets et films de congélation en polyéthylène;
– des récipients en matière plastique avec couvercle;
– des housses spéciales en plastique avec élastique;
– du papier aluminium.
2. Pour le placement dans un autre balconnet de rangement, veuillez pro-
céder en ordre inverse.
La boîte variable peut être suspendue latéralement à une tablette de
rangement du compartiment de réfrigération:
1. Pour ce faire, tirer la tablette en avant
jusqu'à pouvoir la basculer vers le haut
ou le bas et la retirer.
2. Suspendre l'étrier de fixation au rétré-
cissement de la tablette de rangement
et remettre la tablette dans les gui-
dages.
55
Dégivrage
Le compartiment réfrigérateur dégivre automatiquement
La paroi arrière du compartiment frigo se couvre de givre pendant le
fonctionnement du compresseur et dégivre lorsque le compresseur est
à l’arrêt.
L’eau de dégivrage est recueillie dans la goulotte à l’arrière du compar-
timent frigo, est guidée à travers le trou d’écoulement dans un bac-
collecteur sur le compresseur, où elle s’évapore.
Le trou d'écoulement de l'eau de dégivrage doit être nettoyé régulière-
ment (voir chapitre «Nettoyage et entretien»).
Nettoyage et entretien
Pour des raisons d’hygiène, il est nécessaire de nettoyer régulièrement
l’intérieur de l’appareil, y compris les équipements intérieurs.
Avertissement!
• Pendant le nettoyage, l’appareil ne peut pas être raccordé au secteur.
Danger d’électrocution ! Avant tous travaux de nettoyage, mettre
l’appareil hors service et tirer la fiche de la prise ou couper le fusible
ou le tirer.
• Ne jamais nettoyer l’appareil à l’aide d’appareils de nettoyage à l’aide
de vapeur sous pression. L’humidité pourrait pénétrer dans des élé-
ments électriques. Danger d’électrocution ! La vapeur chaude peut
endommager les parties en matière plastique.
• L’appareil doit être sec avant la remise en marche.
Attention!
• Les huiles essentielles et les solvants organiques peuvent agresser les
pièces en plastique, par ex.
– le jus de citron ou les pelures d’orange;
– l’acide butyrique;
– les agents de nettoyage contenant de l’acide acétique.
Ne pas amener de telles substances en contact avec les parties de
l’appareil.
• Ne pas utiliser de produits de nettoyage abrasifs.
1. Enlever les aliments refroidis. Entreposer le tout couvert dans un
endroit frais.
2. Mettre l’appareil hors service et tirer le cordon d’alimentation de la
prise ou débrancher/dévisser le fusible.
56
Conseils d’économie d’énergie
• N’installez pas l’appareil à proximité de cuisinières, radiateurs ou
autres sources de chaleur. Si la température ambiante est élevée, le
compresseur fonctionne plus fréquemment et plus longtemps.
• Veillez à une ventilation suffisante au niveau du socle de l’appareil.
N’obstruez jamais les ouvertures de ventilation.
• Ne placez pas d’aliments chauds dans l’appareil. Attendez que les ali-
ments refroidissent.
• N’ouvrez pas la porte plus longtemps que nécessaire.
• Ne réglez pas la température plus bas que nécessaire.
3. Enlevez de givre de temps en temps à l’aide d’un grattoir en plastique
doux, p. ex. un grattoir à pâte. N’employer en aucun cas d’objets durs
ou pointus à cet effet.
4. Nettoyer l’appareil ainsi que les parties intérieures à l’aide d’un chiffon
et d’eau tiède. Ajouter éventuellement quelques gouttes d’un produit
de nettoyage de la vaisselle du commerce.
5. Essuyer ensuite avec de l’eau pure et sécher.
6. Contrôler le trou d’écoulement de
l’eau de dégivrage dans la paroi arriè-
re du compartiment frigo. S’il est
bouché, vous pouvez déboucher le
trou d’écoulement de l’eau de dégi-
vrage à l’aide de bouchon vert se
trouvant dans le sachet qui fait partie
de la livraison.
7. Lorsque tout est sec, replacer les ali-
ments et remettre l’appareil en service.
57
Que faire si ...
En cas d’anomalie de fonctionnement
Le dérangement n’est peut-être qu’un petit défaut auquel vous pouvez
remédier vous-même à l’aide des indications suivantes. N’effectuez pas
de travaux vous-même si les informations suivantes ne vous aident pas
de manière concrète.
Avertissement! Les réparations à l’appareil de congélation peuvent
uniquement être effectuées par des spécialistes. Des réparations incor-
rectes peuvent être source de dangers graves pour l’utilisateur. En cas
de réparation, adressez-vous à votre distributeur ou à notre service
après-vente.
L’appareil ne fonctionne
pas.
L’appareil n’est pas en fon-
ctionnement.
La prise n’est pas branchée.
Le fusible a disjoncté ou
est défectueux.
La prise murale est défec-
tueuse.
Les anomalies du réseau
électrique doivent être
résolus par votre électrici-
en.
Symptômes Cause possible Solutions
Mettez l’appareil en
marche.
Branchez la prise.
Vérifiez le fusible, rempla-
cez-le cas échéant.
L’appareil refroidit trop.
La température est mal
réglée.
Veuillez consulter la partie
"Réglage de la températu-
re".
La température à l’intéri-
eur de l’appareil est trop
chaude.
La température est mal
réglée.
Veuillez consulter la partie
"Mise en service".
La porte est restée ouverte
trop longtemps.
N’ouvrez pas la porte plus
longtemps que nécessaire.
De trop grandes quantités
d’aliments ont été entre-
posées au cours des derniè-
res 24 heures.
Veuillez consulter la partie
"Réglage de la températu-
re".
L’appareil est installé à côté
d’une source de chaleur.
Veuillez consulter la partie
"Emplacement".
L’ampoule est défectueuse.
Veuillez consulter la partie
"Remplacement de l’am-
poule d’éclairage".
L’éclairage intérieur ne
fonctionne pas.
58
Que faire si ...
Après modification du
réglage de température, le
compresseur ne se met pas
en marche.
C’est normal, il n’y a aucu-
ne anomalie.
Le compresseur se met en
marche après quelques
instants automatiquement.
Il y a de l’eau au fond du
compartiment réfrigérateur
ou sur les clayettes.
Le trou d’écoulement de
l’eau de dégivrage est bou-
ché.
Voir partie "Entretien et
nettoyage”.
Remplacement de l’ampoule d’éclairage
Avant de remplacer l’ampoule, mettez à l’arrêt l’appareil et débran-
chez-le. Caractéristiques de l’ampoule: 220-240 V, max. 15 W.
1. Pour remplacer l’ampoule, dévissez la vis.
2. Exercez une pression sur le cache de
l’ampoule, comme l’indique la fig., et
faites-le glisser vers l’arrière.
3. Remplacez l’ampoule défectueuse.
4. Remontez le cache de l’ampoule et
revissez la vis de fixation.
5. Rebranchez l’appareil.
A
EG65
Symptômes Cause possible Solutions
A l’aide d’un sèche-che-
veux, réchauffez avec pré-
caution le joint de porte
aux endroits non her-
métiques (pas plus chaud
qu’env. 50 °C).
En même temps, formez
manuellement le joint
chauffé de la porte de
manière à ce qu’il soit de
nouveau bien au contact.
Le joint de porte n’est pas
étanche (après changement
du sens d’ouverture de la
porte).
Formation importante de
givre dans l’appareil et
éventuellement aussi au
niveau du joint de porte.
59
Bruits de fonctionnement
Les bruits suivants sont typiques des appareils frigorifiques:
Claquement On l’entend chaque fois que le compresseur se
met en marche ou s’éteint
Bourdonnement Dès que le compresseur se met en marche, vous
l’entendrez bourdonner
Circulation de Il n’est pas anormal d’entendre le bruit de
liquide circulation du fluide frigorigène selon son état
liquide, gazeux ou vaporeux.
Règlements, normes, directives
L’appareil frigorifique est destiné à un usage domestique et a été fabri-
qué en respect des normes s’appliquant à ce type d’appareils. La fabri-
cation tient en particulier compte des mesures prévues par la loi alle-
mande sur la sécurité des appareils (GSG), le règlement préventif
contre les accidents pour les installations frigorifiques (VBG 20) et les
dispositions de l’union des électrotechniciens allemands (VDE).
L’étanchéité du circuit frigorifique a été contrôlée.
Cet appareil est conforme aux directives européennes suivantes :
73/23/CEE du 19.2.1973 - Directive sur les basses tensions
89/336/CEE du 3.5.1989 (y compris la directive de modification
92/31/CEE) - Directive de CEM
94/2/CE du 21. 01. 1994 - Directive d'étiquetage énergétique
96/57 CE du 3. 9. 1996 - Exigence concernant l'efficacité énergetique
des appareils électriques domestiques de refroidissement et de congé-
lation et des combinaisons correspondantes.
60
Termes techniques
• Fluides réfrigérants
Avec ce terme l’on indique les liquides qui peuvent être utilisés pour la
réfrigération. Leur point d’ébullition est si bas que la chaleur des ali-
ments qui se trouvent à l’intérieur du réfrigérateur suffit à les faire
bouillir et/ou évaporer.
• Circuit des fluides réfrigérants
Il s’agit d’un circuit fermé, à l’intérieur duquel se trouvent les fluides
réfrigérants. Il est constitué par l’évaporateur, le compresseur, le con-
denseur et la tuyauterie.
L’évaporateur
L’évaporateur sert à faire évaporer le fluide réfrigérant. Comme tous les
liquides, celui-ci a besoin de chaleur pour s’évaporer, chaleur qui vient
de l’intérieur de l’appareil. En libérant la chaleur l’appareil se refroidit.
Voilà pourquoi l’évaporateur se trouve à l’intérieur de l’appareil ou bien
est placé directement derrière la paroi interne de celui-ci, et il est donc
invisible.
Compresseur
Le compresseur ressemble à une petite bouée. Il fonctionne grâce à un
moteur électrique intégré et il est placé derrière, dans le socle de l’ap-
pareil. Le compresseur reçoit le fluide réfrigérant gazeux par aspiration,
il le comprime et l’envoie au condenseur.
Condenseur
Le condenseur a presque toujours la forme d’une grille. À l’intérieur le
fluide réfrigérant comprimé par le compresseur retourne à l’état liqui-
de. Pendant ce processus il se produit une libération de chaleur, qui se
répand sur la surface du condenseur et, de là, dans l’air. Voilà pourquoi
le condenseur se trouve à l’extérieur du réfrigérateur, dans la plupart
des cas derrière l’appareil.
61
Geachte mevrouw, heer
Hartelijk dank voor het kiezen van een van onze kwaliteitsproducten. U heeft
een goede keuze gemaakt. Zo kunt u dankzij de combinatie van functioneel
design en hoogwaardige technologie rekenen op optimale prestaties en
bedieningsgemak. En onze zorg voor het milieu, komt o.a. tot uitdrukking in
het energiebesparend functioneren van dit apparaat. Om er zeker van te zijn
dat uw apparaat optimaal en onberispelijk presteert, dient u deze gebruik-
saanwijzing aandachtig door te lezen. Dan zult u alle processen perfect en
zeer efficiënt kunnen besturen.
Wij raden u aan deze gebruiksaanwijzing goed te bewaren, zodat u nog eens
iets kunt nalezen. En wilt u dit boekje doorgeven aan een eventuele volgen-
de eigenaar van het apparaat.
Wij wensen u veel succes met uw nieuwe apparaat.
In deze gebruiksaanwijzing worden de volgende symbolen gebruikt
Belangrijke informatie over uw persoonlijke veiligheid en informatie over
hoe u schade aan het apparaat kunt voorkomen
Algemene informatie en tips
Milieu-informatie
62
Inhoud
Veiligheid . . . . . . . . . . . . . . . . . . . . . . . . . . . . . . . . . . . . . . . . . . . . . . . . . . . 63
Weggooien. . . . . . . . . . . . . . . . . . . . . . . . . . . . . . . . . . . . . . . . . . . . . . . . . . 65
Informatie over de verpakking van het apparaat. . . . . . . . . . . . . . . . . . . . . 65
Weggooien van oude apparaten. . . . . . . . . . . . . . . . . . . . . . . . . . . . . . . . . . . 65
Transportbescherming verwijderen. . . . . . . . . . . . . . . . . . . . . . . . . . . . . . . 66
Opstellen . . . . . . . . . . . . . . . . . . . . . . . . . . . . . . . . . . . . . . . . . . . . . . . . . . . 66
Opstelplaats. . . . . . . . . . . . . . . . . . . . . . . . . . . . . . . . . . . . . . . . . . . . . . . . . . . . 66
Het apparaat heeft lucht nodig . . . . . . . . . . . . . . . . . . . . . . . . . . . . . . . . . . . 67
Inbouw. . . . . . . . . . . . . . . . . . . . . . . . . . . . . . . . . . . . . . . . . . . . . . . . . . . . . . . . 68
Elektrische aansluiting. . . . . . . . . . . . . . . . . . . . . . . . . . . . . . . . . . . . . . . . . . . 68
Beschrijving van het apparaat . . . . . . . . . . . . . . . . . . . . . . . . . . . . . . . . . . 69
Vooraanzicht . . . . . . . . . . . . . . . . . . . . . . . . . . . . . . . . . . . . . . . . . . . . . . . . . . . 69
Voor ingebruikname . . . . . . . . . . . . . . . . . . . . . . . . . . . . . . . . . . . . . . . . . . 70
In gebruik nemen en temperatuurregeling . . . . . . . . . . . . . . . . . . . . . . . . 70
Apparaat uitschakelen . . . . . . . . . . . . . . . . . . . . . . . . . . . . . . . . . . . . . . . . . 71
Interieur . . . . . . . . . . . . . . . . . . . . . . . . . . . . . . . . . . . . . . . . . . . . . . . . . . . . 72
Legvlakken. . . . . . . . . . . . . . . . . . . . . . . . . . . . . . . . . . . . . . . . . . . . . . . . . . . . . 72
Variabele binnendeur . . . . . . . . . . . . . . . . . . . . . . . . . . . . . . . . . . . . . . . . . . . . 72
Flessenhouder . . . . . . . . . . . . . . . . . . . . . . . . . . . . . . . . . . . . . . . . . . . . . . . . . . 73
Vochtigheidsregeling . . . . . . . . . . . . . . . . . . . . . . . . . . . . . . . . . . . . . . . . . . . . 73
Variabele box . . . . . . . . . . . . . . . . . . . . . . . . . . . . . . . . . . . . . . . . . . . . . . . . . . 73
Juist bewaren. . . . . . . . . . . . . . . . . . . . . . . . . . . . . . . . . . . . . . . . . . . . . . . . 74
Ontdooien . . . . . . . . . . . . . . . . . . . . . . . . . . . . . . . . . . . . . . . . . . . . . . . . . . 75
De koelruimte wordt automatisch ontdooid. . . . . . . . . . . . . . . . . . . . . . . . . 75
Reiniging en onderhoud . . . . . . . . . . . . . . . . . . . . . . . . . . . . . . . . . . . . . . . 75
Tips om energie te besparen. . . . . . . . . . . . . . . . . . . . . . . . . . . . . . . . . . . . 76
Wat te doen als ... . . . . . . . . . . . . . . . . . . . . . . . . . . . . . . . . . . . . . . . . . . . . 76
Hulp bij storingen. . . . . . . . . . . . . . . . . . . . . . . . . . . . . . . . . . . . . . . . . . . . . . . 76
Lamp vervangen . . . . . . . . . . . . . . . . . . . . . . . . . . . . . . . . . . . . . . . . . . . . . . . . . 78
Geluiden tijdens de werking. . . . . . . . . . . . . . . . . . . . . . . . . . . . . . . . . . . . 78
Bepalingen, normen, richtlijnen . . . . . . . . . . . . . . . . . . . . . . . . . . . . . . . . . 78
Vaktermen . . . . . . . . . . . . . . . . . . . . . . . . . . . . . . . . . . . . . . . . . . . . . . . . . . 79
63
Veiligheid
De veiligheid van onze koelapparaten voldoet aan de Europese en
Nederlandse normen. Desondanks zien wij ons genoodzaakt u met de
volgende veiligheidsaanwijzingen vertrouwd te maken:
Toepassing volgens de voorschriften
• Het apparaat is voor huishoudelijk gebruik bestemd. Het is geschikt
voor het koelen van levensmiddelen. Als het apparaat voor andere
doeleinden gebruikt wordt kan de fabrikant geen verantwoording
nemen voor eventuele schade.
Constructieve wijzigingen of veranderingen aan het apparaat zijn uit
veiligheidsoverwegingen niet toegestaan.
• Als het apparaat commercieel of voor andere doeleinden dan voor
het koelen van levensmiddelen gebruikt wordt, s.v.p. letten op de
hiervoor van kracht zijnde wettelijke bepalingen.
Voordat het apparaat voor de eerste keer in gebruik genomen
wordt
• Controleer het apparaat op transportschade. Een beschadigd appa-
raat in geen geval aansluiten! Wend u in geval van schade tot de
leverancier.
• Overtuig u er van dat het apparaat na de installatie niet op het aan-
sluitsnoer staat. Belangrijk: Het aansluitsnoer mag alleen door vak-
mensen vervangen worden; deze onderdelen zijn verkrijgbaar bij
onze service-afdeling.
Koelmiddelen
Het apparaat bevat in het koelvloeistofcircuit de koelvloeistof isobu-
taan (R600a), een natuurlijk, zeer milieuvriendelijk gas, dat echter wel
brandbaar is.
Waarschuwing - Bij het transport en het opstellen van het apparaat
erop letten dat geen onderdelen van het koelvloeistofcircuit bescha-
digd worden.
• Bij beschadiging van het koelvloeistofcircuit:
– open vuur en brandhaarden absoluut vermijden;
– het vertrek waar het apparaat staat goed ventileren.
Veiligheid van kinderen
• Verpakkingsdelen (bijv. folies, piepschuim) kunnen voor kinderen
gevaarlijk zijn. Verstikkingsgevaar! Verpakkingsmateriaal van kinderen
weghouden!
• Oude apparaten voor het weggooien onbruikbaar maken. Stekker uit
het stopcontact trekken, aansluitsnoer doorknippen, eventueel aanwe-
Veiligheid
64
zige snap– of grendelsloten verwijderen of kapotmaken. Daardoor
wordt voorkomen dat spelende kinderen in het apparaat opgesloten
raken (verstikkingsgevaar!) of in andere levensgevaarlijke situaties
terecht komen.
• Kinderen kunnen gevaren die in het omgaan met huishoudelijke
apparaten schuilen vaak niet herkennen. Zorg daarom voor het nodi-
ge toezicht en laat kinderen niet met het apparaat spelen.
In het dagelijks gebruik
Bussen of flessen met brandbare gassen of vloeistoffen kunnen lek
raken door de inwerking van koude. Explosiegevaar! Leg geen bussen
of flessen met brandbare stoffen zoals spuitbussen, aanstekers,
navullingen voor aanstekers etc. in het koelapparaat.
Waarschuwing - Geen elektrische apparaten (bijv. elektrische ijsma-
chines, mixers etc.) in het koelapparaat gebruiken.
Waarschuwing - Om het functioneren van het apparaat niet nadelig
te beïnvloeden, mogen de ventilatie-openingen van het apparaat of
het inbouwmeubel niet worden afgedekt of versperd.
Waarschuwing - Voor het schoonmaken het apparaat altijd uitscha-
kelen en de stekker uit het stopcontact trekken of de zekering in de
huisinstallatie uitschakelen.
• De stekker altijd aan de stekker zelf uit het stopcontact trekken,
nooit aan het snoer.
Bij storing
• Als er een storing aan het apparaat optreedt eerst in de gebruiksaan-
wijzing kijken onder “Wat te doen als ...”. Als de daar gegeven aan-
wijzingen niet verder helpen zelf verder geen werkzaamheden aan
het apparaat uitvoeren.
• Koelapparaten mogen alleen door vakmensen gerepareerd worden.
Door ondeskundige reparaties kunnen grote gevaren ontstaan. Wend
u bij reparaties tot uw vakhandel of tot onze service-afdeling.
65
Weggooien
Informatie over de verpakking van het apparaat
Gooi het verpakkingsmateriaal van uw apparaat op de juiste wijze weg.
Alle gebruikte materialen zijn niet schadelijk voor het milieu en kun-
nen hergebruikt worden!
De materialen: de kunststoffen kunnen ook opnieuw gebruikt worden
en hebben de volgende aanduidingen:
>PE< voor polyethyleen, bijv. bij de buitenste verpakking en de zakken
binnenin.
>PS< voor schuimpolystyrol, bijv. bij de bekledingsdelen, volkomen
CFK-vrij.
De kartonnen delen zijn van oud papier gemaakt en moeten ook weer
in een container voor oud papier gedeponeerd worden.
Weggooien van oude apparaten
Wegens milieuredenen dienen koelapparaten vakkundig ontmanteld te
worden. Dit geldt voor uw huidige apparaat en - als het ook aan ver-
vanging toe is - ook voor uw nieuwe apparaat.
Waarschuwing! Apparaten die hun tijd gehad hebben onbruikbaar
maken voordat ze weggegooid worden. Stekker uit het stopcontact
trekken, aansluitsnoer doorknippen, eventuele snap- of grendelsloten
verwijderen of kapotmaken. Hierdoor wordt voorkomen dat spelende
kinderen in het apparaat opgesloten worden (verstikkingsgevaar!) of in
andere levensgevaarlijke situaties terechtkomen.
Aanwijzingen voor het weggooien:
• Het apparaat mag niet bij het huis- of grofvuil gezet worden.
• Het koelvloeistofcircuit, in het bijzonder de warmtewisselaar aan de
achterkant, mag niet beschadigd worden.
• Het symbool op het product of op de verpakking wijst erop dat
dit product niet als huishoudafval mag worden behandeld. Het moet
echter naar een plaats worden gebracht waar elektrische en elektro-
nische apparatuur wordt gerecycled. Als u ervoor zorgt dat dit pro-
duct op de correcte manier wordt verwijderd, voorkomt u mogelijk
voor mens en milieu negatieve gevolgen die zich zouden kunnen
voordoen in geval van verkeerde afvalbehandeling. Voor meer details
in verband met het recyclen van dit product, neemt u het best con-
tact op met de gemeentelijke instanties, het bedrijf of de dienst
belast met de verwijdering van huishoudafval of de winkel waar u
het product hebt gekocht.
Opstellen
Opstelplaats
Het apparaat in een goed geventileerde en droge ruimte neerzetten.
De omgevingstemperatuur heeft invloed op het stroomverbruik.
Het apparaat daarom
niet aan directe straling van de zon blootstellen;
niet bij radiatoren, naast een kachel of andere warmtebronnen
plaatsen;
alleen op een plaats neerzetten waarvan de omgevingstemperatuur
overeenkomt met de klimaatklasse waarvoor het apparaat is
ontworpen.
De klimaatklasse staat op het typeplaatje dat zich links aan de binnen-
kant van het apparaat bevindt.
De volgende tabel geeft aan welke omgevingstemperatuur bij welke
klimaatklasse behoort:
Montage direct onder een kookplaat is niet toegestaan. De temperatu-
ren van de kookplaat, die op sommige plaatsen hoog zijn, kunnen het
apparaat beschadigen.
Indien een kookplaat in de buurt van het apparaat geïnstalleerd wordt,
dienen de betreffende montage- en veiligheidsvoorschriften in acht
genomen te worden. Gezien de veelzijdigheid van de mogelijke
inbouwsituaties is het onmogelijk hier gedetailleerde informatie te ver-
schaffen.
Klimaatklasse voor een omgevingstemperatuur van
SN +10 tot +32 °C
N +16 tot +32 °C
ST +18 tot +38 °C
T +18 tot +43 °C
66
Transportbescherming verwijderen
Het apparaat en de onderdelen van het interieur zijn voor het trans-
port beschermd.
1. Plakband links en rechts aan de buitenkant van de deur er af trekken.
2. Alle plakband en bekledingsdelen uit het interieur verwijderen.
67
Opstellen
Men dient te voorkomen dat de koelkast warm wordt, door voldoende
afstand van de warmtebron aan te houden en door middel van het
gebruik van een geschikte isolatieplaat. Een correcte ventilatie van het
apparaat dient gegarandeerd te worden.
Het apparaat heeft lucht nodig
Integreerbare modellen (i-apparaten)
De geïntegreerde deur van de meubelkast
sluit de inbouwnis bijna geheel af. Daarom
moet bij i-apparaten de ventilatie volgens
afb. door een opening in de meubelsokkel
plaatsvinden. De verwarmde lucht moet door
de luchtschacht aan de achterzijde van het
meubel naar boven weg kunnen. De ventila-
tie-openingen moeten minimaal 200 cm
2
bedragen.
Attentie! Om het functioneren van het
apparaat niet nadelig te beïnvloeden, venti-
latie-openingen niet afdekken of blokkeren.
min. 200 cm
2
min. 200 cm
2
50
Modellen met decorlijsten
(E-apparaten)
Inbouwmogelijkheid 1 (optimaal):
Optimale ventilatie voor E-apparaten
bestaat, als frisse lucht zowel onder het
apparaat als door een opening in de meu-
belsokkel kan binnenkomen. De verwarm-
de lucht moet door de luchtschacht (min.
200 cm
2
) aan de achterzijde van het meu-
bel naar boven weg kunnen.
68
Opstellen
Inbouw
Zie meegeleverde montage-aanwijzing.
Controleer na het inbouwen van het apparaat, vooral na overzetten
van het deurscharnier, of de deurafdichting rondom goed afdicht. Een
ondichte deurafdichting kan tot versterkte rijpvorming en daardoor tot
hoger energieverbruik leiden (zie ook hoofdstuk „Wat te doen als ...“).
Elektrische aansluiting
Voor de elektrische aansluiting is een volgens de voorschriften geïn-
stalleerd stopcontact met randaarde vereist. Het stopcontact moet
zodanig worden geïnstalleerd, dat de stekker altijd uit het stopcontact
kan worden getrokken.
Het voor de aansluiting van het apparaat benodigde stopcontact moet
zich links of rechts naast de inbouwnis bevinden.
De elektrische zekering dient minstens 10/16 ampère te zijn. Indien het
stopcontact bij een ingebouwd apparaat niet meer toegankelijk is,
dient een maatregel in de elektrische installatie er voor te zorgen dat
het apparaat van de stroom kan worden afgesloten (bijv. zekering,
beveiligingsschakelaar, aardlekschakelaar of dergelijke met een
contactopeningsbreedte van minimaal 3 mm).
Inbouwmogelijkheid 2:
Ook zonder ventilatie-opening in de
meubelsokkel is het gebruik van E-appa-
raten mogelijk. De frisse lucht die onder
het apparaat kan binnenkomen, is vol-
doende voor de ventilatie. Functie en
levensduur van het apparaat worden
niet nadelig beïnvloed. De verwarmde
lucht moet door de luchtschacht (min.
200 cm
2
) aan de achterzijde van het
meubel naar boven weg kunnen. Bij
ventilatie zonder sokkelopening kunnen
echter afwijkingen in het energiever-
bruik t.o.v. de opgaven in de folder
voorkomen.
Attentie! Om het functioneren van het apparaat niet nadelig te beïn-
vloeden, ventilatie-openingen niet afdekken of blokkeren.
69
Voor ingebruikneming op het typeplaatje van het apparaat controleren
of de netspanning en stroomsoort overeenkomen met de waarden van
het lichtnet op de plaats waar het apparaat komt te staan.
Bijv.: AC 220 ... 240 V 50 Hz of
220 ... 240 V ~50 Hz
(d.w.z. 220 tot 240 Volt wisselstroom, 50 hertz)
Het typeplaatje bevindt zich links aan de binnenkant van het apparaat.
Beschrijving van het apparaat
Vooraanzicht (diverse modellen)
1 = Temperatuurregelaar en
binnenverlichting
2 = Boter-/kaasvak met klep
3 = Variabele box (uitvoering
afhankelijk van model, niet
bij alle modellen)
4 = Deurvak
5 = Flessenvak
Flessenhouder (niet bij alle
modellen)
6 = Fruit-/groenteladen
7 = Legvlakken
8 = Universeelbox (niet bij alle
modellen)
9 = Vochtigheidsregeling (niet
bij alle modellen)
10 = Flessen-/blikkenhouder (niet
bij alle modellen)
11 = Typeplaatje
70
In gebruik nemen en temperatuurregeling
Attentie! Het apparaat alleen gebruiken als het ingebouwd is!
De temperatuurregelaar bevindt zich
in de koelruimte rechts boven. Hij
dient tegelijkertijd als AAN/UIT-scha-
kelaar.
Stand "0" = koeling uit
Stand "1" = warmste binnentempera-
tuur
Stand "6" = koudste binnentemperatuur
1. Stekker in het stopcontact steken.
2. Gewenste temperatuur instellen door de temperatuurregelaar te draai-
en. De binnenverlichting gaat aan. De compressor start en werkt dan
automatisch.
Aanwijzing: als de instelling veranderd wordt, start de compressor niet
direct als op dat ogenblik automatisch ontdooid wordt.
Aangezien de bewaartemperatuur in de koelruimte snel bereikt wordt,
kunnen direct na inschakeling producten opgeborgen worden.
Aanwijzing: Uit voedingswetenschappelijk oogpunt is een bewaartem-
peratuur van ca. +5°C in de koelruimte in de regel koud genoeg.
De volgende zaken zijn van invloed op de binnentemperatuur:
– omgevingstemperatuur;
hoeveelheid en temperatuur van de opgeslagen levensmiddelen;
vaak of lang openen van de deur;
een storing in aan apparaat.
Daarom moet de instelling van de temperatuurregelaar eventueel aan
de omstandigheden van dat moment aangepast worden.
AEG62
Voor ingebruikname
Het interieur van het apparaat en alle accessoires schoonmaken voor
het eerste gebruik (zie hoofdstuk “Reiniging en onderhoud”).
71
Tips m.b.t. de instelling:
Voorbeelden:
3. Als u een hogere of lagere temperatuur wenst, draait u de tempera-
tuurregelaar op een warmere resp. koudere stand.
Belangrijk!
Hoge omgevingstemperatuur (bijv. op hete zomerdagen) en koude
instelling van de temperatuurregelaar (stand “5” tot “6”) kunnen er
voor zorgen dat de compressor continu werkt.
Reden: De compressor moet ononderbroken lopen om bij een hogere
omgevingstemperatuur de lage temperatuur van het apparaat te kun-
nen handhaven. De koelruimte ontdooit dan niet meer – automatisch
ontdooien van de koelruimte is alleen bij stilstaande compressor moge-
lijk (zie hoofdstuk “Ontdooien”). Sterke rijpvorming aan de achterwand
van de koelruimte is dan het gevolg.
Zet in dat geval de temperatuurregelaar op een warmere stand (stand
“4” tot “5”). Bij deze instelling wordt de compressor geregeld en begint
het ontdooien weer automatisch.
omgevingstemperatuur stand van de temperatuurregelaar
ca. 10°C tot 1
ca. 16°C rond 2
ca. 25°C rond 2
ca. 32°C 2 tot 3
ca. 38°C 1 tot 2
Apparaat uitschakelen
1. Om het apparaat uit te schakelen de temperatuurregelaar op stand “0”
draaien. De binnenverlichting gaat uit.
Als het apparaat gedurende langere tijd niet gebruikt wordt:
1. Levensmiddelen uit koelruimte nemen.
2. Apparaat uitschakelen, daartoe de temperatuurregelaar op stand “0”
draaien. De binnenverlichting gaat uit.
3. Stekker uit het stopcontact trekken of zekering in de huisinstallatie
uitschakelen.
72
Interieur
Legvlakken
Afhankelijk van model en uitrusting zijn legvlakken van glas of roos-
ters meegeleverd.
Het glazen legvlak boven de groente- en fruitbakken moet altijd blij-
ven liggen, opdat fruit en groente langer vers blijven.
De overige legvlakken zijn in hoogte verstelbaar:
1. Daartoe het legvlak zover naar voren
trekken tot het naar boven of onde-
ren bewogen kan worden en eruit
gehaald kan worden.
2. Om de legvlakken op een andere
hoogte te zetten in omgekeerde
volgorde te werk gaan.
Plaatsen van grote verpakkingen (niet
bij alle modellen):
De voorste helft van het tweedelige
glazen legvlak eruit halen en op een
andere hoogte erin schuiven.
Hierdoor wordt ruimte gewonnen om
op het daaronder gelegen legvlak grote
verpakkingen te plaatsen.
Variabele binnendeur
Naargelang de behoefte kunnen de deurvakken er naar boven uit-
genomen worden en op andere plaatsen gezet worden.
4. Apparaat grondig reinigen (zie hoofdstuk Reiniging en onderhoud”).
5. Deur daarna open laten om geurvorming te voorkomen.
Interieur
Flessenhouder (niet bij alle modellen)
Sommige modellen hebben een flessen-
houder in het flessenvak. Hij dient als
bescherming tegen het omvallen van losse
flessen en kan aan de zijkant verschoven
worden worden.
Vochtigheidsregeling (niet bij alle modellen)
Voor het legvlak boven de groente- en fruitbakken bevindt zich bij
enkele modellen een verstelbaar ventilatierooster.
De opening van de ventilatiesleuven
kan m.b.v. een schuifje traploos
geregeld worden.
Schuifje rechts:
ventilatiesleuven geopend.
Schuifje links:
ventilatiesleuven gesloten.
Als de ventilatiesleuven open zijn,
heerst t.g.v. sterkere luchtcirculatie
een laag luchtvochtigheidsgehalte in de groente- en fruitbakken.
Als de ventilatiesleuven dicht zijn, blijft het natuurlijke vochtigheidsge-
halte van de levensmiddelen in de groente- en fruitbakken langer
behouden.
Variabele box (niet bij alle modellen, uitvoering afhankelijk van model)
Sommige modellen hebben een variabele box die naar de zijkant ver-
schoven kan worden en onder een deurvak is aangebracht.
De box kan onder ieder deurvak
worden aangebracht.
1. Voor het omzetten het deurvak met
de variabele box naar boven uit de
houders in de deur tillen en de
beugel uit de geleider onder het
deurvak nemen.
2. Inzetten op een andere hoogte
geschiedt in omgekeerde volgorde.
73
74
Juist bewaren
In de koelruimte heersen, fysisch bepaald,
diverse temperaturen. De laagste tempe-
ratuur heerst op de onderste legvlakken.
Warmer is het op de bovenste legvlakken
en in de vakken in de deur. Waar in de
koelruimte de juiste temperatuur heerst
voor de diverse soorten levensmiddelen
laat het voorbeeld hiernaast zien.
Tip: Levensmiddelen dienen altijd afge-
dekt of verpakt in de koelruimte gezet te
worden om uitdrogen en geur- of smaak-
overdracht op andere artikelen te voorko-
men.
Voor het verpakken zijn geschikt:
– vershoudzakken en -folies van poly-
ethyleen;
kunststof dozen met deksel;
– speciale kappen van kunststof met rubber band;
– aluminiumfolie.
De variabele box kan ook in de koel-
ruimte aan de zijkant van een legvlak
gehangen worden:
1. Trek daartoe het legvlak zo ver naar
voren tot het naar boven of naar
beneden weggedraaid en er uit
gehaald kan worden.
2. De beugel aan de zijkant aan het leg-
vlak hangen en het legvlak weer in
de geleiders schuiven.
75
Ontdooien
De koelruimte wordt automatisch ontdooid
Het ontdooien van de verdamper in de achterwand van de koelruimte
geschiedt automatisch.
Het dooiwater wordt in het afvoergootje aan de achterwand van de
koelruimte opgevangen, door het afvoergat naar een bakje aan de
compressor gevoerd en verdampt daar.
Het dooiwaterafvoergat moet regelmatig worden gereinigd (zie hoofd-
stuk "Reiniging en onderhoud").
Reiniging en onderhoud
Om hygiënische redenen dient het apparaat aan de binnenkant met
toebehoren geregeld gereinigd te worden.
Waarschuwing!
• Het apparaat mag tijdens het schoonmaken niet op het elektriciteits-
net aangesloten zijn. Gevaar voor schokken! Schakel voor het
schoonmaken het apparaat uit en trek de stekker uit het stopcontact
of schakel de zekering uit.
• Het apparaat nooit met stoomreinigingsapparaten schoonmaken. Er
kan vocht in de elektrische onderdelen komen. Gevaar voor schok-
ken! Hete damp kan kunststof onderdelen beschadigen.
• Het apparaat dient droog te zijn voordat het weer in gebruik geno-
men wordt.
Let op!
• Etherische oliën en organische oplosmiddelen kunnen kunststof
onderdelen aantasten, bijv.
- sap van citroen– of sinaasappelschillen;
- boterzuur;
- schoonmaakmiddelen die azijnzuur bevatten.
Dergelijke substanties niet in contact brengen met apparaatonder-
delen.
• Geen schurende schoonmaakmiddelen gebruiken.
1. Koelartikelen er uit halen. Alles afgedekt op een koele plaats leggen.
2. Apparaat uitschakelen en de stekker uit het stopcontact trekken of de
zekering in de huisinstallatie uitschakelen.
3. Apparaat en interieur met een doek en lauwwarm water schoonmaken.
Eventueel een beetje normaal afwasmiddel gebruiken.
76
Tips om energie te besparen
• Het apparaat niet in de buurt van kachels, verwarmingselementen of
andere warmtebronnen plaatsen. Bij een hoge omgevingstempera-
tuur werkt de compressor vaker en langer.
• Zorgen voor voldoende ventilatie van het apparaat.
Ventilatieopeningen nooit afdekken.
• Geen warme spijzen in het apparaat zetten. Warme spijzen eerst
laten afkoelen.
• Deur slechts zo lang open laten als nodig is.
• De temperatuur niet lager dan nodig instellen.
Wat te doen als ...
Hulp bij storingen
Het kan bij een storing om kleine defecten gaan die u zelf aan de hand
van de volgende aanwijzingen kunt oplossen. Voer zelf geen verdere
werkzaamheden uit als de volgende informatie in concrete gevallen
niet verder helpt.
Waarschuwing! Reparaties aan het koelapparaat mogen alleen door
vakmensen uitgevoerd worden. Door ondeskundige reparaties kunnen
grote gevaren ontstaan voor de gebruiker. Wend u bij reparatie altijd
tot onze service-afdeling.
4. Daarna met schoon water afnemen en droogwrijven.
5. Het dooiwaterafvoergat aan de ach-
terzijde van de koelruimte schoon-
maken m.b.v. de in het afvoergat
geplaatste groene reinigingsstift.
6. Als alles droog is, de levensmiddelen
er weer in doen en het apparaat weer
in bedrijf nemen.
77
Wat te doen als ...
Storing Mogelijke oorzaken Oplossing
Apparaat werkt niet.
Het apparaat is niet inge-
schakeld.
De stekker zit niet of niet
goed in het stopcontact.
De zekering is doorgesla-
gen of defect.
Het stopcontact is defect.
Een elektricien het defect
aan het stroomnet laten
verhelpen.
Het apparaat inschakelen.
De stekker in het stopcon-
tact steken.
De zekering controleren en
eventueel vervangen.
Het apparaat koelt te sterk.
Temperatuur is te koud
ingesteld.
Temperatuurregelaar tijde-
lijk op warmere instelling
draaien.
Lamp is defect.
Zie hoofdstuk “Lamp ver-
vangen”.
Binnenverlichting werkt
niet.
De levensmiddelen zijn te
warm.
Temperatuur is niet juist
ingesteld.
Zie hoofdstuk “In gebruik
nemen en temperatuurre-
geling
”.
Deur heeft te lang openge-
staan.
Deur slechts zo lang open
laten als nodig is.
In de laatste 24 uur zijn
grotere hoeveelheden
warme levensmiddelen
opgeslagen.
Temperatuurregelaar tijde-
lijk op een koudere stand
zetten.
Het apparaat staat naast
een warmtebron.
Zie hoofdstuk “Opstel-
plaats”.
Water op de bodem van de
koelruimte of op de
legvlakken.
Dooiwaterafvoer is ver-
stopt.
Zie hoofdstuk “Reiniging
en onderhoud”.
Dit is normaal, het betreft
geen storing.
De compressor start na
enige tijd automatisch.
Na het wijzigen van de
temperatuurinstelling start
de compressor niet direct.
Op de ondichte plaatsen
de deurafdichting voor-
zichtig met een haardroger
verwarmen (niet heter dan
ca. 50 °C).
Tegelijkertijd de verwarm-
de deurafdichting met de
hand zo in vorm trekken
dat hij weer
helemaal sluit.
Deurafdichting is ondicht
(eventueel na het overzet-
ten van het deurscharnier).
Sterke rijpvorming in het
apparaat, eventueel ook
aan de deurafdichting.
78
Bepalingen, normen, richtlijnen
Het koelapparaat is voor huishoudelijk gebruik bestemd en is met
inachtneming van de voor deze apparaten geldende normen gemaakt.
Bij de fabricage zijn speciaal die maatregelen genomen die vereist zijn
volgens de Duitse wet op de veiligheid van apparaten (GSG), de Duitse
voorschriften ter voorkoming van ongevallen bij koude-installaties
(VBG 20) en de bepalingen van de vereniging van Duitse elektrotechni-
ci (VDE). De koudecirculatie is op dichtheid getest.
Lamp vervangen
Waarschuwing! Gevaar voor elektrische schok! Voor het vervangen
van de lamp het apparaat uitschakelen en de stekker uit het stopcon-
tact trekken of de zekering in de huisinstallatie uitschakelen.
Lampgegevens: 220-240 V, max. 15 W, fitting: E 14
1. Om het apparaat uit te schakelen de temperatuurregelaar op stand “O”
draaien.
2. Stekker uit het stopcontact trekken.
3. Voor het vervangen van de lamp de bevestigingsschroef eruit draaien.
4. Volgens de afbeelding op de lampaf-
dekking drukken en deze naar achte-
ren wegschuiven.
5. Defecte lamp vervangen.
6. Lampafdekking weer monteren en de
bevestigingsschroef aandraaien.
7. Apparaat weer in gebruik nemen.
A
EG65
Geluiden tijdens de werking
De volgende geluiden zijn karakteristiek voor koelapparaten:
Klikken
Elke keer als de compressor in- of uitschakelt, hoort u een klik.
Zoemen
Zodra de compressor functioneert, hoort u gezoem.
Borrelen/klotsen
Wanneer het koelmiddel door smalle leidingen stroomt, kunt u een
borrelend of klotsend geluid horen. Ook na het uitschakelen van de
compressor is dit geluid nog korte tijd te horen.
79
Dit apparaat voldoet aan de volgende EU-richtlijnen:
– 73/23/EG van 19.2.1973 - laagspanningsrichtlijn
– 89/336/EG van 3.5.1989
(met inbegrip van wijzigingsrichtlijn 92/31/EG) - EMC-richtlijn.
– 94/2/EG van 21. 01. 1994 - richtlijn voor energie-etikettering
– 96/57 EG van 3. 9. 1996 - vereiste met betrekking tot de energie-
efficiëntie van elektrische huishoudelijke koel- en vriesapparaten en
de betreffende combinaties.
Vaktermen
Koelmiddel Vloeistoffen die gebruikt kunnen worden voor koude-
productie, worden koelmiddelen genoemd. Deze stoffen hebben ver-
houdingsgewijs een laag kookpunt, zo laag dat de warmte van de
aanwezige levensmiddelen in het koelapparaat, het koelmiddel tot
koken ofwel tot verdampen kan brengen.
Koelmiddelkringloop Gesloten kringloopsysteem waarin het koel-
middel zich bevindt. De koelmiddelkringloop bestaat hoofdzakelijk
uit verdamper, compressor, condensor en leidingen.
Verdamper In de verdamper verdampt het koelmiddel. Net als alle
vloeistof, heeft het koelmiddel warmte nodig om te kunnen verdam-
pen. Deze warmte wordt onttrokken aan de binnenruimte van het
koelapparaat, de ruimte koelt daardoor af. Daarom is de verdamper
in de binnenruimte geplaatst of gelijk direct de binnenwand inge-
schuimd en daardoor niet zichtbaar.
Compressor De compressor ziet eruit als een tonnetje. Hij wordt
aangedreven door een ingebouwde elektromotor en is achter, aan de
onderkant van het apparaat geplaatst. De compressor zorgt ervoor
dat het dampvormige koelmiddel aan de verdamper onttrokken
wordt en vervolgens verdicht en naar de condensor geleid wordt.
Condensor De condensor heeft meestal de vorm van een rooster.
In de condensor wordt het koelmiddel dat door de compressor ver-
dicht is, gecondenseerd. Hierbij komt warmte vrij die door de opper-
vlakte van de condensor aan de omgevingslucht afgegeven wordt. De
condensor is daarom aan de buitenkant, meestal aan de achterkant
van het apparaat, aangebracht.
www.electrolux.com
www.aeg-electrolux.de
www.aeg-electrolux.at
www.aeg-electrolux.be
www.aeg-electrolux.nl
2222 754-66-00-17072007 Änderungen vorbehalten
Subject to change without notice
Sous réserve de modifications
Wijzigingen voorbehouden
66

Hulp nodig? Stel uw vraag in het forum

Spelregels

Misbruik melden

Gebruikershandleiding.com neemt misbruik van zijn services uitermate serieus. U kunt hieronder aangeven waarom deze vraag ongepast is. Wij controleren de vraag en zonodig wordt deze verwijderd.

Product:

Bijvoorbeeld antisemitische inhoud, racistische inhoud, of materiaal dat gewelddadige fysieke handelingen tot gevolg kan hebben.

Bijvoorbeeld een creditcardnummer, een persoonlijk identificatienummer, of een geheim adres. E-mailadressen en volledige namen worden niet als privégegevens beschouwd.

Spelregels forum

Om tot zinvolle vragen te komen hanteren wij de volgende spelregels:

Belangrijk! Als er een antwoord wordt gegeven op uw vraag, dan is het voor de gever van het antwoord nuttig om te weten als u er wel (of niet) mee geholpen bent! Wij vragen u dus ook te reageren op een antwoord.

Belangrijk! Antwoorden worden ook per e-mail naar abonnees gestuurd. Laat uw emailadres achter op deze site, zodat u op de hoogte blijft. U krijgt dan ook andere vragen en antwoorden te zien.

Abonneren

Abonneer u voor het ontvangen van emails voor uw AEG Electrolux Santo K 98800-5E bij:


U ontvangt een email met instructies om u voor één of beide opties in te schrijven.


Ontvang uw handleiding per email

Vul uw emailadres in en ontvang de handleiding van AEG Electrolux Santo K 98800-5E in de taal/talen: Nederlands, Duits, Engels, Frans als bijlage per email.

De handleiding is 1,57 mb groot.


U ontvangt de handleiding per email binnen enkele minuten. Als u geen email heeft ontvangen, dan heeft u waarschijnlijk een verkeerd emailadres ingevuld of is uw mailbox te vol. Daarnaast kan het zijn dat uw internetprovider een maximum heeft aan de grootte per email. Omdat hier een handleiding wordt meegestuurd, kan het voorkomen dat de email groter is dan toegestaan bij uw provider.

Stel vragen via chat aan uw handleiding

Stel uw vraag over deze PDF

Uw handleiding is per email verstuurd. Controleer uw email

Als u niet binnen een kwartier uw email met handleiding ontvangen heeft, kan het zijn dat u een verkeerd emailadres heeft ingevuld of dat uw emailprovider een maximum grootte per email heeft ingesteld die kleiner is dan de grootte van de handleiding.

Er is een email naar u verstuurd om uw inschrijving definitief te maken.

Controleer uw email en volg de aanwijzingen op om uw inschrijving definitief te maken

U heeft geen emailadres opgegeven

Als u de handleiding per email wilt ontvangen, vul dan een geldig emailadres in.

Uw vraag is op deze pagina toegevoegd

Wilt u een email ontvangen bij een antwoord en/of nieuwe vragen? Vul dan hier uw emailadres in.


Info