72266
64
Verklein
Vergroot
Pagina terug
1/76
Pagina verder
SANTO 70342 KG
Réfrigérateur-Congélateur
Dubbeldeurs-koelautomaat
Fridge-freezer
Notice d’utilisation
Gebruiks-en montage-annwijzing
Operating Instructions
2
Chère Cliente, Cher Client
Conservez cette notice d’utilisation avec votre appareil. Si l’appareil devait
être vendu ou cédé à une autre personne, assurez-vous que la notice d’uti-
lisation l’accompagne. Le nouvel utilisateur pourra alors être informé du
fonctionnement de celui-ci et des avertissements s’y rapportant.
Cette notice d’utilisation s’applique à plusieurs modèles techniquement
comparables, qui diffèrent par leur équipement. Observez uniquement les
indications qui correspondent à votre modèle.
Indications de sécurité
Conseils et recommandations
Informations liées à la protection de l’environnement
La notice d’utilisation contient des indications qui permettent de remédier
soi-même à d’éventuels dérangements. Voir "En cas d’anomalie de fonc-
tionnement". Si ces indications ne suffisent pas, consultez le service après
vente de votre magasin vendeur.
3
Sommaire
Avertissements importants . . . . . . . . . . . . . . . . . . . . . . . . . . . . . . . . .4
Avant la mise en service . . . . . . . . . . . . . . . . . . . . . . . . . . . . . . . . . . .8
Utilisation de votre appareil . . . . . . . . . . . . . . . . . . . . . . . . . . . . . . . .8
Bandeau de commande du compartiment réfrigérateur . . . . . . . . . . . .8
Mise en service - Réglage de la température . . . . . . . . . . . . . . . . . . . . .8
Equipement intérieur . . . . . . . . . . . . . . . . . . . . . . . . . . . . . . . . . . . . .11
Les clayette . . . . . . . . . . . . . . . . . . . . . . . . . . . . . . . . . . . . . . . . . . . . . . . . .11
Les balconnets . . . . . . . . . . . . . . . . . . . . . . . . . . . . . . . . . . . . . . . . . . . . . .11
Régulation d’humidité . . . . . . . . . . . . . . . . . . . . . . . . . . . . . . . . . . . . . . . .11
Le blanc . . . . . . . . . . . . . . . . . . . . . . . . . . . . . . . . . . . . . . . . . . . . . . . . . . . .11
Emplacement des denrées . . . . . . . . . . . . . . . . . . . . . . . . . . . . . . . . .12
Zone la plus froide . . . . . . . . . . . . . . . . . . . . . . . . . . . . . . . . . . . . . . . . . .12
Compartiment réfrigérateur . . . . . . . . . . . . . . . . . . . . . . . . . . . . . . . . . . .12
Bandeau de commande du compartiment congélateur . . . . . . . . . . .13
Mise en service - Réglage de la température . . . . . . . . . . . . . . . . . . . .14
Compartiment congélateur . . . . . . . . . . . . . . . . . . . . . . . . . . . . . . . . . . .15
Conservation des produits surgelés et congelés du commerce . . . . . .16
Fabrication des glaçons . . . . . . . . . . . . . . . . . . . . . . . . . . . . . . . . . . . . . .17
Démoulage des glaçons . . . . . . . . . . . . . . . . . . . . . . . . . . . . . . . . . . . . . .17
Calendrier de congélation . . . . . . . . . . . . . . . . . . . . . . . . . . . . . . . . . . . .17
Accumulateurs de froid . . . . . . . . . . . . . . . . . . . . . . . . . . . . . . . . . . . . . .18
Entretien et nettoyage . . . . . . . . . . . . . . . . . . . . . . . . . . . . . . . . . . .18
Dégivrage . . . . . . . . . . . . . . . . . . . . . . . . . . . . . . . . . . . . . . . . . . . . . . . . . .18
Nettoyage . . . . . . . . . . . . . . . . . . . . . . . . . . . . . . . . . . . . . . . . . . . . . . . . . .19
Remplacement de l’ampoule d’éclairage . . . . . . . . . . . . . . . . . . . . . . . .20
En cas d’absence prolongée ou de non utilisation . . . . . . . . . . . . . . . .20
En cas d’anomalie de fonctionnement . . . . . . . . . . . . . . . . . . . . . . .20
En cas d’arrêt de fonctionnement . . . . . . . . . . . . . . . . . . . . . . . . . . . . . .22
Niveau sonore . . . . . . . . . . . . . . . . . . . . . . . . . . . . . . . . . . . . . . . . . .23
Protection de l’environnement . . . . . . . . . . . . . . . . . . . . . . . . . . . . .24
Installation . . . . . . . . . . . . . . . . . . . . . . . . . . . . . . . . . . . . . . . . . . . . .25
Retrait de la protection pour le transport . . . . . . . . . . . . . . . . . . . . . . .25
Emplacement . . . . . . . . . . . . . . . . . . . . . . . . . . . . . . . . . . . . . . . . . . . . . . .25
Fixation des entretoises arrière . . . . . . . . . . . . . . . . . . . . . . . . . . . . . . . .26
Branchement électrique . . . . . . . . . . . . . . . . . . . . . . . . . . . . . . . . . . . . . .26
Réversibilité des portes . . . . . . . . . . . . . . . . . . . . . . . . . . . . . . . . . . . . . . .27
Caractéristiques techniques . . . . . . . . . . . . . . . . . . . . . . . . . . . . . . .28
4
Avertissements importants
Ces avertissements ont été rédigés pour votre sécurité et celle d’autrui
Utilisation
• Cet appareil a été conçu pour être utilisé par des adultes. Veillez à ce que
les enfants n’y touchent pas et ne l’utilisent pas comme un jouet.
• A la réception de l’appareil, déballez-le ou faites-le déballer immédiate-
ment. Vérifez son aspect général. Faites les éventuelles réserves par écrit sur
le bon de livraison dont vous garderez un exemplaire.
• Votre appareil est destiné à un usage domestique normal. Ne l’utilisez pas
à des fins commerciales ou industrielles ou pour d’autres buts que celui pour
lequel il a été conçu.
• Ne modifiez pas ou n’essayez pas de modifier les caractéristiques de cet
appareil. Cela représenterait un danger pour vous.
• Ne consommez pas certains produits tels que les bâtonnets glacés dès leur
sortie de l’appareil ; la température très basse à laquelle ils se trouvent peut
provoquer des brûlures.
• Les réfrigérateurs et / ou congélateurs ménagers sont destinés uniquement
à la conservation et/ou congélation des aliments.
• Un produit décongelé ne doit jamais être recongelé.
• Suivez les indications du fabricant pour la conservation et/ou congélation
des aliments.
• Dans tous les appareils de réfrigération et congélation certaines surfaces
peuvent se couvrir de givre. Suivant le modèle, ce givre peut être éliminé
automatiquement (dégivrage automatique) ou bien manuellement.
• N’essayez jamais d’enlever le givre avec un objet métallique, vous risque-
riez d’endommager irrémédiablement l’évaporateur rendant du même coup
l’appareil inutilisable. N’employez pour cela qu’une spatule en plastique.
• Ne décollez pas les bacs à glaçons avec un couteau ou tout autre objet
tranchant.
• Ne placez ni bouteilles ni boîtes de boissons gazeuses dans le congéla-
teur/compartiment basse température, elles pourraient éclater.
• Débranchez toujours la prise de courant avant de procéder au nettoyage
intérieur et extérieur de l’appareil et au remplacement de la lampe d’éclai-
rage (pour les modèles qui en sont équipés).
• Ne faites pas fonctionner d’appareils électriques (par exemple : sorbetiè-
res électriques, mélangeurs,...) à l’intérieur de l’appareil.
Stockage des denrées dans les réfrigérateurs et
règles d’hygiène
La consommation croissante de plats préparés et d’autres aliments fragiles,
sensibles en particulier au non-respect de la chaîne de froid (1), rend néces-
5
saire une meilleure maîtrise de la température de transport et de stockage
de ces produits.
A la maison, le bon usage du réfrigérateur et le respect de règles rigoureu-
ses contribuent de façon significative et efficace à l’amélioration de la con-
servation des aliments.
Conservation des aliments/Maîtrise des températures
• Stockez les aliments selon leur nature dans la zone appropriée:
Zone tempérée: Boissons œufs, beurre, sauces industrielles et préparées,
fromages à pâtes cuite, fruits et légumes frais.
Zone fraîche: Produits laitiers, desserts lactés, matières grasses, fromages
frais.
Zone la plus froide: Viandes, volailles, poissons, charcuteries, plats préparé,
salades composées, préparations et pâtisseries à base d’œufs ou de crème,
pâtes fraîches, pâte à tarte, pizza/quiches, produits frais et fromages au lait
cru, légumes prêts à l’empli vendus sous sachet plastique et plus géneérale-
ment,tout produits frais dont la date limite de consommation (DLC) est
associée à une temperature de conservation inférieure ou égale à +4°C.
L’observation des conseils suivantes est de nature à éviter la contamination
croisée et à pévenir une mauvaise conservation des aliments.
• Emaller systématiquement les produits pour éviter que les denrées ne se
contaminent mutuellement.
• Se laver les mains avant de toucher les aliments et plusieurs fois pendant
la préparation du repas si celle-ci implique des maniplations successives
de produits différents, et après, bien sûr, au moment de passer à table
comme les règles d’hygiène l’imposent.
• Ne pas réutiliser des utensiles ayant déjà servi (cuillère en bois, planche à
dècouper sans les avoir bien nettoyés au préalable).
• Attendre le refroidissement complet des préparations avant de les stocker
(ex : soupe).
• Limiter le nombre d’ouvertures de la porte et, en tout état de cause, ne
pas laisser ouverte trop longtemps pour éviter une remontée en tempéra-
ture du réfrigérateur.
• Disposer les aliments de telle sorte que l’air puisse circuler librement tout
autour.
Il convient de vérifier régulièrement que la température, notamment celle
de la zone la plus froide, est correcte et le cas chéant, d’ajuster le thermo-
stat en conséquence comme indiqué (page “UTILISATION”).
La mesure de la tempérautre dans un zone (sur une clayette, par exemple)
peut se faire au moyen d’un thermomètre placé, dès le départ, dans un réci-
pient rempli d’eau (verre). Pour avoir une représentation fidèle de la réalité,
lisez la température sans manipulation des commandes ni ouvertre de porte.
6
Respect des règles d’hygiène
• Nettoyez fréquemment l’intérieur du réfrigérateur en utilisant un produit
d’entretien doux sans effet oxydant sur les parties métalliques, puis rincer
avec de l’eau additionnèe de jus de citron, de vinaigre blanc ou avec tout
produit désinfectant adapté au réfrigérateur.
• Retirez les suremballages du commerce avant de placer les aliments dans
le réfrigérateur (par exemple suremballages des packs de yaourts).
• Couvrez les aliments.
• Consultez la notice d’utilisation de l’appareil en toutes circonstances et en
particulier pour les conseils d’entretien.
Installation
• Assurez-vous, après avoir installé l’appareil, que celui-ci ne repose pas sur
le câble d’alimentation.
Important: en cas de dommage du câble d’alimentation, il ne doit être
renplacé que par un professionnel qualifié.
• L’appareil se réchauffe sensiblement au niveau du condenseur et du com-
presseur. Veillez à ce que l’air circule librement tout autour de l’appareil.
Une ventilation insuffisante entraînerait un mauvais fonctionnement et
des dommages sur l’appareil.
• Suivez les instructions données pour l’installation.
• Après la livraison, attendez 2 heures avant de brancher l’appareil pour que
le circuit frigorifique soit stabilisé.
• Cet appareil est lourd. Faites attention lors de son déplacement.
Veuillez lire attentivement ces remarques avant d’installer et d’utiliser
votre appareil. Nous vous remercions de votre attention.
Protection de l’environnement
Tous les matériaux marqués par le symbole , >PE< (polyéthylène),
>PS< (mousse de polystyrène) sont recyclables. Déposez-les dans une
déchetterie prévue à cet effet (renseignez-vous auprès des services de
votre commune) pour qu’ils puissent être récupérés et recyclés.
• Le système frigorifique et l’isolation de votre appareil ne contiennent
pas de C.F.C. contribuant ainsi à préserver l’environnement.
• Les C.F.C. sont remplacés par des hydrocarbures.
Le circuit réfrigérant de cet appareil contient de l’isobutane (R 600 A):
les interventions doivent être effectuées exclusivement par des person-
nes qualifiées ayant reçues une formation spécifique pour le R 600 A.
Ce gaz est néanmoins inflammable:
1.Ne faites pas fonctionner d’appareils électriques (par exemple: sorbe-
tières électriques, mélangeurs ou de sèche cheveux pour accélérer le
dégivrage,...) à l’intérieur de votre appareil.
2.Pendant le transport et l’installation de votre appareil, assurez-vous
qu’aucune partie du circuit n’est endommagée. Si tel est le cas:
7
• Evitez les flammes vives (briquet) et tout autre allumage (étincelles).
• Aérez la pièce où se trouve l’appareil.
• Si vous vous débarrassez de votre appareil, veillez à ne pas détériorer
les circuits frigorifiques.
• Cet appareil est muni de fermetures magnétiques. S’il remplace un appa-
reil équipé d’une fermeture mécanique, nous vous conseillons de rendre
celle-ci inutilisable avant de vous en débarrasser, ceci afin d’éviter aux
enfants de s’enfermer dans l’appareil et de mettre ainsi leur vie en dan-
ger. Veillez également à couper le câble d’alimentation électrique au ras
de l’appareil. Renseignez-vous auprès des services de votre commune pour
la reprise de l’appareil.
En cas d’anomalie de fonctionnement, reportez-vous à la rubrique “EN CAS
D’ANOMALIE DE FONCTIONNEMENT”. Si malgré toutes les vérifications, une
intervention s’avère nécessaire, le vendeur de votre appareil est le premier
habilité à intervenir. A défaut (déménagement, fermeture du magasin où
vous avez effectué l’achat...), consultez l’Assistance Consommateurs qui vous
communiquera alors l’adresse d’un service après vente.
En cas d’intervention sur votre appareil, exigez du service après vente les
pièces de rechange certifiées Constructeur
Veuillez lire attentivement ces remarques avant d’installer et d’utiliser
votre appareil. Nous vous remercions de votre attention.
8
Avant la mise en service
Votre appareil étant destiné au stockage des aliments, prenez la précaution
de nettoyer l’intérieur avec de l’eau tiède et un savon inodore (produit uti-
lisé pour la vaisselle) avant toute utilisation.
Rincez et séchez soigneusement.
Attendez 2 heures avant de brancher votre appareil et de procéder au régla-
ge du thermostat.
Bandeau de commande du compartiment
réfrigérateur
A. Touche MARCHE/ARRET du réfrigérateur
B. Touche de réglage de la température (pour températures plus chaudes)
C. Indication de température du réfrigérateur
D. Touche de réglage de la température (pour températures plus froides)
E. Indication d'activation de la fonction COOLMATIC (jaune)
F. Touche COOLMATIC
Touches de réglage de la température
Le réglage de la température se fait à l’aide des touches «B» (PLUS CHAUD)
et «D» (PLUS FROID).
Les touches sont en relation avec l’indicateur de température.
Lorsqu’on appuie sur une des deux touches «B» (PLUS CHAUD) ou «D» (PLUS
FROID), l’indicateur de température passe de l’affichage de la température
REELLE (l'indication de température s'allume) à l’affichage de la températu-
re de CONSIGNE (l'indication de température clignote).
A chaque pression supplémentaire sur une des deux touches, la températu-
re de CONSIGNE est modifiée de 1 °C. La température CONSIGNE doit être
atteinte dans les 24 heures.
B
C
F
D
E
A
9
Si on n’actionne aucune touche, l’indicateur de température affiche à nou-
veau la température REELLE après un bref délai (env. 5 s).
Température de CONSIGNE signifie:
La température qui doit régner dans le compartiment frigo. La température
de CONSIGNE est indiquée par des chiffres clignotants.
Température REELLE signifie:
L'affichage de température indique la température qui est momentanément
réellement présente dans le compartiment frigo. La température REELLE est
indiquée par des chiffres lumineux.
Indication de température
L’indicateur de température peut afficher plusieurs informations.
En fonctionnement normal, il affiche la température régnant momentané-
ment dans l’appareil (température REELLE).
Pendant le réglage de température, la température momentanément réglée
pour le compartiment frigo est affichée avec clignotement (température de
CONSIGNE).
Mise en service - Réglage de la température
1. Insérer la fiche dans la prise de courant.
2. Actionner la touche MARCHE/ARRET.
3. Appuyez sur une des touches «b» (PLUS CHAUD) ou «D» (PLUS FROID). L’in-
dicateur de température change d’affichage et indique par un clignotement
la température de CONSIGNE momentanément réglée.
4. Régler la température désirée en enfonçant les touches «B» (PLUS CHAUD)
et «D» (PLUS FROID) (voir section "Touches de réglage de la température").
L'affichage de la température indique immédiatement le réglage modifié. A
chaque actionnement de la touche, la température est modifiée de 1 ÞC.
D'un point de vue diététique, une température de +5 °C pour le comparti-
ment réfrigérateur est à considérer comme une température de stockage
suffisamment froide.
5. Si, après avoir effectué un réglage de la température, les touches ne sont
plus actionnées, l'affichage de température change après une courte durée
(env. 5 sec.) et indique à nouveau la température REELLE momentanément
présente dans le compartiment réfrigérateur.
Indication: En cas de modification du réglage, le compresseur ne démarre
pas immédiatement si le dégivrage automatique est en cours.
Comme la température de stockage dans le compartiment frigo est rapide-
ment atteinte, vous pouvez placer des denrées à refroidir directement après
la mise en service..
10
Coolmatic
La fonction COOLMATIC permet de réfrigérer rapidement des quantités
importantes dans le réfrigérateur.
1. En enfonçant la touche COOLMATIC, on enclenche la fonction COOLMATIC.
La lampe témoin jaune s’allume.
La fonction COOLMATIC assure maintenant un refroidissement intensif, une
température de +2 °C étant spécifiée automatiquement. Au bout de 6 heu-
res, la fonction COOLMATIC s’arrête d’elle même.
2. En enfonçant à nouveau la touche COOLMATIC, on peut à tout moment
mettre manuellement fin à la fonction COOLMATIC.
Fonction vacances
La fonction “Vacances” permet de régler la température du réfrigérateur à
+15°C. Ainsi, lorsque vous vous absentez pendant une longue période
(vacances per exemple), cette fonction vous permettra de garder votre
réfrigérateur vide avec la porte fermée sans qu’il ne se forme de mauvaises
odeurs.
1. Pour activer la fonction vacances, appuyer sur la touche (B).
2. Garder la pression sur la touche de réglage de la témperature “+” jusqu'à ce
que vous voyiez s’afficher sur l’afficheur de témperature la lettre “H” (Holi-
day). L’afficheur de témperature modifie la température affichée jusqu’à
+8°C, par étape de 1°C. Aprés le +8°C, vous passerez à la lettre “H”. Mainte-
nant, le réfrigérateur se trouve en mode économie d’énergie avec la fonc-
tion “Vacances”.
Avec la fonction “Vacances” le compartiment réfrigérateur doit rester vide.
Comment éteindre le compartiment réfrigérateur
Pour éteindre le réfrigérateur appuyer sur le bouton "B" plusieurs fois
jusqu'à ce que le symbole "OF" apparaisse sur l'indicateur de température
(C).
Appuyer encore sur le bouton "B" pendant 5 secondes.
Sur l'indicateur de température paraît le "count down" c'est-à-dire le comp-
te à rebours de "3" à "1".
Lorsque "1" apparaît, le réfrigérateur est éteint.
L'indicateur de température s'éteint..
11
D338
Equipement intérieur
Les clayettes
Les glissières se trouvant sur les
parois de la cuve permettent de posi-
tionner les clayettes à différentes
hauteurs selon vos besoins. Seule la
clayette située sur le(s) bac(s) à légu-
mes doit rester à cet emplacement.
Pour retirer les clayettes, tirez-les vers
vous et soulevez-les.
Les balconnets
Il est posiible de modifier la position en hauteur des balconnets sur la con-
tre porte selon vos besoins. Pour les retirer, soulevez-les vers le haut.
Régulation d'humidité
Une grille d'aération réglable se trouve
au-dessus du compartiment à fruits et
légumes.
L'ouverture des fentes d'aération peut
être réglée en continu à l'aide d'une
coulisse.Coulisse à droite: fentes d'aé-
ration ouvertes.
Coulisse à gauche: fentes d'aération fermées.
Lorsque les fentes d'aération sont ouvertes, il s'établit une teneur en humi-
dité moins élevée dans le compartiment à fruits et légumes du fait d'une
circulation accrue de l'air. Lorsque les fentes d'aération sont fermées, l'hu-
midité naturelle des denrées alimentaires dans le compartiment à fruits et
légumes se conserve plus longtemps.
PR271
Le bac
Le bac est adapté pour la conserva-
tion de fruits et legumes. Il posséde
une cloison qui, selon vos besoins,
permet de séparer les aliments. Le
fond du tiroir est doté d'une grille
dont le but est d'éviter que les ali-
ments contenus à l'intérieur ne
soient en contact avec l'humidité
qui pourrait s'y former et qui s'y
dépose. ll est possible de sortir le tiroir en utilisant les poignées
latérales (comme indiqué dans le dessin) et d'enlever les éléments
intérieurs afin de pouvoir les laver.
12
Emplacements Produits
Compartiment congélateur
Bacs à glaçons, produits surgelés et congelés,
desserts glacés, produits frais à congeler
Compartiment réfrigérateur
Clayettes supérieure et centrales
Aliments cuits, entremets et toutes denrées à
consommer assez rapidement. Fromages frais,
charcuterie.
Clayette inférieure en verre
Viandes, volailles, gibiers et poissons crus.
Temps maximum de conservation: 1 à 2 jours.
Bac(s) à légumes Légumes frais, fruits.
Contre porte
Les balconnets recevront, en bas, les bouteil-
les, puis en remontant les produits de faible
volume et d’emploi courant (crème,
yaourts...). Le beurre, les fromages cuits et les
œufs trouveront leur place dans les casiers
ou étagères appropriés.
Emplacement des denrées
Zone la plus froide
Vous obtiendrez une meilleure conservation de vos aliments si vous les pla-
cez dans la zone de froid convenant le mieux à leur nature.
La zone la plus froide du compartiment réfrigérateur se situe au niveau
de la clayette inférieure en verre.
Remarques : Les bananes, les pommes de terre, l’ail et les oignons ne se con-
servent pas au réfrigérateur. Les fromages fermentés ne seront mis au
réfrigérateur que si l’on désire arrêter leur maturation. Ils devront alors être
soigneusement enveloppés.
Compartiment réfrigérateur
Nos conseils
• N’entreposez que des aliments frais, nettoyés et enfermés dans des embal-
lages ou récipients appropriés de qualité alimentaire (il en existe de nom-
breux modèles dans le commerce).
• Respectez les conseils pour le stockage des denrées, et les règles d’hygiè-
ne alimentaire donnés au paragraphe “ Avertissements importants ”.
• Afin de permettre une circulation d’air correcte, ne couvrez pas les clayet-
tes de papier ou de feuilles en plastique.
13
Bandeau de commande du compartiment
congélateur
G. ndication d'activation de la fonction FROSTMATIC (jaune)
H. Touche FROSTMATIC
I. Touche de réglage de la température (pour températures plus chaudes)
J. Indication de température du congélateur
K Touche de réglage de la température (pour températures plus froides)
L. Touche de désactivation alarme
M. Témoin d'alarme
Touches de réglage de la température
Le réglage de la température se fait à l’aide des touches ”I” et «K« .
Les touches sont en relation avec l’indicateur de température.
Lorsqu’on appuie sur une des deux touches «I» (PLUS CHAUD) ou «K» (PLUS
FROID), l’indicateur de température passe de l’affichage de la température
REELLE (l'indication de température s'allume) à l’affichage de la températu-
re de CONSIGNE (l'indication de température clignote).
A chaque pression supplémentaire sur une des deux touches, la températu-
re de CONSIGNE est modifiée de 1 °C. La température CONSIGNE doit être
atteinte dans les 24 heures.
Si on n’actionne aucune touche, l’indicateur de température affiche à nou-
veau la température REELLE après un bref délai (env. 5 s).
Température de CONSIGNE signifie:
La température qui doit régner dans le compartiment congélateur. La
température de CONSIGNE est indiquée par des chiffres clignotants.
Température REELLE signifie:
L'affichage de température indique la température qui est momentané-
ment réellement présente dans le compartiment congélateur. La tempéra-
ture REELLE est indiquée par des chiffres lumineux.
H
I
K
J L MG
14
Indication de température
L’indicateur de température peut afficher plusieurs informations.
En fonctionnement normal, il affiche la température régnant momentané-
ment dans l’appareil (température REELLE).
Pendant le réglage de température, la température momentanément réglée
pour le compartiment congélateur est affichée avec clignotement (tempé-
rature de CONSIGNE).
Mise en service - Réglage de la température
1. Insérer la fiche dans la prise de courant.
2. Actionner la touche MARCHE/ARRET. La témoin d’alarme (M) se met à cli-
gnoter puisque la température demandée n’a pas été atteinte. Le signal
sonore se déclenche.
3. Appuyez sur la touche (L), le signal coustique s’éteint
4. Appuyez sur une des touches «I» ou «K» . L’indicateur de température chan-
ge d’affichage et indique par un clignotement la température de CONSIGNE
momentanément réglée.
5. Régler la température désirée en enfonçant les touches «I» (PLUS CHAUD)
et «K» (PLUS FROID) (voir section "Touches de réglage de la température").
L'affichage de la température indique immédiatement le réglage modifié. A
chaque actionnement de la touche, la température est modifiée de 1 °C.
D'un point de vue diététique, une température de -18 °C pour le comparti-
ment congélateur est à considérer comme une température de stockage
suffisamment froide.
6. La témoin d’alarme (M) s’éteint quand la température demandée est attein-
te. Appuyer sur la touche d’alarme (L) pour arrêter l’alarme acoustique.
Frostmatic
Cette fonction FROSTMATIC accélère la congélation d’aliments frais et
protège en même temps les marchandises déjà entreposées d’un réchauffe-
ment indésirable.
1. En enfonçant la touche FROSTMATIC, on enclenche la fonction FROSTMA-
TIC. La lampe témoin jaune s’allume.
Si la fonction FROSTMATIC n’est pas interrompue manuellement, l’électro-
nique de l’appareil interrompt la fonction FROSTMATIC après presque 48
heures. La lampe témoin jaune s’éteint.
2. En enfonçant à nouveau la touche FROSTMATIC, on peut à tout moment
mettre manuellement fin à la fonction FROSTMATIC. La lampe témoin jau-
ne s’éteint.
15
Touche de désactivation alarme
Une élévation anormale de la température du congélateur (par exemple en
cas de coupure de courant) est indiquée par le clignotement du témoin (M)
et par un signal sonore.
Une fois rétablies les conditions normales de fonctionnement, le signal
sonore s'arrête alors que le témoin d'alarme continue de clignoter.
En appuyant sur la touche (L), s'affiche sur l'indicateur (J) pendant quelques
secondes la température maximum atteinte à l'intérieur du congélateur.
Comment éteindre le compartiment congélateur
Pour éteindre le congélateur appuyer sur le bouton "J" plusieurs fois jusqu'à
ce que le symbole "OF" apparaisse sur l'indicateur de température (J).
Appuyer encore sur le bouton "I" pendant 5 secondes.
Sur l'indicateur de température paraît le "count down" c'est-à-dire le comp-
te à rebours de "3" à "1". Lorsque "1" apparaît, le congélateur est éteint.
L'indicateur de température s'éteint.
Mettre l’appareil hors service
1. Pour mettre hors service, maintenir la touche MARCHE/ARRET enfoncée
pendant. L'affichage de température s'éteint.
Indication:
L’appareil ne peut être mis ni en service ni hors service lorsque la fiche est
tirée de la prise ou en l’absence de tension d’alimentation. Après raccorde-
ment au réseau électrique, l’appareil reprend l’état dans lequel il était avant
la coupure de l’alimentation.
En cas d’absence prolongée ou de non-utilisation:
1. Éteindre l'électroménager (voir le point 1 reporté ci-dessous).
2. Videz l’appareil et débranchez la fiche secteur ou déconnectez ou dévissez
le fusible.
3. Dégivrez et nettoyez l'appareil (voir section «Nettoyage et entretien»).
4. Maintenez les portes entrouvertes pendant tout la durée de non-utilisation
afin d'éviter la formation de mauvaises odeurs.
Compartiment congélateur
Comment congeler
Votre appareil porte le sigle normalisé 4 étoiles c’est à dire qu’il vous permet
de congeler vous-même des denrées fraîches et des plats cuisinés.
Congeler un aliment, c’est abaisser le plus rapidement possible sa tempéra-
ture «à cœur» à -18°C.
16
Pour cela:
1. Enfonçant la touche Frostmatic.
3 heures avant d’introduire les denrées fraîches si l’appareil est vide
(mise en service ou après dégivrage par exemple).
24 heures (*) avant d’introduire les denrées fraîches si l’appareil contient
des denrées congelées, et si vous utilisez la capacité maximale de congé-
lation.
2. Maintenez le fonction Frostmatic pendant 24 heures (*) après avoir
introduit les produits à congeler.
3. Remettez l’appareil en fonctionnement conservation.
(*) Ces temps peuvent être réduits proportionnellement aux quantités d’a-
liments à congeler.
Pour congeler dans les meilleures conditions:
• Respectez le pouvoir de congélation de votre appareil, c’est-à-dire la
quantité maximale de denrées frâches que vous pouvez congeler par 24
heures.
Le pouvoir de congélation de votre appareil est de13 kg/24 heures.
• Disposez les produits frais dans le tiroir supérieur.
Après écoulement du temps nécessaire à la congélation (24 heures) répar-
tissez les produits dans les autres tiroirs de manière à libérer le tiroir supé-
rieur pour une prochaine opération de congélation.
Evitez de procéder à la fabrication des glaçons pendant le temps de
congélation (24 heures) et de placer les produits frais en contact avec les
produits déjà congelés.
Conservation des produits surgelés et congelés du
commerce
Pour une bonne conservation des produits surgelés et congelés, la tempé-
rature à l’intérieur du compartiment congélateur doit être maintenue éga-
le ou inférieure à -18°C.
Assurez-vous que l’emballage des aliments est intact et qu’il ne présente
aucune trace d’humidité, signe d’un début de décongélation.
Prévoyez un temps réduit au minimum pour leur transport du magasin
d’alimentation à votre domicile. Utilisez des sacs isothermes (dans la
mesure du possible).
Repérez la date de fabrication du produit, et respectez la durée de con-
servation indiquée par le fabricant.
Evitez d’ouvrir trop souvent la porte du compartiment congélateur et ne
la laissez ouverte que le temps nécessaire. Une augmentation de la tempé-
rature peut réduire sensiblement la durée de conservation des aliments.
Laissez refroidir les aliments chauds avant de les introduire dans le congé-
lateur.
17
Ne consommez pas certains produits tels que les bâtonnets glacés dès
leur sortie du compartiment congélateur, la température très basse à
laquelle ils se trouvent peut provoquer des brûlures. Un produit décon-
gelé doit être consommé dans le plus bref délai et ne jamais être recon-
gelé, sauf s’il a été cuit entre-temps.
Fabrication des glaçons
La fabrication des glaçons s’effectue dans le compartiment congélateur.
Remplissez les bacs jusqu’aux trois quarts de leur hauteur, de manière à per-
mettre l’expansion de la glace.
Si votre eau est particulièrement riche en sels minéraux (calcaire notam-
ment), remplissez vos bacs avec de l’eau minérale non gazeuse.
Les bacs en matière plastique vous assurent un démoulage plus facile. Si tou-
tefois vous désirez obtenir des glaçons plus rapidement, nous vous conseil-
lons d’utiliser des bacs métalliques que vous trouverez dans le commerce.
Démoulage des glaçons
Le démoulage des bacs en matière plastique s’obtient par simple torsion.
Si vous utilisez des bacs métalliques, passez-les sous l’eau froide pour en
faciliter le démoulage.
Ne décollez jamais les bacs à glaçons avec un couteau ou tout autre objet
tranchant, vous risqueriez de détériorer irrémédiablement l’évaporateur.
Calendrier de congélation
• Les symboles qui figurent sur les tiroirs correspondent à différents types
de produits congelés.
• Les chiffres indiquent la durée de conservation en mois du type cor-
respondant de produit. La durée de conservation supérieure ou infé-rieure
est valable en fonction de la qualité des aliments et du traitement qu’ils ont
subi avant la congélation. La valeur inférieure s’applique toujours aux ali-
ments contenant un fort pourcentage de graisse.
18
Accumulateur de froid
Votre appareil est équipé avec deux accumulateurs de froid. Il doit être placé
dans le tiroir supérieur.
Il vous permet:
d’augmenter l’autonomie de votre appareil en cas de coupure de courant,
de transporter des produits congelés ou surgelés,
de maintenir le froid au niveau le plus bas dans une glacière de pique nique,
de maintenir le froid dans les produits surgelés ou congelés durant la pério-
de de dégivrage.
Entretien et nettoyage
Dégivrage
Compartiment réfrigérateur
Le dégivrage du compartiment réfrigérateur s’effectue AUTOMATIQUEMENT
à chaque arrêt du compresseur. L’eau de dégivrage est évacuée dans un bac
situé à l’arrière de l’appareil où elle s’évapore. Cette opération ne nécessite
aucune intervention de votre part.
Compartiment congélateur
Périodiquement (toutes les 2 ou 3 semaines) à l’aide de une spatule en pla-
stique, grattez la mince couche de givre qui recouvre les parois. Il n’est pas
nécessaire de débrancher l’appareil et d’enlever les produits contenus dans
ce compartiment.
N’utilisez jamais de couteau ou d’objet métallique pour gratter la couche
de givre, vous risquez de détériorer irrémédiablement l’évaporateur.
Une ou deux fois par an, ou chaque fois que l’épaisseur du givre excède 5
mm environ, il est recommandé de procéder, au dégivrage complet.
Pour dégivrer complètement l’appareil
1. Choisissez le moment où votre appareil est peu garni.
2. Comme une élévation de température peut altérer les denrées congelées,
mettez le thermostat sur la position “6”, 12 heures avant d’effectuer le dégi-
vrage pour assurer une réserve de froid (une baisse de température des ali-
ments).
3. Débranchez l’appareil.
19
4. Sortez les bacs à glaçons et éventuel-
lement les denrées congelées. Enve-
loppez celles-ci dans plusieurs feuil-
les de papier journal, ou mieux, dans
des emballages isothermes. Conser-
vez-les dans un endroit frais.
5. Maintenez la porte ouverte .
6. Utilisez la spatule comme gouttière.
Placez au-dessous un récipient dans
lequel s’écoulera l’eau de dégivrage.
Le dégivrage une fois terminé; épon-
gez et séchez soigneusement et
rebranchez l’appareil si nécessaire.
Deux heures plus tard, replacez les produits surgelés et congelés (s’il y a lieu).
Nettoyage
Ne procédez au nettoyage qu’après avoir débranché l’appareil.
N’utilisez jamais de produits abrasifs ou caustiques ni d’éponges avec
grattoir pour procéder au nettoyage de votre appareil.
Il est indispensable de maintenir votre appareil en parfait état de propreté.
Nettoyage intérieur
Il est recommandé de nettoyer le compartiment réfrigérateur très réguliè-
rement et le compartiment congélateur chaque fois que vous procédez au
dégivrage complet.
Compartiment réfrigérateur
• Retirez tous les accessoires (clayettes, balconnets, bac(s) à légumes, etc...).
Lavez-les à l’eau tiède additionnée d’un détergent doux et inodore (pro-
duit utilisé pour la vaisselle par exemple) ; rincez à l’eau javellisée et séchez
très soigneusement.
• Lavez les parois intérieures du com-
partiment comme indiqué pour les
accessoires. Soignez particulière-
ment les supports de clayettes et la
gouttière d’évacuation de l’eau de
dégivrage. Nettoyez l’orifice d’é-
coulement de l’eau de dégivrage
du réfrigérateur avec le bâtonnet
se trouvant dans l’orifice..
D068
D037
20
• Lavez le joint de porte en caoutchouc sans omettre de nettoyer également
sous le joint.
Compartiment congélateur
A l’occasion d’un dégivrage, lavez le compartiment et le joint de porte à l’ai-
de d’une éponge et d’un détergent doux. Rincez et séchez soigneusement.
Nettoyage extérieur
Lavez l’ensemble de la carrosserie à l’eau tiède savonneuse. Rincez et séchez
soigneusement.
De temps en temps, dépoussiérez le condenseur (grille située à l’arrière de
l’appareil) à l’aide d’un aspirateur ou d’une brosse.
Remplacement de l’ampoule d’éclairage
L’ampoule est accessible à travers l’ouverture prévue à cet effet dans le dif-
fuseur.
Pour remplacer l’ampoule
• Débranchez l’appareil.
• Appuyez sur l’enclichetage arrière
et en même temps retirez le cou-
vercle dans le sens de la flèche.
• Remplacez l’ampoule par un
modèle semblable.
(La puissance
maximale est indiquée sur le dif-
fuseur).
• Replacez le cache.
• Rebranchez l’appareil.
En cas d’absence prolongée ou de non-utilisation
Débranchez, videz, dégivrez et nettoyez l’appareil.
Maintenez la porte entrouverte pendant toute la durée de non-utilisation.
Si toutefois, vous n’avez pas la possibilité de débrancher et vider l’appareil,
faites vérifier régulièrement le bon fonctionnement de celui-ci et ceci en
tenant compte de sa charge et de son autonomie de fonctionnement.
En cas d’anomalie de fonctionnement
La fabrication de cet appareil a fait l’objet de nombreuses vérifications.
Cependant, si vous constatez une anomalie de fonctionnement consultez le
tableau ci-dessous avant d’appeler le service après vente.
21
La température de surgélation
ne suffit pas, le voyant rouge
est allumé, l’avertisseur de
température retentit.
L’appareil se trouve à côté d’une
source de chaleur.
Veuillez consulter la section
"Lieu d’installation"
Défaillance de l’appareil.
Activer le commutateur de
congélation rapide, laisser le
congélateur fermé, contacter le
service après-vente.
La température de surgélation
ne suffit pas, le voyant rouge
est allumé, l’avertisseur de
température retentit.
La température est mal réglée.
Veuillez consulter la section
"Mise en service".
La porte est restée ouverte trop
longtemps.
Ne pas ouvrir la porte plus
longtemps que nécessaire.
Actionner le commutateur de
congélation rapide.
De trop grandes quantités d’ali-
ments ont été entreposées au
cours des dernières 24 heures.
Actionner le commutateur de
congélation rapide.
Dérangement
Cause possible Remède
L’appareil ne fonctionne pas,
aucun voyant de contrôle ne
s’allume.
L’appareil n’est pas mis en servi-
ce.
Mettre l’appareil en service.
La fiche n’est pas branchée ou
ne donne pas de contact.
Brancher la fiche secteur.
Le fusible a déclenché ou est
défectueux.
Vérifier le fusible, remplacer le
cas échéant.
La prise de courant est défec-
tueuse.
Les dérangements du réseau
électrique doivent être sup-
primés par votre électricien.
L’appareil refroidit trop forte-
ment.
La température est réglée trop
bas.
Mettre temporairement le
régulateur de température sur
une température plus élevée.
Contacter le service après-ven-
te.
Le voyant vert est défectueux.
Le voyant vert ne s’allume pas,
le voyant jaune est allumé lor-
sque la fonction Frostmatic est
activée.
Contacter le service après-ven-
te.
Le voyant jaune est défectueux.
Le voyant jaune ne s’allume pas,
le voyant jaune est allumé lor-
sque la fonction Frostmatic est
activée. L’appareil fonctionne.
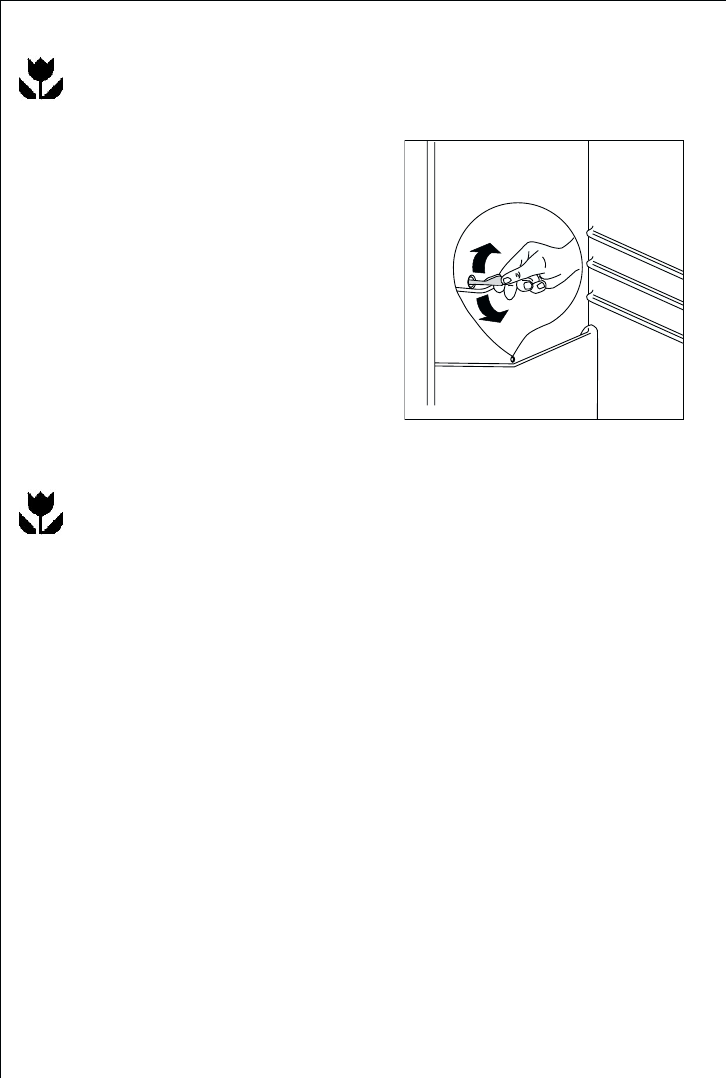
Formation importante de givre
dans l’appareil, éventuellement
aussi au joint de porte.
Le joint de porte n’est pas étan-
che (après changement du sens
d’ouverture de la porte).
A l’aide d’un sèche-cheveux,
réchauffer avec précaution le
joint de porte aux endroits des
fuites (pas plus chaud qu’env.
50 °C). Remettre en même tem-
ps le joint de porte en forme à
la main de manière à ce qu’il
soit de nouveau en position
correcte.
22
Voir section "Nettoyage et
Entretien".
Il y a de l’eau au fond du com-
partiment surgélateur ou sur les
surfaces de rangement.
Le trou d’écoulement de l’eau
de dégivrage est bouché.
Le compresseur se met en mar-
che de lui même au bout d’un
certain temps.
Ceci est normal, il ne s’agit pas
d’un dérangement.
Après modification du réglage
de température, le compresseur
ne démarre pas immédiatement.
Bruits anormaux.
L’appareil est en contact avec la
paroi ou d’autres objets.
L’appareil n’est pas d’aplomb.
Une partie de l’appareil, p. ex.
un tuyau, est en contact avec
une autre partie de l’appareil ou
la paroi à l’arrière de l’appareil
Le cas échéant, plier cette par-
tie avec précaution pour l’éloi-
gner.
Déplacer légèrement l’appareil.
Ajuster les pieds réglables.
Dérangement
Cause possible Remède
Si aucun de ces défauts n’est observé, il convient de consulter très rapide-
ment le service après vente de votre magasin vendeur afin d’éviter toute
altération des aliments. Donnez-lui la référence complète de votre appareil:
ces renseignements figurent sur la plaque signalétique située à l’intérieur de
l’appareil.
En cas d’arrêt de fonctionnement
Si la panne est de courte durée, il n’y a aucun risque d’altération pour les
aliments. Abstenez-vous cependant d’ouvrir la porte.
Si la panne doit se prolonger, transférez les produits surgelés et congelés
dans un autre congélateur. L’autonomie de fonctionnement de votre appa-
reil est indiquée au paragraphe “ Caractéristiques techniques ”.
Cette durée est sensiblement raccourcie suivant la charge l’appareil.
Dès que vous constatez un début de décongélation, consommez les aliments
le plus rapidement possible ou recongelez-les après les avoir cuits (aliments
crus).
23
Niveau sonore
Ci-dessous, nous indiquons certaines sources de bruit qui, toutefois, ne
compromettent en aucun cas le fonctionnement de l’appareil.
Bruit dû au compresseur
Bruit dû à la circulation du fluide
frigorigène.
Bruit dû à la mise en place du meuble
Tic
Tic
Blubb
Blubb
Brrrr
24
Sources de bruit possibles faciles à éliminer
La mise à niveau de l’appareil n’est pas correcte:
Agissez sur les pieds
L’appareil est accolé à d’autres meubles:
Espacez les meubles.
Les accessoires intérieurs sont mal installés:
Retirez les clayettes et/ou les balconnets et remettez-les correctement en
place.
Les bouteilles et/ou les boîtes se touchent:
Séparez les différents éléments à l’intérieur de l’appareil.
Protection de l’environnement
Information sur l’emballage de l’appareil
Tous les matériaux marqués par le symbole >PE< (polyéthylène),
>PS< (mousse de polystyrène) sont recyclables. Déposez-les dans
une déchetterie prévue à cet effet (renseignez-vous auprès des ser-
vices de votre commune) pour qu’ils puissent être récupérés et recy-
clés.
Mise au rebut des anciens appareils
Cet appareil est muni de fermetures magnétiques. S’il remplace un
appareil équipé d’une fermeture mécanique, nous vous conseillons
de rendre celle-ci inutilisable avant de vous en débarrasser, ceci afin
d’éviter aux enfants de s’enfermer dans l’appareil et de mettre ainsi
leur vie en danger. Veillez également à couper le câble d’alimenta-
tion électrique au ras de l’appareil. Renseignez-vous auprès des ser-
vices de votre commune pour la reprise de l’appareil.
Si vous vous débarrassez de votre appareil, veillez à ne pas détériorer
les circuits frigorifiques.
• Le symbole sur le produit ou son emballage indique que ce
produit ne peut être traité comme déchet ménager. Il doit être
remis au point de collecte dédié à cet effet (collecte et recyclage
du matériel électrique et électronique). En procédant à la mise à la
casse réglementaire de l'appareil, nous préservons l'environnement
et notre sécurité, s'assurant ainsi que le déchets seront traités dans
des conditions appropriées. Pour obtenir plus de détails sur le
recyclage de ce produit, veuillez prendre contact avec les services
de votre commune ou le magasin où vous avez effectué l’achat.
25
Installation
Retrait de la protection pour le transport
L’appareil et certaines parties de l’équipement intérieur sont protégés pour
le transport.
Retirez toutes les bandes autocollantes et cales à l’intérieur de l’appareil.
Votre appareil est équipé d’arrêts
pour clayettes qui permettent de les
bloquer pendant le transport.
Pour les enlever, procéder de la façon
suivante :
déplacez les arrêts dans le sens de la
flèche, soulevez à l’arrière la clayette
et poussez-la vers l’avant jusqu’à elle
se dégage. Retirez les arrêts.
Emplacement
Placez de préférence votre appareil
loin d’une source de chaleur (chauf-
fage, cuisson ou rayons solaires trop
intenses).
Veillez à ce que l’air circule librement
tout autour de l’appareil. Si toutefois,
vous désirez placer l’appareil dans
une niche ou directement sous un
élément, il est indispensable de lais-
ser un espace de 100 mm entre le
dessus de l’appareil et un élément
supérieur.
Les conduits de ventilation ne doi-
vent en aucun cas être obstrués.
NP00
100 mm10 mm
10 mm
A
C
B
Retrait de la protection pour le transport
L’appareil et certaines parties de l’équipement intérieur sont protégés
pour le transport.
1. Enlevez les bandes autocollantes à gauche et à droite à l’extérieur de la
porte.
2. Enlevez toutes les bandes autocollantes et rembourrages à l’intérieur
de l’appareil (sauf la plaque signalétique).
26
Pour le bon fonctionnement de votre appareil, la température ambiante
du local doit être comprise entre +10°C et +38°C. Au delà de ces tempé-
ratures, ses performances peuvent s’en trouver diminuées.
Si l’installation à côté d’une source de chaleur est inévitable, observez les
distances latérales minimales suivantes :
• avec des cuisinières électriques 3 cm,
• avec des poêles à mazout et à charbon 30 cm.
S’il n’est pas possible d’observer ces distances, une plaque isolante doit être
placée entre la source de chaleur et l’appareil frigorifique.
Si l’appareil est placé à côté d’un autre réfrigérateur ou congélateur, une
distance latérale de 5 cm est nécessaire pour éviter la formation de con-
densation sur les côtés des appareils.
Important:
L’appareil doit
pouvoir être débranché à tout moment; il est donc nécessai-
re que la prise murale reste accessible une fois que l’installation est terminée.
Fixation des entretoises arrière
Pour éviter que le condenseur ne
touche le mur, fixez les 2 entretoises
jointes à la notice d’utilisation.
Procédez comme indiqué sur les
figures.
Branchement électrique
Votre appareil ne peut être branché
qu'en 230 V monophasé.
Vérifiez que le compteur électrique
peut supporter l'intensité absorbée
par votre appareil compte tenu des
autres appareils déjà branchés.
Calibre des fusibles en ligne (un par
phase) 10 A en 230 V.
Important
L'installation doit être réalisée conformément aux règles de l'art, aux pre-
scriptions de la norme NF.C 15.100 et aux prescriptions de l'E.D.F.
Utilisez un socle de prise de courant comportant une borne de mise à la
terre, qui doit être obligatoirement raccordée conformément à la norme
NF.C.15.100 et aux prescriptions de l’E.D.F ; cette prise de courant doit
impérativement être accessible.
Si le câble d'alimentation est endommagé, il doit être remplacé par un
câble d'alimentation certifié .
Cette opération ne peut être effectuée que par une personne habilitée,
par votre vendeur, ou par le fabricant.
D594
27
F
D
PR18
F
F
F
E
E
G
L’appareil ne doit pas être raccordé à l’aide d’un prolongateur ou d’une pri-
se multiple.
Vérifiez que la prise de terre est conforme aux règlements en vigueur.
Notre responsabilité ne saurait être engagée en cas d'accidents ou d'in-
cidents provoqués par une mise à la terre inexistante ou défectueuse.
Réversibilité des portes
Les portes de cet appareil sont réversibles: leur sens d’ouverture peuvent être
modifiés en fonction du souhait de l’utilisateur.
Attention ! Avant de procéder à la réversibilité des portes, débranchez
l’appareil.
Procédez comme suit:
1. Retirez la grille d’aération (D) qui se
monte par encliquetage.
2. Retirez la charnière inférieure (E) en
dévissant les deux vis de fixation.
3. Dégagez la porte inférieure de la
charnière du milieu (H).
4. Retirez la charnière du milieu et
dégagez la porte supérieure du pivot
(G); dévissez celui-ci et remontez-le
sur le côté opposé.
5. Enlevez les deux caches, de façon à
découvrir les trous pour les pivots de
la charnière, et remontez-les de l’au-
tre côté.
6. Remontez la porte supérieure et la
charnière du milieu (H) sur le côté
opposé.
7. Remontez la porte inférieure.
8. Remontez la charnière inférieure (E)
sur le côté opposé en utilisant les
deux vis retirées précédemment.
9. Enlevez le cache-trou (F) de la grille
d’aération (D) en le poussant dans le
sens de la flèche et remontez-le sur
le côté opposé.
28
1
2
Caractéristiques techniques
Hauteur mm 2000
Largeur mm 600
Profondeur mm 625
Pouvoir de congélation kg/24h 13
Autonomie, en cas de panne, heures * 30
*Selon la Norme NF EN 28187
Cet appareil est conforme aux Directives Communautaires suivantes:
-73/23 CEE 19/02/73 (Basse Tension) et modifications successives;
-89/336 CEE 03/05/89 (Compatibilité Electromagnétique) et modifications
successives.
H
10. Remontez la grille d’aération (D) en
l’encliquetant à fond.
11. Démontez les poignées en dévis-
sant le couvrépoigneé les vis late-
rales et centrale de fixation.
Remontez-les de l’autre côté après
avoir percé les caches avec un
poinçon. Couvrez les trous libres
avec les caches contenus dans le
sachet de la documentation.
Attention
La réversibilité des portes une fois
effectuée, contrôlez que les joints
magnétiques adhèrent à la carrosse-
rie. Si la température à l’intérieur de
la pièce est trop basse (en hiver, par
exemple), il se peut que les joints
n’adhèrent pas parfaitement. Dans ce
cas, si on ne veut pas attendre que les
joints reprennent leurs dimensions
naturelles après un certain temps, on
pourra accélérer ce processus en
chauffant la partie intéressée à l’aide
d’un sèche-cheveux.
29
Geachte klant,
Lees eerst aandachtig de gebruiksaanwijzing door voordat u uw nieuwe
koelapparaat in gebruik neemt. Hierin staat belangrijke informatie over een
veilig gebruik, over het opstellen en over het onderhoud van het apparaat.
De gebruiksaanwijzing s.v.p. bewaren om lager nog eens iets na te kunnen
lezen.. Aan eventuele volgende bezitters van het apparaat doorgeven.
Deze gebruiksaanwijzing is voor meerdere, technisch vergelijkbare modellen
in diverse uitvoeringen bestemd. S.v.p. alleen op de aanwijzingen letten die
op uw apparaat betrekking hebben.
Met de waarschuwingsdriehoek en/of door signaalwoorden (Waar-
schuwing!, Voorzichtig!, Let op!) wordt de aandacht gevestigd op aanwij-
zingen die belangrijk zijn voor uw veiligheid of voor het juist functioneren
van het apparaat. Hier absoluut op letten.
Na dit symbool wordt uitleg gegeven over de bediening en het praktisch
gebruik van het apparaat.
Met het klaverblad worden tips en aanwijzingen voor een economischen
milieuvriendelijk gebruik van het apparaat aangegeven.
Voor eventueel optredende storingen staan in de handleiding aanwijzingen
om deze zelf op te lossen, zie Hoofdstuk "Wat te doen als...". Als deze aanwij-
zingen niet voldoende informatie bieden staat onze service-afdeling u te
allen tijde ter beschikking.
30
Inhoud
Veiligheid . . . . . . . . . . . . . . . . . . . . . . . . . . . . . . . . . . . . . . . . . . . . . .31
Weggooien . . . . . . . . . . . . . . . . . . . . . . . . . . . . . . . . . . . . . . . . . . . . .32
Informatie over de verpakking van het apparaat . . . . . . . . . . . . . . . . .32
Weggooien van oude apparaten . . . . . . . . . . . . . . . . . . . . . . . . . . . . . . .33
Transportbescherming verwijderen . . . . . . . . . . . . . . . . . . . . . . . . . .33
Opstellen . . . . . . . . . . . . . . . . . . . . . . . . . . . . . . . . . . . . . . . . . . . . . .33
Opstelplaats . . . . . . . . . . . . . . . . . . . . . . . . . . . . . . . . . . . . . . . . . . . . . . . .33
Uw koelapparaat heeft lucht nodig . . . . . . . . . . . . . . . . . . . . . . . . . . . .34
Muur-afstandshouders . . . . . . . . . . . . . . . . . . . . . . . . . . . . . . . . . . . . . . .34
Overzetten van het deurscharnier . . . . . . . . . . . . . . . . . . . . . . . . . . . . . .35
Elektrische aansluiting . . . . . . . . . . . . . . . . . . . . . . . . . . . . . . . . . . .36
Voor ingebruikname . . . . . . . . . . . . . . . . . . . . . . . . . . . . . . . . . . . . .36
Bedienings- en kontrolinrichting Koelkast . . . . . . . . . . . . . . . . . . .37
In gebruik nemen - temperatuur instellen . . . . . . . . . . . . . . . . . . .38
Interieur . . . . . . . . . . . . . . . . . . . . . . . . . . . . . . . . . . . . . . . . . . . . . . 39
Legvlakken . . . . . . . . . . . . . . . . . . . . . . . . . . . . . . . . . . . . . . . . . . . . . . . . .39
Variabele binnendeur . . . . . . . . . . . . . . . . . . . . . . . . . . . . . . . . . . . . . . .39
Vochtigheidsregeling . . . . . . . . . . . . . . . . . . . . . . . . . . . . . . . . . . . . . . . .40
De lade . . . . . . . . . . . . . . . . . . . . . . . . . . . . . . . . . . . . . . . . . . . . . . . . . . . .40
Koelen van levensmiddelen . . . . . . . . . . . . . . . . . . . . . . . . . . . . . . . .40
Bedienings- en controleinrichting Vrieskast . . . . . . . . . . . . . . . . .41
In gebruik nemen - temperatuur instellen . . . . . . . . . . . . . . . . . . .42
Invriezen en diepgevroren bewaren . . . . . . . . . . . . . . . . . . . . . . . . .44
Diepvrieskalender . . . . . . . . . . . . . . . . . . . . . . . . . . . . . . . . . . . . . . . . . . .45
Koude-accu’s . . . . . . . . . . . . . . . . . . . . . . . . . . . . . . . . . . . . . . . . . . . . . . .45
Maken van ijsblokjes . . . . . . . . . . . . . . . . . . . . . . . . . . . . . . . . . . . . . . . .45
Ontdooien van het apparaat . . . . . . . . . . . . . . . . . . . . . . . . . . . . . . .45
Apparaat uitzetten . . . . . . . . . . . . . . . . . . . . . . . . . . . . . . . . . . . . . .46
Reiniging en onderhoud . . . . . . . . . . . . . . . . . . . . . . . . . . . . . . . . . .47
Tips om energie te besparen . . . . . . . . . . . . . . . . . . . . . . . . . . . . . .48
Wat te doen als . . . . . . . . . . . . . . . . . . . . . . . . . . . . . . . . . . . . . . . . .48
Hulp bij storingen . . . . . . . . . . . . . . . . . . . . . . . . . . . . . . . . . . . . . . . . . . .48
Lamp vervangen . . . . . . . . . . . . . . . . . . . . . . . . . . . . . . . . . . . . . . . .50
Doel, normen, richtlijnen . . . . . . . . . . . . . . . . . . . . . . . . . . . . . . . . .50
31
Veiligheid
De veiligheid van onze apparaten voldoet aan de Europese en Nederlandse
normen. Desondanks zien wij ons genoodzaakt u met de volgende veili-
gheidsaanwijzingen vertrouwd te maken:
Reglementaire toepassing
• Het apparaat is voor huishoudelijk gebruik bestemd. Het is geschikt voor
het koelen, invriezen en diepgevroren bewaren van levensmiddelen en
voor het maken van ijs. Als het apparaat voor andere doeleinden gebruikt
wordt kan de fabrikant geen verantwoording nemen voor eventuele
schaden.
• Het ombouwen van of veranderingen aan het apparaat aanbrengen is uit
veiligheidsoverwegingen niet toegestaan.
• Als het apparaat commercieel of voor andere doeleinden dan voor het
koelen, diepgevroren bewaren en invriezen van levensmiddelen gebruikt
wordt, s.v.p. letten op de hiervoor van kracht zijnde wettelijke bepalingen.
Voordat het apparaat voor de eerste keer in gebruik
genomen wordt
• Controleer het koelapparaat op transportschaden. Een beschadigd appa-
raat in geen geval aansluiten! Wend u in geval van schade tot de leve-
rancier.
Koelmiddelen
Het apparaat bevat in het koelvloeistofcircuit de koelvloeistof Isobutan
(R600a), een natuurlijk, zeer milieuvriendelijk gas, dat echter wel brandbaar is.
• Bij het transport en het opstellen van het apparaat erop letten dat geen
onderdelen van het koelvloeistofcircuit beschadigd worden.
• Bij beschadiging van het koelvloeistofcircuit:
– open vuur en brandhaarden absoluut vermijden;
– het vertrek waar het apparaat staat goed ventileren.
Veiligheid van kinderen
• Verpakkingsdelen (bijv. folies, piepschuim) kunnen voor kinderen gevaar-
lijk zijn. Verstikkingsgevaar! Verpakkingsmateriaal van kinderen weghou-
den!
• Oude apparaten voor het weggooien onbruikbaar maken. Stekker uit het
stopcontact trekken, stroomkabel doorknippen, eventueel aanwezige
snap– of grendelsloten verwijderen of kapotmaken. Daardoor wordt
voorkomen dat spelende kinderen in het apparaat opgesloten raken (ver-
stikkingsgevaar!) of in andere levensgevaarlijke situaties terecht komen.
• Kinderen kunnen gevaren die in het omgaan met huishoudelijke appara-
ten schuilen vaak niet herkennen. Zorg daarom voor de nodige toezicht
en laat kinderen niet met het apparaat spelen.
32
Bij dagelijks gebruik
• Containers met brandbare gassen of vloeistoffen kunnen lek raken door
de inwerking van koude. Explosiegevaar! Leg geen containers met brand-
bare stoffen zoals bijv. spraybussen, aanstekers, navullingen van aan-
stekers etc. in het koelapparaat.
• Flessen en blikken mogen niet in het vriesvak. Ze kunnen springen als de
inhoud bevriest – bij koolzuurhoudende inhoud zelfs exploderen! Leg
nooit limonades, sappen, bier, wijn, champagne etc. in het vriesvak. Uit-
zondering: sterke drank met een zeer hoog alcoholpercentage kan in het
vriesvak gelegd worden.
• Consumptie-ijs en ijsblokjes niet direct vanuit de vriesruimte in de mond
steken. Zeer koud ijs kan aan de lippen of de tong vastvriezen en verwon-
dingen veroorzaken.
• Niet met natte handen aan diepvriesartikelen komen. De handen kunnen
daaraan vastvriezen.
• Geen elektrische apparaten (bijv. elektrische ijsmachines, mixers etc.) in het
koelapparaat gebruiken.
• Voor het schoonmaken het apparaat altijd uitzetten en de stekker uit het
stopcontact trekken of de zekering in de uitschakelen huisinstallatie.
• De stekker altijd aan de stekker zelf uit het stopcontact trekken, nooit aan
het snoer.
Bij storing
• Als er een storing aan het apparaat optreedt eerst in de gebruiksaanwij-
zing kijken onder “Wat te doen als ...”. Als de daar gegeven aanwijzingen
niet verder helpen zelf niet verder aan het apparaat werken.
• Koelapparaten mogen alleen dooor geschoold personeel gerepareerd wor-
den. Door ondeskundige reparaties kunnen grote gevaren ontstaan. Wend
u zich bij reparaties tot uw vakhandel of tot onze service-afdeling.
Weggooien
Informatie over de verpakking van het apparaat
Alle gebruikte grondstoffen zijn milieuvriendelijk! Ze kunnen zonder gevaar
weggegooid of in de vuilverbrandingsoven verbrand worden!
De grondstoffen: de kunststoffen kunnen ook opnieuw gebruikt worden en
worden als volgt gekarakteriseerd:
>PE< voor polyethyleen, bijv. bij de buitenste verpakking en de zakken binne-
nin.
>PS< voor schuimpolystyrol, bijv. bij de bekledingsdelen, in principe CFK-vrij.
De kartonnen delen zijn van oud papier gemaakt en kunnen ook weer bij
het oudpapier gedaan worden.
33
Weggooien van oude apparaten
Wegens milieuredenen dienen koelapparaten vakkundig ontmanteld te
worden. Dit geldt voor uw huidige apparaat en - als het ook aan vervanging
toe is - ook voor uw nieuwe apparaat.
Waarschuwing! Apparaten die hun tijd gehad hebben onbruikbaar maken
voordat ze weggegooid worden. Stekker er afhalen, netsnoer doorknippen,
eventuele snap- of grendelsloten verwijderen of kapotmaken. Hierdoor
wordt voorkomen dat spelende kinderen in het apparaat opgesloten worden
(verstikkingsgevaar!) of in andere levensgevaarlijke situaties terechtkomen.
Aanwijzingen voor het weggooien:
• Het apparaat mag niet bij het huis- of grofvuil gezet worden.
• Het koelvloeistofcircuit, in het bijzonder de warmtewisselaar aan de ach-
terkant, mag niet beschadigd worden.
• Het symbool op het product of op de verpakking wijst erop dat dit
product niet als huishoudafval mag worden behandeld. Het moet echter
naar een plaats worden gebracht waar elektrische en elektronische appa-
ratuur wordt gerecycled. Als u ervoor zorgt dat dit product op de correc-
te manier wordt verwijderd, voorkomt u mogelijk voor mens en milieu
negatieve gevolgen die zich zouden kunnen voordoen in geval van
verkeerde afvalbehandeling. Voor meer details in verband met het recy-
clen van dit product, neemt u het best contact op met de gemeentelijke
instanties, het bedrijf of de dienst belast met de verwijdering van hui-
shoudafval of de winkel waar u het product hebt gekocht.
Transportbescherming verwijderen
Het apparaat alsmede de onderdelen van het interieur zijn voor het tran-
sport beschermd.
• Alle plakband alsmede bekledingsdelen uit het interieur verwijderen.
Uw apparatuur is voorzien van blokkeringen, waardoor de platen tijdens het
transport op hun plaats blijven.
Handel als volgt om deze te verwij-
deren:
Beweeg de blokkeringen in de rich-
ting van de pijl, til de glasplaat aan
de achterkant op en duw deze in de
richting van de pijl tot deze los raakt
en verwijder de blokkeringen.
Opstellen
Opstelplaats
Het apparaat in een goed geventileerde en droge ruimte neerzetten.
De omgevingstemperatuur heeft invloed op het stroomverbruik.
Het apparaat daarom
34
D594
NP00
100 mm10 mm
10 mm
Klimaatklasse voor een omgevingstemperatuur van
SN +10 tot +32 °C
N +16 tot +32 °C
ST +18 tot +38 °C
T +18 tot +43 °C
– niet aan directe straling van de zon blootstellen;
– niet bij radiatoren, naast een kachel of andere warmtebronnen plaatsen;
– alleen op een plaats neerzetten waarvan de omgevingstemperatuur over-
eenkomt met de klimaatklasse waarvoor het apparaat is ontworpen.
De klimaatklassees staan op het typeplaatje dat zich links aan de binnenkant
van het apparaat bevindt.
De volgende tabel geeft aan welke omgevingstemperatuur bij welke kli-
maatklasse behoort:
Als het onvermijdelijk is het apparaat naast een warmtebron te plaat-sen,
aan weerszijden minimaal de volgende afstanden aanhouden:
– tot elektrische fornuizen 3 cm;
– tot olie- en kolenfornuizen 30 cm.
Als men zich niet aan deze afstanden kan houden, is een warmte-isoleren-
deplaat tussen fornuis en koelapparaat aan te bevelen.
Als het koelapparaat naast een ander
koel- of diepvriesapparaat staat, is
een afstand van 5 cm aan weerszij-
den aan te bevelen, zodat zich geen
condens vormt aan de buitenkant
van de apparaten.
Uw apparaat heeft lucht nodig
Om veiligheidsredenen moet de ven-
tilatie zodanig zijn als aangegeven de
afbeelding.
Attentie: zorg ervoor dat de ventila-
tie openingen tijdens gebruik niet
worden afgedekt.
Muur-afstandhouders
In het documentenzakje bevinden
zich twee afstandhouders die in de
bovenste hoeken aan de achterzijde
geplaatst dienen te worden.
Draai de schroeven los steek de
afstandhouder onder de schroefkop
en draai de schroeven weer vast.
35
F
D
PR18
F
F
F
E
E
H
G
Overzetten van het deurscharnier
Het deurscharnier kan van rechts (stand waarin het wordt afgeleverd) naar
links overgezet worden als dat voor de opstelplaats nodig is.
Waarschuwing! Bij het overzetten van de deurscharnieren mag het appa-
raat niet op het lichtnet aangesloten zijn. Van te voren de stekker uit het
stopcontact halen.
Ga nu verder als volgt te werk:
1. Trek het ventilatierooster (D), dat
door palwerk vastgezet is, uit.
2. Verwijder het onderscharnier (E) door
de twee schroeven, die het bevesti-
gen; verwijder de deur van de vrie-
sruimte door hem naar beneden te
schuiven.
3. Draai de schroeven weer vast.
4. Verwijder de beschermdopjes van de
schroeven linksonder en plaats ze op
de schroeven rechts.
5. Draai de twee schroeven links-onder
los.
6. Schroef het middenscharnier los;
verwijder de deur van de koelruimte
door hem naar beneden te schuiven
7. Draai met een schroevendraaier de
twee beschermdopjes op de gaatjes
links los en monteer ze aan de rech-
terkant.
8. Draai de stift van het bovenscharnier
los en monteer haar aan de
linkerkant.
9. Plaats de deur van de koelruimte op
de bovenstift.
10. Plaats het middenscharnier in het
onderste deel van de deur van de
koelruimte; vergeet de sluitringetjes
niet.
11. Schroef het middenscharnier stevig
vast.
12. Plaats de deur van de vriesruimte op
het middenscharnier.
13. Hermonteer het onderscharnier (E)
aan de andere kant door middel van
de twee schroeven die u eerder
verwijderd hebt.
36
1
2
14. Verwijder het stopstuk (F) uit het
ventilatierooster (D) door het naar de
pijlrichting te duwen en breng het
aan de andere kant weer aan.
15. Hermonteer het ventilatierooster (D),
voer het door palwerk in.
16. Demonteer de handgrepen door
de handgreepbedekking weg te
nemen en de bevestigingsschroe-
ven aan de zijkant en in het mid-
den los te draaien en deze vervol-
gens aan de tegengestelde kant te
monteren. De niet gebruikte gaten
worden gemaskerd door kunststof
dopjes die zich in het zakje met
toebehoren bevinden.
Belangrijk
Na het omkeren van de deurdraairichting moet u controleren of het deur-
rubber rondom goed op de sponning sluit. In een koud vertrek (in de win-
ter) kan het gebeuren dat dat niet het geval is. Na enkele dagen zal het rub-
ber zich echter aangepast hebben. Wilt u dat bespoedigen, dan kunt u het
rubber warm maken met een föhn.
Elektrische aansluiting
Voor de elektrische aansluiting is een volgens de voorschriften geïnstalleerde
contactdoos met randaarde vereist. De contactdoos moet zodanig worden
geïnstalleerd, dat de stekker altijd uit de contactdoos kan worden getrokken.
De elektrische zekering dient minstens 10 Ampère te zijn.
Indien het stopcontact bij een ingebouwd apparaat niet meer toegankelijk
is, dient een maatregel in de elektrische installatie er voor te zorgen dat het
apparaat van de stroom kan worden afgesloten (bijv. zekering, beveiligings-
schakelaar, aardlekschakelaar of dergelijke met een contactopeningsbreed-
te van minimaal 3 mm).
• Voor ingebruikneming op het typeplaatje van het apparaat controleren of
de netspanning en stroomsoort overeenkomen met de waarden van het
lichtnet op de plaats waar het apparaat komt te staan.
Bijv.: AC 230 ... 240 V 50 Hz of
230 ... 240 V~ 50 Hz
(d.w.z. 230 tot 240 Volt wisselstroom, 50 Hertz)
Het typeplaatje bevindt zich links aan de binnenkant van het apparaat.
Voor ingebruikname
• Het interieur van het apparaat en alle accessoires schoonmaken voor het
eerste gebruik (zie Hoofdstuk “Reiniging en onderhoud”).
37
A. toets ON/OFF van de koelkast
B. toets voor temperatuurinstelling (voor warmere temperaturen)
C. temperatuurindicatie
D. toets voor temperatuurinstelling (voor koudere temperaturen)
E. indicatie voor ingeschakelde COOLMATIC-functie (geel)
F. toets COOLMATIC
Toetsen voor temperatuurinstelling
De temperatuur wordt ingesteld via de toetsen „B“ en „D“. De toetsen staan
in verbinding met de temperatuurindicatie.
Door te drukken op één van de twee toetsen „B“ of „D“ wordt de tempera-
tuurindicatie van de WERKELIJKE temperatuur (temperatuurindicatie
brandt) op de GEWENSTE temperatuur (temperatuurindicatie knippert)
omgeschakeld.
Met elke verdere druk op één van beide toetsen wordt de GEWENSTE tem-
peratuur 1 °C verder gesteld. De GEWENSTE temperatur dient binnen 24 uur
te worden bereikt.
Als geen toets wordt ingedrukt, schakelt de temperatuurindicatie na korte
tijd (ca. 5 sec.) automatisch weer op de WERKELIJKE temperatuur terug.
GEWENSTE temperatuur betekent:
De temperatuur die in de koelruimte moet heersen. De GEWENSTE tempe-
ratuur wordt met knipperende cijfers aangegeven.
WERKELIJKE temperatuur betekent:
De temperatuurindicatie geeft de temperatuur aan die op dat moment
werkelijk in de koelruimte heerst. De WERKELIJKE temperatuur wordt met
brandende cijfers aangegeven.
Bedienings- en kontroleinrichting
Koelkast
B
C
F
D
E
A
38
Temperatuurindicatie
De temperatuurindicatie kan meerdere soorten informatie aangeven.
Bij normaal gebruik wordt de temperatuur aangegeven die op dat moment
in de koelruimte heerst (WERKELIJKE temperatuur).
Tijdens de temperatuurinstelling wordt knipperend de op dat moment inge-
stelde koelruimte temperatuur aangegeven (GEWENSTE temperatuur).
In gebruik nemen - temperatuur instellen
1. Stekker in stopcontact steken.
2. Toets KOELEN ON/OFF indrukken. Het apparaat start.
3. Druk op de toetsen „B“ of „D“. De temperatuurindicatie schakelt om en geeft
knipperend de op dat moment ingestelde GEWENSTE temperatuur aan.
4. Gewenste temperatuur door indrukken van de toetsen „B“ en „D“ instellen
(zie hoofdstuk "Toetsen voor temperatuurinstelling"). De temperatuurindi-
catie geeft direct de gewijzigde instelling aan. Met elke druk op de toets
wordt de temperatuur 1 °C hoger ingesteld.
Uit voedingswetenschappelijk standpunt is +5 °C voor de koelruimte koud
genoeg als bewaartemperatuur.
5. Als na het instellen van de temperatuur de toetsen niet meer worden inge-
drukt, schakelt de temperatuurindicatie na korte tijd (ca. 5 seconden) om en
geeft weer de WERKELIJKE temperatuur aan die op dat moment in de koel-
ruimte heerst.
Aanwijzing: als de instelling veranderd wordt, start de compressor niet
direct als op dat ogenblik automatisch wordt ontdooid. Omdat de bewaar-
temperatuur in de koelruimte snel wordt bereikt, kunt u direct na het
inschakelen levensmiddelen in de koelruimte leggen.
COOLMATIC
De COOLMATIC-functie is geschikt voor het snel afkoelen van grotere hoe-
veelheden in de koelruimte.
1. Door te drukken op de COOLMATIC toets wordt de COOLMATIC-functie
ingeschakeld. Het gele lampje gaat branden.
De COOLMATIC-functie zorgt nu voor intensief koelen. Daarbij wordt auto-
matisch een temperatuur van +2 °C ingesteld. Na verloop van 6 uur wordt
de COOLMATIC-functie automatisch beëindigd. Het gele lampje gaat uit.
2. De COOLMATIC toets te drukken kan de COOLMATIC-functie te allen tijde
handmatig beëindigd worden. Het gele lampje gaat uit.
Vakantiefunctie
Bij de vakantiefunctie is de temperatuur ingesteld op +15°C. Zodoende kunt
u tijdens een lange periode van afwezigheid (bijv. vakantie) de deur van de
39
Interieur
Legvlakken
Naargelang het model is het appa-
raat voorzien van glazen legvlakken.
Het legvlak van glas boven de groen-
te- en fruitbakken moet altijd op die
plaats blijven liggen, opdat groente
en fruit langer vers blijven.
De overige legvlakken zijn in hoogte
verstelbaar:
Daartoe het legvlak zover naar voren trekken tot het naar boven of onde-
ren bewogen kan worden en eruit gehaald kan worden.
Om de legvlakken op een andere hoogte te zetten in omgekeerde volgorde
te werk gaan.
Variabele binnendeur
Naargelang de behoefte kunnen de deurvakken er naar boven uitgenomen
worden en op andere plaatsen gezet worden.
D338
lege koelkast dus dicht laten in plaats van deze open te laten staan, zonder dat er
onaangename luchtjes ontstaan.
1. Om de vakantiefunctie in te stellen, dient men op toets (B) te drukken°.
2. Men dient nu net de toets voor temperatuurverhoging te drukken tot de
letter “H” (holiday) op de temperatuuraanduiding verschijnt. De tempera-
tuuraanduiding wijzigt de getoonde temperatuur telkens met 1°C tot +8°C.
Na +8°C volgt de letter “H”. NU bevindt de koelkast zich op de energiebe-
sparende stand van de vakantiefunctie.
De koelkast uitschakelen
Druk om de koelkast uit te schakelen meerdere keren op drukknop "B" tot
het symbool "OF" op de tweede verklikker (C) verschijnt.
Druk nogmaals gedurende ongeveer 5 seconden op knop "B". De tempera-
tuurmelder begint nu van "3" tot "1" af te tellen. Zodra de "1" verschijnt,
betekent dit dat de koelkast uitgeschakeld is. De temperatuurmelder wordt
uitgeschakeld.
40
Koelen van levensmiddelen
Voor een optimaal gebruik van de koelruimte adviseren wij u de volgende
eenvoudige regels in acht te nemen:
Plaats geen warme of dampende spijzen of dranken in de koelruimte;
• dek vooral sterk geurend voedsel af of verpak het;
plaats de levensmiddelen zo, dat de lucht vrij eromheen kan circuleren.
PR271
Vochtigheidsregeling
Voor het legvlak boven de groente-
en fruitbakken bevindt zich een ver-
stelbaar ventilatierooster.
De opening van de ventilatiesleuven
kan m.b.v. een schuifje traploos gere-
geld worden.
Schuifje rechts: ventilatiesleuven
geopend.
Schuifje links: ventilatiesleuven
gesloten.
Als de ventilatiesleuven open zijn, heerst t.g.v. sterkere luchtcirculatie een
laag luchtvochtigheidsgehalte in de groente- en fruitbakken.
Als de ventilatiesleuven dicht zijn, blijft het natuurlijke vochtigheidsgehalte
van de levensmiddelen in de groente- en fruitbakken langer behouden.
De lade
De lade is geschikt om er groente en
fruit in te bewaren.
Binnenin de lade bevindt zich een
scheidingswand die op verschillende
plaatsen kan worden gezet om de
afscheiding aan de eigen wensen af
te stemmen.
Op de bodem van bovengenoemde
lade bevindt zich een rooster dat
ervoor zorgt dat de etenswaren die
erin zitten niet in aanraking komen met het vocht dat zou kunnen
ontstaan en dat in het onderste gedeelte opgevangen wordt.
De lade kan verwijderd worden met behulp van de zijhandgrepen
(zoals aangeduid in de afbeelding) en de binnenste onderdelen kun-
nen weggenomen worden om schoongemaakt te worden.
41
Bedienings- en kontroleinrichting
Vrieskast
G. indicatie voor ingeschakelde FROSTMATIC-functie (geel)
H. toets FROSTMATIC
I. toets voor temperatuurinstelling (voor warmere temperaturen)
J. temperatuurindicatie van de diepvriezer
K. toets voor temperatuurinstelling (voor koudere temperaturen)
L Toets om het alarm uit te schakelen
M. Alarmcontrolelampje
Toetsen voor temperatuurinstelling
De temperatuur wordt ingesteld via de toetsen „I“ en „K“. De toetsen staan
in verbinding met de temperatuurindicatie.
Door te drukken op één van de twee toetsen „I“ of „K“ wordt de tempera-
tuurindicatie van de WERKELIJKE temperatuur (temperatuurindicatie
brandt) op de GEWENSTE temperatuur (temperatuurindicatie knippert)
omgeschakeld.
H
I
K
J L MG
Enkele belangrijke tips:
Vlees (alle soorten): wordt in plastic zakjes op de glazen plaat boven de
groentelade geplaatst.
Bewaar vlees niet langer dan één of twee dagen.
Gekookt voedsel, koude schotels enz.: kunnen, goed afgedekt, op elk legv-
lak geplaatst worden.
Gekookt voedsel, koude schotels enz.: kunnen, goed afgedekt, op elk leg-
vlak geplaatst worden.
Fruit en groente: worden schoongemaakt in de groentelade(n) gelegd.
Boter en kaas: worden, om blootstelling aan de lucht te voorkomen, in spe-
ciale koeldozen bewaard of in plastic- of aluminiumfolie verpakt.
Flessen melk: worden, goed gesloten, in het flessenrek geplaatst.
Bewaar niet-luchtdicht verpakte bananen, aardappelen, uien of knoflook
niet in de koelkast.
42
Met elke verdere druk op één van beide toetsen wordt de GEWENSTE tem-
peratuur 1 °C verder gesteld. De GEWENSTE temperatur dient binnen 24 uur
te worden bereikt..
Als geen toets wordt ingedrukt, schakelt de temperatuurindicatie na korte
tijd (ca. 5 sec.) automatisch weer op de WERKELIJKE temperatuur terug.
GEWENSTE temperatuur betekent:
De temperatuur die in de diepvriezer moet heersen. De GEWENSTE tempe-
ratuur wordt met knipperende cijfers aangegeven.
WERKELIJKE temperatuur betekent:
De temperatuurindicatie geeft de temperatuur aan die op dat moment
werkelijk in de diepvriezer heerst. De WERKELIJKE temperatuur wordt met
brandende cijfers aangegeven.
Temperatuurindicatie
De temperatuurindicatie kan meerdere soorten informatie aangeven.
Bij normaal gebruik wordt de temperatuur aangegeven die op dat moment
in de diepvriezer heerst (WERKELIJKE temperatuur).
Tijdens de temperatuurinstelling wordt knipperend de op dat moment inge-
stelde diepvriezer temperatuur aangegeven (GEWENSTE temperatuur).
In gebruik nemen - temperatuur instellen
1. Stekker in stopcontact steken.
2. Toets Vriezer ON/OFF indrukken. Het alarmcontrolelampje (M) knippert
zodra de ingestelde temperatuur bereikt worden. Het geluidsalarm wordt
ingeschakeld.
3. Druk op de toest “L” om het geluidsalarm uit te schakelen.
4. Druk op de toetsen „I“ of „K“ .De temperatuurindicatie schakelt om en geeft
knipperend de op dat moment ingestelde GEWENSTE temperatuur aan.
5. Gewenste temperatuur door indrukken van de toetsen „I“ en „K“ instellen
(zie hoofdstuk "Toetsen voor temperatuurinstelling"). De temperatuurindi-
catie geeft direct de gewijzigde instelling aan. Met elke druk op de toets
wordt de temperatuur 1 °C hoger ingesteld.
Uit voedingswetenschappelijk standpunt is -18 °C voor de diepvriezer koud
genoeg als bewaartemperatuur.
6. Het alarmcontrolelampje wordt uitgeschakeld zodra de ingestelde tempera-
tuur bereikt worden. Druk op de alarmtoers om het geluidsalarm uit te
schakelen.
43
FROSTMATIC
De FROSTMATIC-functie versnelt het invriezen van verse levensmiddelen en
beschermt tegelijkertijd de reeds ingevroren waren tegen ongewenste
verwarming.
1. Door te drukken op de FROSTMATIC toets wordt de FROSTMATIC-functie
ingeschakeld. Het gele lampje gaat branden.
Als de FROSTMATIC-functie niet handmatig beëindigd wordt, schakelt de
elektronica van het apparaat de FROSTMATIC-functie na 48 uur uit. Het gele
lampje gaat uit.
2. De FROSTMATIC toets te drukken kan de FROSTMATIC-functie te allen tijde
handmatig beëindigd worden. Het gele lampje gaat uit.
Toets om het alarm uit te schakelen
Een abnormale verhoging van de temperatuur in de diepvries (bijv. uitval-
len van de elektriciteit) wordt aangeduid door het knipperen van het con-
trolelampje (M) en door een geluidsignaal.
Wanneer de normale omstandigheden hersteld worden, gaat het geluidsa-
larm uit, terwijl het alarmcontrolelampje blijft knipperen.
Door op alarmtoets (L) te drukken, verschijnt op de aanduiding (J) geduren-
de enkele seconden de hoogste temperatuur die in de diepvriezer ontstaan
is.
Het vriesvak uitschakelen
Druk om de diepvriezer uit te schakelen meerdere keren op drukknop "I" tot
het symbool "OF" op de temperatuurmelder (J) verschijnt.
Druk nogmaals gedurende ongeveer 5 seconden op knop "I". De tempera-
tuurmelder begint nu van "3" tot "1" af te tellen. Zodra de "1" verschijnt,
betekent dit dat de diepvriezer uitgeschakeld is. De temperatuurmelder
wordt uitgeschakeld.
Apparaat uitschakelen
Om uit te schakelen toets ON/OFF ingedrukt houden. De temperatuurindi-
catie gaat uit.
Aanwijzing:
De instelling van het apparaat kan niet veranderd worden, als de stekker uit
het stopcontact getrokken is of als er anderszins geen elektriciteit aanwezig
is. Na aansluiting op het elektriciteitsnet start het apparaat weer op de stand
waar het voor de stroomonderbreking op stond.
Als het apparaat gedurende langere tijd niet gebruikt wordt:
44
Invriezen en diepgevroren bewaren
In uw koelapparaat kunt u diepvriesproducten bewaren en verse levens-
middelen zelf invriezen.
Attentie!
• Voor het invriezen van levensmiddelen dient de temperatuur in de vries-
ruimte –18 °C of lager te zijn.
• Let op het op het typeplaatje aangegeven vriesvermogen. Het vriesver-
mogen is de maximale hoeveelheid verse waren die binnen 24 uur inge-
vroren kunnen worden. Als er gedurende meerdere dagen achter elkaar
ingevroren wordt, neem dan slechts 2/3 tot 3/4 van de hoeveelheid aan-
gegeven op het typeplaatje. De kwaliteit is beter, als de levensmiddelen
snel tot in de kern bevriezen.
• Warme levensmiddelen voor het invriezen laten afkoelen. De warmte leidt
tot verhoogde ijsvorming en verhoogt het energieverbruik.
• Bij het bewaren van kant-en-klare diepvriesproducten dient u zich besli-
st aan de door de fabrikant opgegeven bewaartijd te houden.
• Eenmaal ontdooide levensmiddelen zonder verdere verwerking (bereiden
tot panklare gerechten) in geen geval een tweede keer invriezen.
• Containers met brandbare gassen of vloeistoffen kunnen lek raken door
de inwerking van koude. Explosiegevaar! Leg geen containers met brand-
bare stoffen zoals bijv. spraybussen, aanstekers, navullingen van aan-
stekers etc. in het vriesapparaat.
• Flessen en blikken mogen niet in de vriesruimte. Ze kunnen springen als
de inhoud bevriest – bij koolzuurhoudende inhoud zelfs exploderen! Leg
nooit limonades, sappen, bier, wijn, champagne etc. in de vriesruimte. Uit-
zondering: sterke drank met een zeer hoog alcoholpercentage kan in de
vriesruimte gelegd worden.
Alle levensmiddelen voor het invriezen luchtdicht verpakken, zodat ze
niet uitdrogen, de smaak niet verloren gaat en de smaak niet op andere
1. Schakel het apparaat uit (zie het bovenbeschreven punt 1)
2. Stekker uit het stopcontact halen of zekering uitschakelen, er resp. uithalen.
3. Vriesvak ontdooien en apparaat grondig reinigen (zie hoofdstuk "Reiniging
en onderhoud").
4. Daarna de deuren open laten staan om reukvorming te voorkomen.
45
diepvriesproducten overgebracht wordt.
• Daardoor heeft u een beter overzicht, wordt het lang openen van de deur
voorkomen en wordt stroom bespaard.
• Niet-bevroren artikelen mogen niet in aanraking komen met reeds bevro-
ren waren omdat anders de bevroren artikelen kunnen ontdooien.
Voorzichtig! Diepvriesartikelen niet met natte handen aanraken. De handen
kunnen daaraan vast vriezen.
1. De in te vriezen levensmiddelen in de bovenste lade van het apparaat plaat-
sen.
2. Indien u voedsel sneller wilt invriezen of indien u de max. hoeveelheid wilt
invriezen, dan dient u 24 uur van te voren de snelvriesschakelaar in te
drukken. op de koude instelling.
Diepvrieskalender
• De symbolen geven de diverse soorten diepvriesproducten aan.
• De getallen geven voor iedere soort diepvriesproduct de bewaartijd in
maanden aan. Of de hoogste of de laagste waarde van de aangegeven
bewaartijd geldt, hangt af van de kwaliteit van de levensmiddelen en de
behandeling voorafgaand aan het invriezen. Voor levensmiddelen met een
hoog vetgehalte geldt altijd de laagste waarde.
Koude-accu’s
In één van de laden van de vriesruimte bevinden zich twee koude-accu’s.
Als de stroom uitvalt of bij een storing aan het apparaat verlengen de koude-
accu’s de tijd tot de diepvriesartikelen te warm worden met meerdere uren.
De koude-accu’s kunen dit echter alleen optimaal doen als ze in de boven-
ste lade vooraan boven op de diepvriesartikelen gelegd worden. De koude-
accu’s kunnen tijdelijk ook als koelelement voor koeltassen gebruikt wor-
den.
Maken van ijsblokjes
1. IJsbakje voor 3/4 met koud water vullen, in de vriesruimte plaatsen en laten
bevriezen.
2. Om de ijsblokjes los te maken het ijsbakje omdraaien of kort onder stro-
mend water houden.
Attentie! Een eventueel vastgevroren ijsbakje in geen geval met spitse
of scherpe voorwerpen losmaken.
46
Ontdooien van het apparaat
Het ontdooien van de koelruimte
Als de compressor loopt vormt zich op de achterwand van de koelruimte
een rijplaag. Deze laag wordt automatisch verwijderd, wanneer de com-
pressor stilstaat. Het dooiwater wordt in een gootje in de achterwand van
de koelruimte opgevangen en via een afvoeropening naar een verzamelbak
boven de compressor gevoerd, alwaar het verdampt.
Het ontdooien van de vriesruimte
In het vriesvak slaat het vocht dat ontstaat tijdens de werking van het
apparaat en tijdens het openen van de deur neer. Daardoor vormt zich in
de vriesruimte een rijplaag. Deze dient regelmatig verwijderd te worden
met behulp van de speciale kunststof schraper. Een dikke rijplaag in de
vriesruimte betekent een hoger energieverbruik. Ontdooi daarom minstens
éénmaal per jaar, resp. als zich een rijplaag van ca. 4 mm gevormd heeft, de-
vriesruimte. Dit kunt u het beste doen, wanneer de vriesruimte leeg of sle-
chts voor een klein deel gevuld is.
Ga als volgt te werk:
1. Verwijder de diepvriesproducten en
bewaar ze op een koele plaats.
2. Schakel het apparaat uit en haal de
stekker uit het stopcontact of
schakel de zekering in de huisinstal-
latie uit.
3. Laat de deur van de vriesruimte
openstaan.
4. Steek de kunststof schraper in de ope-
ning onder de vriesruimte en plaats
daar een schaaltje of teiltje onder.
5. Draai de thermostaatknop in de gewenste stand of steek de stekker weer in
het stopcontact. Na twee of drie uur kunt u de diepvriesproducten weer
terugplaatsen.
Belangrijk
Gebruik geen metalen voorwerpen om de rijplaag te verwijderen.
Gebruik geen elektrische verwarmingsapparaten o.i.d. om het ontdooipro-
ces te versnellen. Houd u aan de aanwijzingen in dit boekje.
Temperatuurstijging van diepvriesproducten kan hun houdbaarheidsduur
verkorten.
Apparaat uitzetten
Voor het uitzetten de temperatuurregelaar op stand “0” draaien.
Als het apparaat gedurende langere tijd niet gebruikt wordt:
D068
47
1. Levensmiddelen uit koelruimte en vriesvak nemen.
2. Apparaat uitzetten, daartoe de temperatuurregelaar op stand “0” draaien.
3. Stekker uit het stopcontact halen of zekering in de huisinstallatie uit-
schakelen.
4. Diepvriesruimte ontdooien en grondig reinigen (zie hoofdstuk “Reiniging en
onderhoud”).
5. Deuren daarna open laten om geurvorming te voorkomen.
Reiniging en onderhoud
Om hygiënische redenen dient het apparaat aan de binnenkant met toe-
behoren geregeld gereinigd te worden.
Waarschuwing!
• Het apparaat mag tijden het schoonmaken niet op het elektriciteitsnet aan-
gesloten zijn. Gevaar voor schokken! Zet voor het schoonmaken het appa-
raat uit en trek de stekker uit het stopcontact of schakel de zekering uit.
• Het apparaat nooit met stoomreinigingsapparaten schoonmaken. Er kan
vocht in de elektrische onderdelen komen. Gevaar voor schokken! Hete
damp kan kunstof onderdelen beschadigen.
• Het apparaat dient droog te zijn voordat het weer in gebruik genomen
wordt.
Let op!
• Etherische oliën en organische oplosmiddelen kunnen kunststof onderde-
len aantasten, bijv.
– Sap van citroen– of sinaasappelschillen;
– boterzuur;
– schoonmaakmiddelen die azijnzuren bevatten.
Dergelijke substanties niet in contact brengen met apparaatonderdelen.
• Geen schurende schoonmaakmiddelen gebruiken.
1. Koel– en diepvriesartikelen er uit halen. Diepvriesartikelen in meerdere
lagen kranten verpakken. Alles afgedekt op een koele plaats leggen.
2. Vriesvak voor het schoonmaken ontdooien (zie hoofdstuk “Ontdooien”).
3. Apparaat uitzetten en de stekker uit het stopcontact halen of de zekering
in de huisinstallatie uitschakelen.
4. Apparaat en interieur met een doek
en lauwwarm water schoonmaken.
Eventueel een beetje normaal afwa-
smiddel gebruiken.
5. Daarna met schoon water afnemen
en droogmaken.
Stof op de condensor verhoogt het
energieverbruik. Daarom eenmaal
per jaar de condensor aan de ach-
terkant van het apparaat met een
D037
48
48
Apparaat koelt te sterk.
Temperatuur is te laag inge-
steld.
Temperatuurregelaar tijdelijk
op een hogere stand zetten.
Storing Mogelijke oorzaken Oplossing
Apparaat werkt niet.
Apparaat is niet aangezet. Apparaat aanzetten.
Stekker zit niet in het stopcon-
tact of zit los.
Stekker in stopcontact steken.
Zekering is los of kapot.
Zekering controleren,eventueel
vernieuwen
Stopcontact is kapot.
Storingen in het lichtnet door
uw elektrovakman laten
verhelpen.
zachte borstel of met de stofzuiger
voorzichtig schoonmaken.
6. Het dooiwaterafvoergat aan de achterwand van de koelruimte contro-
leren. Een verstopt dooiwaterafvoergat met behulp van het groene
stopje dat met het toestel is meegeleverd schoonmaken.
7. Als alles droog is, de levensmiddelen er weer in doen en het apparaat weer
in bedrijf nemen.
Tips om energie te besparen
• Het apparaat niet in de buurt van kachels, verwarmingselementen of
andere warmtebronnen plaatsen. Bij een hoge omgevingstemperatuur
werkt de compressor vaker en langer.
• Zorgen voor voldoende be- en ontluchting aan de onderkant van het
apparaat. Ventilatieopeningen nooit afdekken.
• Geen warme spijzen in het apparaat zetten. Warme spijzen eerst laten
afkoelen.
• Deur slechts zo lang open laten als nodig is.
• De temperatuur niet lager dan nodig instellen.
• Diepvriesartikelen voor het ontdooien in de koelruimte leggen. De koude
in de diepvriesartikelen wordt zo voor koeling van de koelruimte gebruikt.
• Houd de warmte afgevende verdamper, het metalen rooster aan de ach-
terzijde van het apparaat, schoon.
Wat te doen als ...
Hulp bij storingen
Het kan bij een storing om kleine defecten gaan die u zelf aan de hand van
de volgende aanwijzingen kunt oplossen. Voer zelf geen verdere werk-
zaamheden uit als de volgende informatie in concrete gevallen niet verder
helpt.
Waarschuwing! Reparaties aan het koelapparaat mogen alleen door
geschoold personeel uitgevoerd worden. Door ondeskundige reparaties kun-
nen grote gevaren ontstaan voor de gebruiker. Wend u bij reparatie tot onze
service-afdeling.
49
Sterke rijpvorming in het
apparaat, eventueel ook aan
de deurafdichting.
Deurafdichting is lek (even-
tueel na het overzetten van
het deurscharnier).
Op de ondichte plaatsen de
deurafdichting voorzichtig met
een föhn verwarmen (niet heter
dan ca. 50 °C). Tegelijkertijd de
verwarmde deurafdichting met
de hand zo in vorm trekken dat
hij weer helemaal sluit.
De levensmiddelen zijn te
warm.
Binnenverlichting werkt niet.
Het apparaat staat naast een
warmtebron.
Temperatuur is niet juist inge-
steld.
Zie hoofdstuk “Ingebruikname”.
Lamp is kapot.
Zie hoofdstuk “Lamp vervan-
gen”.
Temperatuurregelaar op een
koudere stand zetten.
Deur heeft te lang openge-
staan.
Zie hoofdstuk “Opstelplaats”.
In de laatste 24 uur zijn gro-
tere hoeveelheden warme
levensmiddelen opgeslagen.
Deur slechts zo lang open
laten als nodig is.
Storing Mogelijke oorzaken Oplossing
Ongewone geluiden.
Apparaat komt tegen de muur
of tegen andere voorwerpen
aan.
Apparaat staat niet recht.
Een onderdeel, bijv. een leiding,
aan de achterkant van het
apparaat komt tegen een
ander onderdeel van het appa-
raat aan of tegen de muur.
De compressor start na enige
tijd automatisch.
Zie hoofdstuk “Reiniging en
onderhoud”.
Dit is normaal, het betreft
geen storing.
Na het wijzigen van de tempe-
ratuurinstelling start de com-
pressor niet direct.
Water op de bodem van de
koelruimte of op de leg-
vlakken.
Dooiwaterafvoer is verstopt.
Dit onderdeel voorzichtig weg-
buigen.
Apparaat iets wegtrekken.
Stelvoetjes bijstellen.
50
Lamp vervangen
Waarschuwing! Gevaar voor elektrische schok! Voor het vervangen van de
lamp het apparaat uitzetten en de stekker uit het stopcontact trekken of de
zekering in de huisinstallatie uitschakelen.
Lampgegevens: 220-240 V
1. Om uit te schakelen toets ON/OFF
ingedrukt houden.
2. Stekker uit het stopcontact trekken.
3. Voor het vervangen van de lamp,
dient men op de achterste vasthech-
ting te drukken en tegelijkertijd het
dekseltje in de richting van de pijltjes
weg te nemen.
4. Vervang de lamp met een exem-
plaar van gelijke sterkte (het
maximum vermogen staat op de
lichtverspreider aangegeven).
5. De afdekking weer monteren.
6. De koelkast aanzetten.
Doel, normen, richtlijnen
Het koelapparaat is voor huishoudelijk gebruik bestemd en is met inacht-
neming van de voor deze apparaten geldende normen gemaakt. Bij de
fabricage zijn speciaal die maatregelen genomen die vereist zijn volgens de
Duitse wet op de veiligheid van apparaten (GSG), volgens de Duitse voor-
schriften ter voorkoming van ongevallen bij koudeinstallaties (VBG 20) en
volgens de bepalingen van de vereniging van Duitse elektotechnici (VDE). De
koudecirculatie is op dichtheid getest.
Dit apparaat voldoet aan de volgende EU-richtlijnen:
– 73/23/EG van 19.2.1973 - Laagspanningsrichtlijn
– 89/336/EG van 3.5.1989
(met inbegrip van Wijzigingsrichtlijn 92/31/EG) - EMC-richtlijn
51
Dear customer,
Before placing your new refrigerator/freezer into operation please read the-
se operating instructions carefully. They contain important information for
safe use, for installation and for care of the appliance.
Please keep these operating instructions for future reference. Pass them on
to possible new owners of the appliance.
Notes which are important for your safety or for the proper functioning of
the appliance are stressed with a warning triangle and/or with signal words
(Warning!, Caution!, Attention!). Please observe the following carefully.
Supplementary information regarding operation and practical applications
of the appliance appear after this symbol.
Tips and notes concerning economical and environmentally sound use of
the appliance are marked with the flower.
The operating instructions contain instructions for the correction of possi-
ble malfunctions by the user in the section "What to do if ...". If these
instructions should not be sufficient, our customer service department is
always available to you.
52
Contents
Safety . . . . . . . . . . . . . . . . . . . . . . . . . . . . . . . . . . . . . . . . . . . . . . . . .53
Disposal . . . . . . . . . . . . . . . . . . . . . . . . . . . . . . . . . . . . . . . . . . . . . . .54
Appliance Packaging Information . . . . . . . . . . . . . . . . . . . . . . . . . . . . .54
Disposal of old Appliances . . . . . . . . . . . . . . . . . . . . . . . . . . . . . . . . . . . .55
Remove transport safeguard . . . . . . . . . . . . . . . . . . . . . . . . . . . . . . .55
Installation . . . . . . . . . . . . . . . . . . . . . . . . . . . . . . . . . . . . . . . . . . . . .55
Installation Location . . . . . . . . . . . . . . . . . . . . . . . . . . . . . . . . . . . . . . . . .55
Your appliance needs air . . . . . . . . . . . . . . . . . . . . . . . . . . . . . . . . . . . . .56
Rear spacer . . . . . . . . . . . . . . . . . . . . . . . . . . . . . . . . . . . . . . . . . . . . . . . . .57
Rehingeing the door . . . . . . . . . . . . . . . . . . . . . . . . . . . . . . . . . . . . . . . . .57
Electrical connection . . . . . . . . . . . . . . . . . . . . . . . . . . . . . . . . . . . . .58
Prior to Inital Start-up . . . . . . . . . . . . . . . . . . . . . . . . . . . . . . . . . . .58
Operating and indicator panel Fridge . . . . . . . . . . . . . . . . . . . . . . .59
Starting up - Setting the Temperature . . . . . . . . . . . . . . . . . . . . . .60
Interior Accessories . . . . . . . . . . . . . . . . . . . . . . . . . . . . . . . . . . . . . .61
Storage shelves . . . . . . . . . . . . . . . . . . . . . . . . . . . . . . . . . . . . . . . . . . . . .61
Door rack . . . . . . . . . . . . . . . . . . . . . . . . . . . . . . . . . . . . . . . . . . . . . . . . . .61
Moisture regulator . . . . . . . . . . . . . . . . . . . . . . . . . . . . . . . . . . . . . . . . . .61
Drawer . . . . . . . . . . . . . . . . . . . . . . . . . . . . . . . . . . . . . . . . . . . . . . . . . . . .62
Fresh food refrigeration . . . . . . . . . . . . . . . . . . . . . . . . . . . . . . . . . .62
Operating and indicator panel Freezer . . . . . . . . . . . . . . . . . . . . . . .63
Starting up - Setting the Temperature . . . . . . . . . . . . . . . . . . . . . .64
Freezing and storing frozen food . . . . . . . . . . . . . . . . . . . . . . . . . . .66
Preparation of Ice Cubes . . . . . . . . . . . . . . . . . . . . . . . . . . . . . . . . .67
Freezing calender . . . . . . . . . . . . . . . . . . . . . . . . . . . . . . . . . . . . . . . .67
Ice packs . . . . . . . . . . . . . . . . . . . . . . . . . . . . . . . . . . . . . . . . . . . . . . .67
Defrosting . . . . . . . . . . . . . . . . . . . . . . . . . . . . . . . . . . . . . . . . . . . . .68
Cleaning and Care . . . . . . . . . . . . . . . . . . . . . . . . . . . . . . . . . . . . . . .69
Energy Saving Tips . . . . . . . . . . . . . . . . . . . . . . . . . . . . . . . . . . . . . . .70
What to do if . . . . . . . . . . . . . . . . . . . . . . . . . . . . . . . . . . . . . . . . . .71
Correcting Malfunctions . . . . . . . . . . . . . . . . . . . . . . . . . . . . . . . . . . . . .71
Changing the light bulb . . . . . . . . . . . . . . . . . . . . . . . . . . . . . . . . . . . . . .72
Regulations, Standards, Guidelines . . . . . . . . . . . . . . . . . . . . . . . . .73
53
Safety
The safety aspects of our refrigerators/freezers comply with accepted tech-
nical standards and the German Appliance Safety Law. Nevertheless, we
consider it our obligation to make you aware of the following safety infor-
mation:
Intended use
• The refrigerator is intended for use in the home. It is suitable for the coo-
ling, freezing and storing of frozen food, as well as for making ice. If the
appliance is used for purposes other than those intended or used incor-
rectly, no liability can be accepted by the manufacturer for any damage
that may be caused.
• Alterations or changes to the freezer are not permitted for reasons of
safety.
• If you use the refrigerator in a commercial application or forpurposes
other than the cooling, freezing or frozen storage of foods,please obser-
ve all valid legal regulations for your application.
Prior to initial start–up
• Check the refrigerator for transport damage. Under no circumstance
should a damaged appliance be plugged in! In the event of damage, please
contact the vendor.
Refrigerant
The refrigerant isobutane (R600a) is contained within the refrigerant circuit
of the appliance, a natural gas with a high level of environmental compa-
tibility, which is nevertheless flammable.
• During transportation and installation of the appliance, be certain that
none of the components of the refrigerant circuit become damaged.
• If the refrigerant circuit should become damaged:
– avoid open flames and sources of ignition;
– thoroughly ventilate the room in which the appliance is situated.
Safety of children
• Packaging (e.g. wraps, polystyrene) can be dangerous for children. There is
a risk of suffocation! Keep packaging material away from children!
• Please make old appliances unusable prior to disposal. Pull out the mains
plug, cut off the mains cable, break or remove spring or boltcatches, if fit-
ted. By doing this you ensure that children cannot lock themselves in the
fridge when playing (there is risk of suffocation!)or get themselves into
other dangerous situations.
• Often children cannot recognise the hazards present in household
appliances. It is therefore important that you ensure adequate supervision
and never let children play with the appliance!
54
Daily Operation
• Containers with flammable gases or liquids can leak at low temperatures.
There is a risk of an explosion! Do not store any containers with flamma-
ble materials such as, for example, spray cans, fire extinguisher refill car-
tridges etc in the refrigerator/freezer.
• Bottles and cans must not be placed in the freezer compartment. They can
burst when the contents freeze, high carbonate content drinks can even
explode! Never store lemonade, juices, beer, wine, sparkling wine etc. in
the freezer compartment. Exception: high alcohol content spirits can be
stored in the freezer compartment.
• Do not put ice creams or ice cubes in the mouth immediately after remo-
val from the freezer compartment. Very cold ice can freeze to the lips or
tongue and cause injury.
• Do not touch frozen food with wet hands. Your hands could freeze to the
food.
• Do not operate any electrical appliances in the refrigerator/freezer (e.g.
electric ice cream makers, mixers etc.).
• Before cleaning the appliance, always switch off the appliance and unplug
it, or pull the house fuse or switch off the circuit breaker.
• When unplugging always pull the plug from the mains socket, do not pull
on the cable.
In case of malfunction
• If the a malfunction occurs on the appliance, please look first in the "What
to do if ..." section of these instructions. If the information given there
does not help, please do not perform any further repairs yourself.
• Refrigerators/freezers may only be repaired by qualified service engineers.
Improper repairs can give rise to significant hazards. If your appliance
needs repairing, please contact your specialist dealer or our Customer Ser-
vice.
Disposal
Appliance Packaging Information
All materials are environmentally sound! They can be dumped or burned at
an incinerating plant without danger!
About the materials: The plastics can be recycled and are identified as fol-
lows:
>PE< for polyethylene, e.g. the outer covering and the bags in the interior.
>PS< for polystyrene foam, e.g. the pads, which are all free of chlorofluo-
rocarbon.
The carton parts are made from recycled paper and should be disposed of
at a waste-paper recycling collection location.
55
Disposal of old Appliances
For environmental reasons, refrigeration appliances must be disposed of
properly. This applies to your old appliance, and - at the end of its service
life - for your new appliance as well.
Warning! Before disposing of old appliances make them inoperable. Remo-
ve plug from mains, sever the power cable, remove or destroy any snap or
latch closures. This eliminates the danger that playing children lock them-
selves into the appliance (danger of suffocation!) or place themselves into
other life-endangering situations.
Disposal:
• The appliance may not be disposed of with domestic waste or bulky refuse.
• The refrigerant circuit, especially the heat exchanger at the back of the
appliance, may not be damaged.
The symbol on the product or on its packaging indicates that
this product may not be treated as household waste. Instead it shall
be handed over to the applicable collection point for the recycling
of electrical and electronic equipment. By ensuring this product is
disposed of correctly, you will help prevent potential negative con-
sequences for the environment and human health, which could
otherwise be caused by inappropriate waste handling of this pro-
duct. For more detailed information about recycling of this product,
please contact your local city office, your household waste disposal
service or the shop where you purchased the product.
Remove transport safeguard
The appliance and the interior fittings are protected for transport.
• Remove all adhesive tape and packing pieces from the interior of the
appliance.
Your appliance is equipped with shelf
retainers that make it possible to secure
the shelves during transportation.
To remove them proceed as follows:
Move the shelf retainers in the direc-
tion of the arrow, raise the shelf from
the rear and push it forward until it is
freed and remove the retainers.
Installation
Installation Location
The appliance should be set up in a well ventilated, dry room.
Energy use is affected by the ambient temperature. The appliance should
therefore
A
C
B
56
Climate classification for an ambient temperature of
SN +10 bis +32 °C
N +16 bis +32 °C
ST +18 bis +38 °C
T +18 bis +43 °C
If installation next to a source of heat is unavoidable, the following mini-
mum clearances must be maintained at the sides of the appliance:
– for electric cookers 3 cm;
– for oil and coal fired ranges 30 cm.
If these clearances cannot be maintained a heat insulating pad is required
between the cooker and the refrigeration appliance.
If the refrigeration appliance is installed next to another refrigerator or free-
zer a clearance of 5 cm at the sides is required, in order to prevent the for-
mation of condensation on the outside of the appliance.
Your appliance needs air
For safety reasons, minimum ventila-
tionmust be as shown Fig.
Attention: keep ventilation ope-
nings clear of obstruction;
NP00
100 mm10 mm
10 mm
– not be exposed to direct sunlight;
– not be installed next to radiators, cookers or other sources of heat;
– only be installed at a location whose ambient temperature corresponds to
the climate classification, for which the appliance is designed.
The climate classification can be found on the serial plate, which is located
at the left on the inside of the appliance.
The following table shows which ambient temperature is correct for each
climate classification: each climate classification:
57
H
F
D
PR18
F
F
F
E
E
G
Rear spacers
Fit the rear spacers contained in
the documentation bag to ensu-
re even dissipation of heat gene-
reted during operation. Proceed
in the sequence illustrated by the
figures.
Rehingeing the door
The side at which the door opens can
be changed from the right side (fac-
tory adjustment) to the left side, if
the installation site requires.
Warning! When changing the side at
which the door opens, the appliance
may not be connected to the mains.
Remove plug from the mains befo-
rehand.
Procced as follow:
1. Remove the clip-in ventilation grille
(D).
2. Remove the bottom hinge (E) by
unscrewing the fixing screws.
3. Slide the bottom door off the centre
hinge (H).
4. Remove the centre hinge and slide
the top door off pin (G); unscrew pin
(G) and refit it on the opposite side.
5. Remove the two plugs, to reveal the
holes for the hinge pivots, and
remount them on the other side.
6. Refit the top door and the centre
hinge (H) on the opposite side.
7. Refit the bottom door.
8. Using a 10 mm spanner, unscrew
the hinge pin (E) and reassemble it
on the opposite side of the hinge;
9. Refit bottom hinge (E) on the oppo-
site side, using the screws previously
removed.
D594
58
Electrical connection
Before initial start-up, refer to the appliance rating plate to ascertain if sup-
ply voltage and current values correspond with those of the mains at the
installation location.
e.g.: AC 230 ... 240 V 50 Hz or
230 ... 240 V~ 50 Hz
(i.e. 230 to 240 volts alternating current, 50 Hertz)
The rating plate is inside the appliance on the left.
A correctly installed, earthed socket is required for the electrical supply. The
supply must have a fuse rating of at least 10 Amps.
If the socket is not accessible once the appliance is built in, the electrical
installation must include suitable means of isolating the appliance from the
mains (e.g. fuse, cut-out, current trip or similar with a minimum contact
separation of 3 mm).
Attention: The mains connection cable may only be replaced by a skilled
electrician. Please contact your dealer or our customer service department
for repairs.
Prior to Initial Start–Up
• Please clean the appliance interior and all accessories prior to initial start-
up (see section: “Cleaning and Care”).
1
2
10. Remove blanking cover (F) from ven-
tilation grille (D) by pushing it in the
direction of the arrow and refit it on
the opposite side.
11. Refit ventilation grille (D), clipping it
into place.
12. Dismantle the handles, by sliding
the handle-cover, by unscrewing
its side and middle screws and
reassemble them on the opposite
side. Cover the holes left open
with the plugs contained in the
documentation pack.
59
59
Operating and indicator panel Fridge
A. Fridge button ON/OFF
B. Temperature setting button (for warmer temperatures)
C. Temperature display
D. Temperature setting button (for colder temperatures)
E COOLMATIC function "on" indicator (yellow)
F COOLMATIC button
Temperature setting buttons
The temperature is adjusted using the „B“ and „D“ buttons. These buttons
are connected to the temperature display.
The temperature display is switched over from the display of the ACTUAL
temperature (Temperature display is illuminated) to the display of the DESI-
RED temperature (Temperature display flashes) by pressing one of the two
buttons, „B“ or „D“ .
Each time one of the two buttons is pressed again the DESIRED temperatu-
re is adjusted by 1 °C. The DESIRED temperature must be reached within 24
hours.
If neither button is pressed, the temperature display automatically switches
back after a short period (approx. 5 sec.) to the display of the ACTUAL tem-
perature.
DESIRED temperature means:
The temperature that has been selected for inside the fridge. The DESIRED
temperature is indicated by flashing numbers.
ACTUAL temperature means:
The temperature display indicates the current temperature inside the fridge.
The ACTUAL temperature is indicated with illuminated numbers.
Temperature display
The temperature display can indicate several pieces of information.in the
fridge (ACTUAL temperature) is displayed.
B
C
F
D
E
A
60
During normal operation, the temperature currently present in the fridge
(ACTUAL temperature) is displayed.
When the temperature is being adjusted a flashing display indicates the
fridge temperature currently set (DESIRED temperature).
Starting Up - Setting the Temperature
1. Plug the mains plug into the mains socket.
2. If the display is off press ON/OFF button. The appliances start.
3. Press either the „B“ or „D“ button. The temperature display switches over
and the DESIRED temperature currently set flashes on the temperature
display.
4. Set the required temperature by pressing the „B“ or „D“ buttons (see section
"Temperature setting buttons"). The temperature display will immediately
show the changed setting. Each time the button is pressed the temperatu-
re is adjusted by 1 °C.
From a food safety point of view +5 °C should be considered sufficiently
cold for storing food in the fridge.
5. Once the required temperature has been set, after a short period (approx. 5
sec.) the temperature display will change and again indicate the current
ACTUAL temperature inside the fridge. The display will change from flashing
to continuous illumination.
Information! When the setting is changed, the compressor does not start
immediately if automatic defrosting is currently taking place. As the stora-
ge temperature within the fridge is reached quickly you can store food
immediately after switching on.
COOLMATIC
The COOLMATIC function is suited for quick cooling of large quantities of
goods in the refrigerator.
1. The COOLMATIC function is switched on by pressing the COOLMATIC but-
ton. The yellow light illuminates.
The COOLMATIC function now provides for intensive cooling. A DESIRED
temperature of +2 °C is automatically selected. The COOLMATIC function is
ended automatically after a period of 6 hours.
2. The COOLMATIC function can be ended manually at any time by pressing
the COOLMATIC button again. The yellow light goes out.
Holiday function
The holiday function sets the temperature at +15°C. This function allows
you to keep the refrigerator shut and empty during a long holiday period
(e.g. the summer holidays) without the formation of a bad smell.
61
Interior Accessories
Storage shelves
• You should always slide one of the full size glass storage shelf into the
lowest set of guides, above the fruit and the vegetable containers, and
keep it in this position.
• The height of the storage shelves
can be adjusted:
• To do this pull the storage shelf
forward until it can be swivelle-
dupwards or downwards and
removed.
• Please do the same in reverse to
insert the shelf at a different hei-
ght.
Adjusting the upper door rack
• Depending on the food stored, the upper door racks can be changed to
other holders or removed. Take out the refrigerators food, press the door
racks digonally upwards at their edges, reposition them, and press them
back into place.
D338
1. To turn on the holiday function, press button (B).
2. Press continuosly button (B) until the letter “H” (Holiday) appears on the
temperature indicator. The temperature indicator can modify the displayed
temperature up to +8°C, 1° at a tim. 8°C will be followed by the letter “H”.
Now the refrigerator is in the “holiday” function in the energy-saving mode.
The fridge compartment must be empty with holiday function on.
Turning OFF the refrigerator compartment
To turn off the refrigerator press the button “B” several times until the sym-
bol “OF” appears in the temperature indicator (C). Press the button “B” again
for about 5 seconds. In the temperature indicator there is a “count down”
i.e. a backward counting from “3” to “1”. When “1” appears the refrigerator
is turned off. The temperature indicator switches off.
Moisture regulator
There is an adjustable air grille in
front of the shelf above the fruit and
vegetable compartments. The ope-
ning in the ventilation slots can be
adjusted with the slider.
Right slider: Ventilation slots opened.
With the ventilation slots open, more
PR271
62
Fresh food refrigeration
To obtain the best performance:
• do not store warm food or evaporating liquide in the refrigeator
• do cover or wrap the food, particularly if it has a strong flavour.
• Position food so that air can circuiate freely round it.
Useful hints:
Meat (all types): wrap in polythene bags and place on the glass shelf above
the vegetable drawer(s). For safety, store in this way only one or two days
at the most.
Cooked foods, cold dishes, etc: these should be covered and may be placed
on any shelf.
Fruit and vegetables: these should be thoroughly cleaned and placed in the
special drawer(s) provided.
Butter and cheese: these should be placed in special airtight containers or
wapped in aluminium foil or polythene bags to exclude as much air as pos-
sible.
Milk bottles: these should have a cap and should be stored in the bottle
rack on the door.
Bananas, potatoes, onions and garlic, if not packed, must not be kept in
the refrigerator.
air circulation results in a lower air
moisture content in the fruit and
vegetable compartments.
Left slider: Ventilation slots closed.
When the ventilation slots are closed, the natural moisture content of the
food in the fruit and vegetable compartments is preserved for longer.
Drawer
The drawer is suitable for storing
fruit and vegetables. There is a sepa-
rator inside the drawer that can be
placed in different positions to allow
for the subdivision best suited to
personal needs.
There is a grille on the bottom of the
drawer to separate the fruit and
vegetables from any humidity that
may form on the bottom surface.
To remove the drawer, use the side handles (as shown in the
drawing). All parts inside the drawer can be removed for cleaning
purposes.
63
Operating and indicator panel freezer
G. FROSTMATIC function "on" indicator (yellow)
H. FROSTMATIC button
I. Temperature setting button (for warmer temperatures)
J. Temperature display
K. Temperature setting button (for colder temperatures)
L. Alarm reset button
M. Alarm reset light
Temperature setting buttons
The temperature is adjusted using the „I“ and „K“ buttons. These buttons are
connected to the temperature display.
The temperature display is switched over from the display of the ACTUAL
temperature (Temperature display is illuminated) to the display of the DESI-
RED temperature (Temperature display flashes) by pressing one of the two
buttons, „I“ or „K“).
Each time one of the two buttons is pressed again the DESIRED temperatu-
re is adjusted by 1 °C. The DESIRED temperature must be reached within 24
hours.
If neither button is pressed, the temperature display automatically switches
back after a short period (approx. 5 sec.) to the display of the ACTUAL tem-
perature.
H
I
K
J L MG
64
DESIRED temperature means:
The temperature that has been selected for inside the freezer. The DESIRED
temperature is indicated by flashing numbers.
ACTUAL temperature means:
The temperature display indicates the current temperature inside the freezer.
The ACTUAL temperature is indicated with illuminated numbers.
Temperature display
The temperature display can indicate several pieces of information.
During normal operation, the temperature currently present in the freezer
(ACTUAL temperature) is displayed.
When the temperature is being adjusted a flashing display indicates the
freezer temperature currently set (DESIRED temperature).
Starting Up - Setting the Temperature
1. Plug the mains plug into the mains socket.
2. If the display is ogg press ON/OFF button. The alarm light flashes since the
temperature is reached. The buzzer sounds.
3. Pressing button “L” the buzzer stops.
4. Press either the „I“ or „K“ button. The temperature display switches over and
the DESIRED temperature currently set flashes on the temperature display.
5. Set the required temperature by pressing the „I“ or „K“ buttons (see section
"Temperature setting buttons"). The temperature display will immediately
show the changed setting. Each time the button is pressed the temperatu-
re is adjusted by 1 °C.
From a food safety point of view -18 °C should be considered sufficiently
cold for storing food in the freezer.
6. The alarm light,when the set temperature is reached. Press the alarm but-
ton to turn off the buzzer.
65
FROSTMATIC
The FROSTMATIC function accelerates the freezing of fresh food and, at the
same time, protects foodstuffs already stored from undesirable warming.
1. The FROSTMATIC function is switched on by pressing the FROSTMATIC but-
ton. The yellow light illuminates.
If the FROSTMATIC function is not ended manually, the appliance turns off
the FROSTMATIC function after about 52 hours. The yellow light goes out.
2. The FROSTMATIC function can be ended manually at any time by pressing
the FROSTMATIC button again. The yellow light goes out.
Alarm reset button
In the event of an abnormal temperature rise inside the freezer (e.g. power
cut) warning light (M) will start to flash and a buzzer will sound.
After the temperature has returned to normal, the warning light (M) will
continue to flash, although the buzzer has stopped.
When the alarm button is pressed, the warmest temperature reached in the
compartment flashes on the indicator.
Turning OFF the freezer compartment
To turn off the freezer press the button “J” several times until the symbol
“OF” appears in the temperature indicator (J). Press the button “I” again for
about 5 seconds. In the temperature indicator there is a “count down” i.e. a
backward counting from “3” to “1”. When “1” appears the freezer is turned
off. The temperature indicator switches off.
Switching the Appliance off
To switch off, push the ON/OFF button. The temperature display will go off.
Note:
The appliance cannot be switched on or off if unplugged, or if there is no
power being supplied to it. Following connection to the mains power sup-
ply, the appliance returns to the same operating state as before the inter-
ruption of main power.
If the appliance is not going to be used for an extended period:
1. Turn off the appliance (please see the above point 1).
2. Remove the mains plug or switch off or turn out the circuit breaker or fuse.
3. Defrost the freezer compartment and clean the appliance thoroughly (see
section: “Cleaning and Maintenance”).
4. Finally, leave the doors open so as to avoid a build up of odours.
66
Freezing and storing frozen food
You can use your freezer for freezing fresh food yourself.
Important!
• The temperature in the freezer compartment must be –18 °C or colder
before freezing food.
• Please observe the freezing capacity given on the rating plate. The free-
zing capacity is the maximum quantity of fresh food that can be frozen
within a period of 24 hours. If you wish to freeze food several days in a
row, please observe a maximum capacity of only 2/3 to 3/4 of that on the
rating plate. The quality of the food is best preserved when it is frozen
right through to the core as quickly as possible.
• Allow warm food to cool down before freezing. The warmth will cause
increased ice formation and increase the power consumption.
• Please note the maximum storage times specified by the manufacturer.
• Thawed foods which have not been processed further (cooked into meals)
may not under any circumstances be frozen a second time.
• Containers with flammable gases or liquids can leak at low temperatures.
There is a risk of an explosion! Do not store any containers with flamma-
ble materials such as, for example, spray cans, fire extinguisher refill car-
tridges etc in the refrigerator/freezer.
• Bottles and cans must not be placed in the freezer. They can burst when
the contents freeze, high carbonate content drinks can even explode!
Never store lemonade, juices, beer, wine, sparkling wine etc. in the free-
zer. Exception: high alcohol content spirits can be stored in the freezer.
• All foods must be packed air tight prior to freezing, so that they do not
dry out or lose their flavour, and so that no flavour contamination of
other frozen goods occurs.
Caution! Do not touch frozen food with wet hands. Your hands could free-
ze to the food.
1. To achieve faster freezing of food or to freeze the maximum allowed quan-
tity, depress the FROSTMATIC button 24 hours before loading the food
2. Place the food to be frozen in the top drawer.
3. Not open the door frequently or leave it open longer than absolutely neces-
sary.
67
Preparation of Ice Cubes
1. Fill the ice cube tray 3/4 full with cold water, place it in the freezer com-
partment and leave to freeze.
2. To loosen the frozen cubes, either bend the ice cube tray or hold it under
running water for a few seconds.
Important! Never try to free an ice tray that is frozen to the freezer com-
partment using pointed or sharp edged objects. Use the ice scraper supplied.
Freezing Calendar
• The symbols on the drawers show different types of frozen goods.
• The numbers indicate storage times in months for the appropriate types
of frozen goods. Whether the upper or lower value of the indicated sto-
rage time is valid depends on the quality of the foods and pre-treating
before freezing. The lower value applies to foods with high fat content.
Ice packs
There are two ice packs in one drawer of the freezer.
In the event of a power failure or malfunction, the ice pack will lengthen
the amount of time it takes for the frozen food to become too warm by
several hours. The ice pack can only fulfil this task optimally if it is placed in
the uppermost drawer, at the front, above the frozen food. You can use the
ice pack for cooling cold bags.
68
Defrosting
Refrigerator
Frost is automatically eliminated from the evaporator of the refrigerator
compartment every time the motor compressor stops, during normal use.
The defrost water drains out through a trough into a special container at
the back of the appliance, over the motor compressor, where it evaporates.
Freezer
The freezer compartment, however, will become progrssively covered with
frost. This should be removed with the special plastic scraper provided, whe-
never the tickness of the frost exceeds 4 mm. During this operation it is not
necessary to switch off the power supply or to remove the foodstuffs.
However when the ice becomes very thick on the inner liner, complete
defrosting should be carried out as follows:
1. Remove the frozen food from the
freezer, wrap it in several layers of
newspaper and put it in a very
cool place.
2. Switch off the appliance and pull
out the plug, or remove or
unscrew the safety fuses.
3. Leave the freezer compartment
door open.
4. Insert the plastic scraper into the
recess provided under the defrost
water channel and place a collec-
ting basin under it.
5. Once defrosting is completed keep the scraper for future use;
6. Turn the thermostat knob to the required setting or replace the plug in the
power socket.
Warning!
Never use metal tools to scrape off the frost
Do not use a mechanical device or any artificial means to speed up the
thawing process other than those recommended by the manufacturer.
A temperature rise of the frozen food packs, during defrosting , may shor-
ten their safe storage life.
D068
69
Cleaning and Care
For hygienic reasons the appliance interior, including interior accessories,
should be cleaned regularly.
Warning!
• The appliance may not be connected to the mains during cleaning. Dan-
ger of electrical shock! Before cleaning switch the appliance offand rem
ve the plug from the mains, or switch off or turn out the circuit breaker
or fuse.
• Never clean the appliance with a steam cleaner. Moisture could accumu-
late in electrical components, danger of electrical shock! Hot vapours can
lead to the damage of plastic parts.
• The appliance must be dry before it is placed back into service.
Attention!
• Ethereal oils and organic solvents can attack plastic parts, e.g.
– lemon juice or the juice from orange peals;
– butyric acid;
– cleansers which contain acetic acid.
Do not allow such substances to come into contact with appliance parts.
• Do not use any abrasive cleansers.
1. Remove frozen food and the food from the refrigerator. Wrap frozen
food in several layers of newspaper. Store it in a cool place, well covered.
2. Defrost the freezer compartment prior to cleaning (see "Defrosting" sec-
tion).
3. Switch the appliance off and remove the plug from the mains, or switch off
or turn out the circuit breaker or fuse.
4. Clean the appliance and the interior accessories with a cloth and lukewarm
water. Commercially available dish washing detergents may also be used.
70
5. After cleaning wipe with fresh water and rub dry.
Accumulation of dust at the condenser increases energy consumption. For
this reason carefully clean the condenser at the back of the appliance once
a year with a soft brush or a vacuum cleaner.
6. Check the water drain hole on
the rear wall of the fridge. Clear a
blocked drain hole with the aid of
the green peg in the pack of
accessories included with the
appliance.
7. After everything is dry place
appliance back into service.
Energy Saving Tips
• Do not install the appliance near cookers, radiators or other sources of
warmth. High ambient temperatures cause longer, more frequent opera-
tion of the compressor.
• Ensure sufficient air circulation and exhaust at the appliance base
and at the back wall of the appliance. Never cover air vent openings.
• Do not place warm foods into the appliance. Allow warm foods to cool
first.
• Only leave door open as long as necessary.
• Do not set temperature any colder than necessary.
• Put frozen food in the fridge to defrost. The cold in the frozen food will
then be used to cool the fridge.
• Keep the heat emitting condenser, the metall grille on the rear wall of
your appliance, always clean.
D037
71
The food is too warm.
Interior lighting does not
work.
The appliance is near a heat
source.
Temperature is not properly
adjusted.
Please look in the "Initial Start
Up" section.
Light bulb is defective.
Please look in the "Changing
the Light Bulb" section.
Turn the temperature regula-
tor to a colder setting tempo-
rarily.
Door was open for an exten-
ded period.
Please look in the "Installation
location" section.
A large quantity of warm food
was placed in the appliance
within the last 24 hours.
Open the door only as long as
necessary.
Malfunction Possible Cause Remedy
Appliance does not work.
Appliance is not switched on Switch on the appliance.
Mains plug is not plugged in
or is loose.
Insert mains plug.
Fuse has blown or is defective.
Check fuse, replace if neces-
sary.
Socket is defective.
Mains malfunctions are to be
corrected by an electrician.
Appliance cools too much. Temperature is set too cold.
Turn the temperature regula-
tor to a warmer setting tem-
porarily.
What to do if ...
Correcting Malfunctions
A malfunction may be caused by only a minor fault that you can rectify
yourself using the following instructions. Do not perform any other work on
the appliance if the following information does not provide assistance in
your specific case.
Warning! Repairs to refrigerators/freezers may only be performed by
qualified service engineers. Improper repairs can give rise to significant
hazards for the user. If your appliance needs repairing, please contact your
specialist dealer or our Customer Service.
Heavy build up of frost, possi-
bly also on the door seal.
Door seal is not air tight (pos-
sibly after changing over the
hinges).
Carefully warm the leaking
sections of the door seal with
a hair dryer (not hotter than
approx. 50 °C). At the same
time shape the warmed door
seal by hand such that it sits
correctly.
72
Unusual noises.
The appliance is touching the
wall or other objects.
Appliance is not level.
A component, e.g. a pipe, on
the rear of the appliance is
touching another part of the
appliance or the wall.
The compressor starts after a
period of time.
See the "Cleaning and Care"
section.
This is normal, no error has
occurred.
The compressor does not start
immediately after changing
the temperature setting.
Water on the floor or on sto-
rage shelves.
Water drain hole is blocked.
If necessary, carefully bend
the component out of the
way.
Move the appliance slightly.
Readjust the feet.
Changing the light bulb
Warning! There is a risk of electric shocks! Before changing the light bulb,
switch off the appliance and unplug it, or pull the fuse or the circuit breaker.
Light bulb data: 220-240 V
1. To switch off the appliance, press the
ON/OFF button.
2. Unplug the mains plug.
3. To change the light bulb press on the
rear hook and at the same time slide
the cover in the direction indicated
by the arrow.
4. Change the defective light bulb with
one of the some power (the maxi-
mum power is shown on the light
diffuser).
5. Refit the light bulb cover.
6. Put the refrigerator back into opera-
tion.
Malfunction Possible Cause Remedy
73
Regulations, Standards, Guidelines
This appliance was designed for household use and was manufactured in
accordance with the appropriate standards. The necessary measures in
accordance with appliance safety legislation regulations (GSG), accident
prevention regulations for refrigeration appliances (VBG 20) and the regu-
lations of the German Society of Electrical Engineers (VDE) were observed in
the manufacture of this appliance.
The refrigerant circuit has been checked for leaks.
This appliance is in accordance with the following EU guidelines:
– 73/23/EWG dated 19 February 1973 - low voltage guidelines.
– 89/336/EWG dated 3 May 1989
(including guideline change notice 92/31/EWG) - EMV guideline
AEG Hausgeräte GmbH
Postfach 1036
D-90327 Nürnberg
http://www.aeg.hausgeraete.de
© Copyright by AEG Sous réserve de modifications
2223 287-64 06/07 Wijzigingen voorbehouden
Subject to change without notice
64

Hulp nodig? Stel uw vraag in het forum

Spelregels

Misbruik melden

Gebruikershandleiding.com neemt misbruik van zijn services uitermate serieus. U kunt hieronder aangeven waarom deze vraag ongepast is. Wij controleren de vraag en zonodig wordt deze verwijderd.

Product:

Bijvoorbeeld antisemitische inhoud, racistische inhoud, of materiaal dat gewelddadige fysieke handelingen tot gevolg kan hebben.

Bijvoorbeeld een creditcardnummer, een persoonlijk identificatienummer, of een geheim adres. E-mailadressen en volledige namen worden niet als privégegevens beschouwd.

Spelregels forum

Om tot zinvolle vragen te komen hanteren wij de volgende spelregels:

Belangrijk! Als er een antwoord wordt gegeven op uw vraag, dan is het voor de gever van het antwoord nuttig om te weten als u er wel (of niet) mee geholpen bent! Wij vragen u dus ook te reageren op een antwoord.

Belangrijk! Antwoorden worden ook per e-mail naar abonnees gestuurd. Laat uw emailadres achter op deze site, zodat u op de hoogte blijft. U krijgt dan ook andere vragen en antwoorden te zien.

Abonneren

Abonneer u voor het ontvangen van emails voor uw AEG Electrolux 70342 KG bij:


U ontvangt een email met instructies om u voor één of beide opties in te schrijven.


Ontvang uw handleiding per email

Vul uw emailadres in en ontvang de handleiding van AEG Electrolux 70342 KG in de taal/talen: Nederlands, Engels, Frans als bijlage per email.

De handleiding is 0,71 mb groot.


U ontvangt de handleiding per email binnen enkele minuten. Als u geen email heeft ontvangen, dan heeft u waarschijnlijk een verkeerd emailadres ingevuld of is uw mailbox te vol. Daarnaast kan het zijn dat uw internetprovider een maximum heeft aan de grootte per email. Omdat hier een handleiding wordt meegestuurd, kan het voorkomen dat de email groter is dan toegestaan bij uw provider.

Stel vragen via chat aan uw handleiding

Stel uw vraag over deze PDF

Uw handleiding is per email verstuurd. Controleer uw email

Als u niet binnen een kwartier uw email met handleiding ontvangen heeft, kan het zijn dat u een verkeerd emailadres heeft ingevuld of dat uw emailprovider een maximum grootte per email heeft ingesteld die kleiner is dan de grootte van de handleiding.

Er is een email naar u verstuurd om uw inschrijving definitief te maken.

Controleer uw email en volg de aanwijzingen op om uw inschrijving definitief te maken

U heeft geen emailadres opgegeven

Als u de handleiding per email wilt ontvangen, vul dan een geldig emailadres in.

Uw vraag is op deze pagina toegevoegd

Wilt u een email ontvangen bij een antwoord en/of nieuwe vragen? Vul dan hier uw emailadres in.


Info