536915
14
Verklein
Vergroot
Pagina terug
1/40
Pagina verder
14
EN
USING YOUR DYSON APPLIANCE
PLEASE READ thE 'ImPORtANt SAfEtY INStRUCtIONS' IN thIS DYSON
OPERAtING mANUAL bEfORE PROCEEDING.
CARRYING thE APPLIANCE
Carry the appliance by the main handle on the body.
Do not press the cyclone release button or shake the appliance when carrying or
the cyclone could disengage, fall off and cause injury.
OPERAtION
Always extend the cable fully to the red tape before use.
Plug the appliance into the mains electricity supply.
To switch ‘ON’ or ‘OFF’ press the red power button, located as shown.
After use: unplug, retract the cable safely, put the appliance away.
Switch 'OFF' the appliance, unplug and ensure it is upright before:
changing or using tools
removing the hose or airway inspection parts.
LOOKING AftER YOUR DYSON APPLIANCE
Do not carry out any maintenance or repair work other than that shown in this
Dyson Operating Manual, or advised by the Dyson Helpline.
Only use parts recommended by Dyson. If you do not this could invalidate
your guarantee.
Store the appliance indoors. Do not use or store it below 0°C (32°F). Ensure the
appliance is at room temperature before operating.
Clean the appliance only with a dry cloth. Do not use any lubricants, cleaning
agents, polishes or air fresheners on any part of the appliance.
If used in a garage, always wipe the base plate and ball with a dry cloth
after vacuuming to clean off any sand, dirt, or pebbles that could damage
delicate floors.
VACUUmING
Do not use without the clear bin and cyclone in place.
Do not use on rubble, ash or plaster. This appliance is designed only for
domestic use to remove household dirt, hair and allergens. The appliance is not
designed to be used on:
debris produced from activities such as DIY, building or similar tasks
larger types and quantities of dust or debris, such as soot and sawdust.
These materials may harm the appliance and may void your guarantee.
Fine dirt such as flour should only be vacuumed in very small amounts.
Do not use the appliance to pick up sharp hard objects, small toys, pins, paper
clips, etc. They may damage the appliance.
When vacuuming, certain carpets may generate small static charges in the
clear bin or wand. These are harmless and are not associated with the mains
electricity supply. To minimise any effect from this, do not put your hand or
insert any object into the clear bin unless you have first emptied it and rinsed it
out with cold water (see ‘Cleaning the clear bin’).
Do not work with the appliance above you on the stairs.
Do not put the appliance on chairs, tables, etc.
Before vacuuming highly polished floors, such as wood or lino, first check that
the underside of the floor tool and its brushes are free from foreign objects that
could cause marking.
Do not push hard with the floor tool when vacuuming, as this may
cause damage.
On waxed floors the movement of the cleaner head may create an uneven
lustre. If this happens, wipe with a damp cloth, polish the area with wax, and
wait for it to dry.
Do not leave the cleaner head in one place on delicate floors.
To reduce suction (for example, when vacuuming curtains or rugs), simply pull
the suction release trigger on the handle to reduce airflow. Alternatively, slide
open the two red tabs on the cleaner head (it is easier to open the tab from
beneath, and to close it from the top).
EmPtYING thE CLEAR bIN
Empty as soon as the dirt reaches the level of the MAX mark – do not overfill.
Switch ‘OFF’ and unplug before emptying the clear bin.
To remove the cyclone and clear bin unit, push the release button to the side of
the carrying handle, as shown. The carrying handle will be released.
To release the dirt, press the red bin release button.
To minimise dust/allergen contact when emptying, encase the clear bin tightly in
a plastic bag and empty.
Remove the clear bin carefully from the bag.
Seal the bag tightly, dispose as normal.
Close the clear bin base so it clicks into place and is secure.
Place the clear bin and cyclone unit into position on the front of the main body
of the appliance. The recess in the base of the clear bin must fit onto the lug on
the support bracket.
Push the carrying handle down so it clicks into place on the top of the clear bin
and cyclone unit. Ensure it is secure.
CLEANING thE CLEAR bIN
Remove cyclone and clear bin (see 'Emptying the clear bin').
To separate the cyclone from the clear bin press the red bin release button
to open the bin base. This exposes a small silver button behind the red
opening mechanism.
Press the small silver button on the cyclone. Separate the cyclone from the
clear bin.
Clean the clear bin with cold water only.
Do not use detergents, polishes or air fresheners to clean the clear bin.
Do not put the clear bin in a dishwasher.
Do not immerse the whole cyclone in water or pour water into the cyclones.
Clean the cyclone shroud with a cloth or dry brush to remove lint and dust.
Ensure the clear bin is completely dry before replacing.
To replace, first close the clear bin base so it clicks into place and is secure.
Fit the clear bin onto the cyclone. To secure it, first fit the slot on the front rim of
the clear bin onto the lug on the front of the cyclone; then push the rear of the
clear bin into place so the silver button engages and clicks into place.
Fit the cyclone and clear bin unit onto the appliance (see 'Emptying the
clear bin').
bLOCKAGES – thERmAL CUt-OUt
This appliance is fitted with an automatically resetting thermal cut-out.
If any part becomes blocked the appliance may overheat and automatically
cut-out.
If this happens, follow the instructions below in 'Looking for blockages'.
NOTE: Large items may block the tools or wand inlet. If this happens, do not
operate the wand release catch. Switch ‘OFF’ and unplug. Failure to do so could
result in personal injury.
LOOKING fOR bLOCKAGES
Switch ‘OFF’ and unplug before looking for blockages. Failure to do so could
result in personal injury.
Leave to cool down for 1-2 hours before looking for blockages.
Beware of sharp objects when checking for blockages.
To access the flexible inspection hose beneath the clear bin, first remove the
clear bin (see above).
Unscrew the two Phillips screws on the clear bin locator bracket. (Do not remove
any other screws.) Remove the bracket.
Firmly twist the flexible inspection hose away from the inlet next to the ball (do
not remove the end next to the connection for the main hose).
Inspect for blockages.
Clear any blockage before restarting.
Refit all parts securely before using.
Clearing blockages is not covered by your guarantee.
DISPOSAL INfORmAtION
Dyson products are made from high grade recyclable materials. Recycle
where possible.
EN
GUARANtEE tERmS AND CONDItIONS
DYSON CUStOmER CARE
thANK YOU fOR ChOOSING tO bUY A DYSON APPLIANCE
After registering your 5year guarantee, your Dyson appliance will be covered
for parts and labour for 5years from the date of purchase, subject to the terms
of the guarantee. If you have any questions about your Dyson appliance, call the
Dyson Helpline with your serial number and details of where/when you bought
the appliance. Most questions can be solved over the phone by one of our
trained Dyson Helpline staff.
Alternatively, visit www.dyson.com for online help, general tips and useful
information about Dyson.
If your Dyson appliance needs a service, call the Dyson Helpline so we can
discuss the available options. If your Dyson appliance is under guarantee, and
the repair is covered, it will be repaired at no cost.
Your serial number can be found on your rating plate which is on the base of
the appliance.
PLEASE REGIStER AS A DYSON
APPLIANCE OWNER
To help us ensure you receive prompt and efficient service, please register as a
Dyson appliance owner. There are two ways to do this:
Online at www.dyson.com
Telephone the Dyson Helpline.
This will confirm ownership of your Dyson appliance in the event of an insurance
loss, and enable us to contact you if necessary.
LImItED 5 YEAR GUARANtEE
tERmS AND CONDItIONS Of thE DYSON 5 YEAR LImItED GUARANtEE.
WhAt IS COVERED
The repair or replacement of your Dyson appliance (at Dyson’s discretion) if it
is found to be defective due to faulty materials, workmanship or function within
5 years of purchase or delivery (if any part is no longer available or out of
manufacture Dyson will replace it with a functional replacement part).
Where this appliance is sold outside of the EU, this guarantee will only be valid if
the appliance is used in the country in which it was sold.
Where this appliance is sold within the EU, this guarantee will only be valid (i) if
the appliance is used in the country in which it was sold or (ii), if the appliance is
used in Austria, Belgium, France, Germany, Ireland, Italy, Netherlands, Spain or
the United Kingdom and the same model as this appliance is sold at the same
voltage rating in the relevant country.
WhAt IS NOt COVERED
Dyson does not guarantee the repair or replacement of a product where a
defect is the result of:
Accidental damage, faults caused by negligent use or care, misuse, neglect,
1
2
3
14

Hulp nodig? Stel uw vraag in het forum

Spelregels
1

Forum

Dyson-DC-52

Zoeken resetten

  • de dyson heeft geen zuigkracht meer en stinkt ,snirkt ,een brandlucht,wat zou het zijn ? Gesteld op 11-7-2021 om 16:35

    Reageer op deze vraag Misbruik melden
  • De turboborstel van Dyson dc52 rolt niet meer, de wielen zitten vast. Hoe kan ik de wielen losmaken? Gesteld op 12-10-2020 om 17:44

    Reageer op deze vraag Misbruik melden
  • dyson DC52 stopt plotseling en komt er rook uit de stofzuiger
    Gesteld op 12-8-2020 om 18:51

    Reageer op deze vraag Misbruik melden
  • mijn dyson 52 begint na enkele minuten werking een fluitend geluid te maken als ik de zuigmond volledig afsluit stopt dit snerpend lawaai maar begint direct terug van zogauw ik mijn hand verwijder dit lawaai verergert in de tijd dat het toestel in werking is . wat is de oorzaak van dit probleem lijkt op een lager die vastloopt Gesteld op 18-6-2020 om 16:27

    Reageer op deze vraag Misbruik melden
  • by stofzuigen een hart piepent geluid voor heen was dat niet Gesteld op 29-5-2020 om 14:04

    Reageer op deze vraag Misbruik melden
  • Zuigkracht verminderd, motor maakt een ander geluid en wordt warm. Waar zit het probleem? Gesteld op 27-2-2020 om 10:51

    Reageer op deze vraag Misbruik melden
  • 6
  • Beste, na het legen van het grootste vuil, hoe reinig ik het overgebleven fijn stof. met dank Chris Gesteld op 4-8-2018 om 14:19

    Reageer op deze vraag Misbruik melden
  • Zeer slecht toestel (Dyson DC52 van mei 2016) om het stof en vezels uit de opvangbak te verwijderen, je moet al zitten prutsen met een smal voorwerp, zoals een keukenmes, om het te ledigen tussen de smalle rand omheen de motorfilter.
    Met als gevolg, fijn stof die rond dwarrelt.
    Al met al minder goed dan onze vorige Dyson die het 5 jaar goed deed.. Gesteld op 16-5-2018 om 13:49

    Reageer op deze vraag Misbruik melden
    • Sorry hoor .
      Wat een simplistisch antwoord, ik heb de indruk dat u er geen enkel idee van hebt hoe deze stofzuiger ineen steekt. Geantwoord op 23-6-2018 om 08:40

      Waardeer dit antwoord (3) Misbruik melden
  • Hallo ik ben in bezit van een Dyson 52 cinetic multifloor.

    maar ik wilde gaan stofzuigen en het lijkt wel of de stofzuiger ineens dichtklapt terwijl alles schoon is filter,bak slang ect ect.

    wie herkend dit probleem.

    zit er ergens een zekering die defect is.

    hoopt dat iemenad mij kan helpen.

    B.V.D.

    van Leeuwen Gesteld op 27-7-2016 om 11:47

    Reageer op deze vraag Misbruik melden
  • Als ik de stofzuiger opzet lijkt het alsof iets in de stofzuiger toeslaat, zodat de kracht van het zuigen afneemt en hij dus niet goed stofzuigt. Heb hem al binnenste buiten gekeerd maar vind niets?! Gesteld op 1-7-2016 om 11:29

    Reageer op deze vraag Misbruik melden


  • Wie weet hoe ik het stofreservoir van de Dyson DC 52 kan verwijderen? De handleiding is niet helpend voor me. Graag een reactie. Bedankt vast! Ria.
    . Gesteld op 10-4-2016 om 11:59

    Reageer op deze vraag Misbruik melden
    • Als je op het rode knopje drukt springt het handvat omhoog van de stoffilter. Schuif het stoffilter van de stofzuiger. Dan druk je op de rode knop boven ewn afvalbak en leeg je het. Daarne schuif de stoffilter weer op de stofzuiger zorgvwel dat het goed aansluit druk dan het handvat weer naar beneden. Geantwoord op 10-4-2016 om 20:57

      Waardeer dit antwoord (9) Misbruik melden
  • hoe maak ik de dyson open om het stof te verwijderen??? Gesteld op 12-2-2016 om 13:45

    Reageer op deze vraag Misbruik melden
  • 12
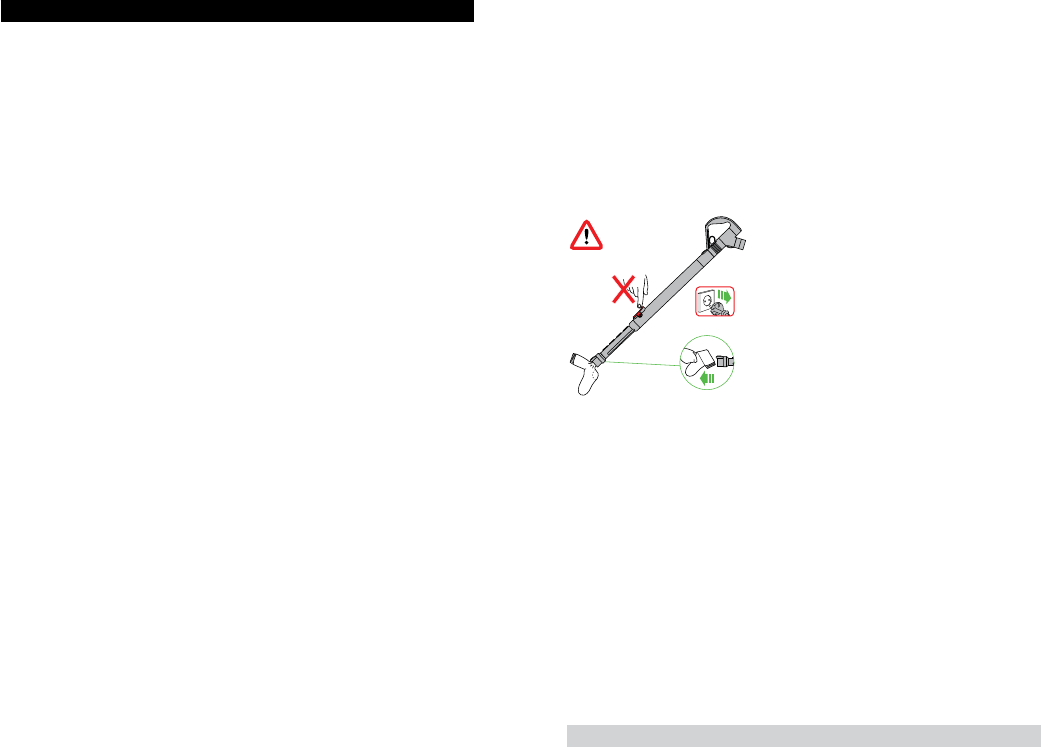
  • Hoe haal ik een sok uit de stofzuiger Gesteld op 4-8-2014 om 13:01

    Reageer op deze vraag Misbruik melden

Misbruik melden

Gebruikershandleiding.com neemt misbruik van zijn services uitermate serieus. U kunt hieronder aangeven waarom deze vraag ongepast is. Wij controleren de vraag en zonodig wordt deze verwijderd.

Product:

Bijvoorbeeld antisemitische inhoud, racistische inhoud, of materiaal dat gewelddadige fysieke handelingen tot gevolg kan hebben.

Bijvoorbeeld een creditcardnummer, een persoonlijk identificatienummer, of een geheim adres. E-mailadressen en volledige namen worden niet als privégegevens beschouwd.

Spelregels forum

Om tot zinvolle vragen te komen hanteren wij de volgende spelregels:

Belangrijk! Als er een antwoord wordt gegeven op uw vraag, dan is het voor de gever van het antwoord nuttig om te weten als u er wel (of niet) mee geholpen bent! Wij vragen u dus ook te reageren op een antwoord.

Belangrijk! Antwoorden worden ook per e-mail naar abonnees gestuurd. Laat uw emailadres achter op deze site, zodat u op de hoogte blijft. U krijgt dan ook andere vragen en antwoorden te zien.

Abonneren

Abonneer u voor het ontvangen van emails voor uw Dyson DC 52 bij:


U ontvangt een email met instructies om u voor één of beide opties in te schrijven.


Ontvang uw handleiding per email

Vul uw emailadres in en ontvang de handleiding van Dyson DC 52 in de taal/talen: Nederlands, Duits, Engels, Frans, Portugees, Spaans als bijlage per email.

De handleiding is 3,99 mb groot.


U ontvangt de handleiding per email binnen enkele minuten. Als u geen email heeft ontvangen, dan heeft u waarschijnlijk een verkeerd emailadres ingevuld of is uw mailbox te vol. Daarnaast kan het zijn dat uw internetprovider een maximum heeft aan de grootte per email. Omdat hier een handleiding wordt meegestuurd, kan het voorkomen dat de email groter is dan toegestaan bij uw provider.

Stel vragen via chat aan uw handleiding

Stel uw vraag over deze PDF

loading

Uw handleiding is per email verstuurd. Controleer uw email

Als u niet binnen een kwartier uw email met handleiding ontvangen heeft, kan het zijn dat u een verkeerd emailadres heeft ingevuld of dat uw emailprovider een maximum grootte per email heeft ingesteld die kleiner is dan de grootte van de handleiding.

Er is een email naar u verstuurd om uw inschrijving definitief te maken.

Controleer uw email en volg de aanwijzingen op om uw inschrijving definitief te maken

U heeft geen emailadres opgegeven

Als u de handleiding per email wilt ontvangen, vul dan een geldig emailadres in.

Uw vraag is op deze pagina toegevoegd

Wilt u een email ontvangen bij een antwoord en/of nieuwe vragen? Vul dan hier uw emailadres in.


Info